
User's Manual


The Sapling Company, Inc.
1633 Republic Road
Huntingdon Valley, PA 19006
USA
+1 215.322.6063 P.
+1 215.322.8498 F.
www.sapling-inc.com
16
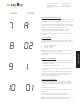
Option 7 - American or European Date Style:
This option will allow the user to choose what style the date is displayed
on the digital clock. Press the bottom button to scroll between “A” or
“E.”
“A” stands for American style and displays the date as follows: month,
day and year (ex. 10 28 12). “E” stands for European style and displays
the date as follows: day, month and year (ex. 28 10 12).
The date will be displayed during normal operation only if the
“Alternate Time/Date” option has been enabled in Option 6.
Once the date style is selected, press the top button to continue on to
Option 8.
Option 8 - Brightness:
This option allows the user to choose the brightness level the digital
clock will display. Press the bottom button to scroll between “00,” “01”
and “02.”
• Level “02” is High (default)
• Level “01” is Medium
• Level “00” is Low
Note: The user has the ability to create a Brightness Schedule for the
clocks. Refer to page 28 for more information.
Once the brightness level is selected, press the top button to continue
on to Option 9.
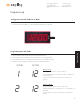
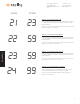
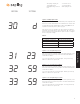
Option 9 - Set the Clock Number:
This option allows the user to choose a specific clock number in order to
easily identify a specific clock within the system. Use the bottom button
to scroll between “1-999.”
An example of a clock number is “123.”
Once the clock number is selected, press the top button to continue on
to Option 10.
Options 9 also allows a user to address a specific clock for displaying
messages, such as 911, BELL or FiRE using a Sapling Master Clock.
Option 9 sets the clock number. This is step 1 of 2. Step 2 of this
process can be completed in Option 10.
Option 10 - Set the Zone Number:
This option allows the user to choose a zone number for a specific
clock. A zone number is a collection or grouping of clocks within a
certain section of a facility. Press the bottom button to scroll between
"01-99."”
An example of a zone number is “12.”
Once the zone number is selected, press the top button to continue on
to Option 11.
Option 10 programs the zone number in order to display
messages on each clock in a zone, such as 911, BELL or FiRE.
Note: The message feature must be programmed via the master clock.
Refer to the specific master clock manual for more information.
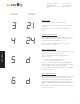
9 1
10 01
8 02
OPTION
SETTING
7 A
Programming