
Instruction Manual

1
The Sapling Company, Inc.
670 Louis Drive
Warminster, PA 18974
USA
P. (+1) 215.322.6063
F. (+1) 215.322.8498
www.sapling-inc.com
7
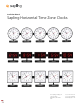
Mounting a Zone Clock Pole
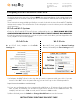
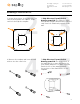
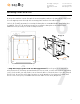
1) Determine where you wish to install the zone clock by using the provided mounting template
as a guide. Use a level to confirm that the horizontal line on the template is level with the
floor. The amount of space that you must leave between the template and the ceiling or walls
depends on the type of clock purchased. Use the table below to determine how much space is
required. Height is the distance from the center of the mounting plate to the ceiling. Length is
the distance from the center of the mounting plate to the closest wall.
When you are satisfied with the position, attach the template to the wall to prevent it from
moving.
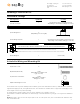
NAME
TO CEILING TO WALL
Analog with Round 12 inch housing
10.5” (26.7cm) 10.5” (26.7cm)
Analog with Round 16 inch housing
14.5” (36.8cm) 14.5” (36.8cm)
Analog with Round 12 inch housing and Aluminium Rim
11.5” (29.2cm) 11.5” (29.2cm)
Analog with Round 16 inch housing and Aluminium Rim
15.5” (39.4cm) 15.5” (39.4cm)
Analog with Square 9 inch housing
9” (22.9cm) 9” (22.9cm)
Analog with Square 12 inch housing
11” (27.9cm) 11” (27.9cm)
Digital with 2.5 inch 4 digit display
5” (12.7cm) 11.5” (29.2cm)
Digital with 2.5 inch 6 digit display
5” (12.7cm) 13.0” (33.0cm)
Digital with 4 inch 4 digit display
5” (12.7cm) 13.0” (33.0cm)
Digital with 4 inch 6 digit display
5” (12.7cm) 16.5” (41.9cm)
CEILING
Wall
Minimum
Distance to
Ceiling
Wall
Minimum
Distance
to Wall
Minimum
Distance to
Ceiling
Minimum
Distance
to Wall