
Instruction Manual

1
2
3
The Sapling Company, Inc.
670 Louis Drive
Warminster, PA 18974
USA
P. (+1) 215.322.6063
F. (+1) 215.322.8498
www.sapling-inc.com
4
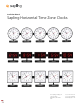
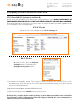
Configuring a Clock to be Used in a Zone Clock
Clocks for IP-PoE and Wi-Fi Zone Clocks are configured by the user. EACH CLOCK MUST BE
CONFIGURED INDIVIDUALLY BY THE USER UNLESS PRESET SERVICE WAS ORDERED.
Consult the manual for instructions on how to log in to each clock. Once you have logged into the
clock, navigate to the following pages:
The below instructions are to be followed ONLY after initial mandatory clock settings have been
configured (such as network settings) per the clock installation manual (which will depend on its
series).
These instructions are provided specifically to set each clock with its time offset and DST (daylight
savings time) settings. This will allow the clock to display the correct local time per the designated
city it represents.
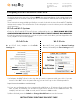
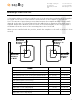
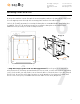
IP-PoE and Wi-Fi Systems
IP-PoE Clocks Wi-Fi Clocks
On an IP PoE clock, navigate to the Clock
Settings tab.
On a Wi-Fi clock, press the General Settings
button, followed by the Time Settings button.
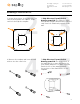
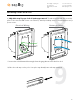
1) Configure the GMT offset for the city that you wish to represent with your clock. If you are
unsure of the GMT offset of a particular city, you can look it up on the following website:
https://www.timeanddate.com/time/map/
2) If you are configuring time for a country with a half-hour or 15-minute offset (such as India,
Iran, or parts of Australia), use the Bias Seconds field to account for the additional time. For
example, half an hour is 1800 seconds, and 15 minutes is 900 seconds.
3) When finished, press the Submit or Change Bias/Offset button at the bottom.
INSTRUCTIONS CONTINUE ON NEXT PAGE
1
2
3