
Instruction Manual

The Sapling Company, Inc.
670 Louis Drive
Warminster, PA 18974
USA
P. (+1) 215.322.6063
F. (+1) 215.322.8498
www.sapling-inc.com
2
Interactive Hyperlinked PDF – Click on the topic and the document will go to the relevant
page. Clicking on the logo will take you back to the table of contents.
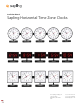
Sapling Horizontal Time Zone Clocks - Table of Contents
*Manuals may change without prior notice
Table of Contents 2
Important Safety Instructions 3
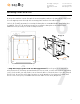
Configuring the Clocks - IP Power over Ethernet and Wi-Fi Systems 4 - 5
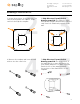
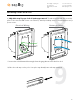
Mounting a Zone Clock Pole 6 - 15
Attaching the Name Plates 16
Warranty 17
VERY IMPORTANT:
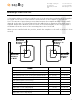
The Sapling Time Zone Clock is offered in a horizontal or vertical design format, which each
have key differences in appearance and installation. The horizontal design includes the user-
selected clocks and a mounting pole on which they are placed, side-by-side. The vertical
design features a specific set of clocks fixed, one over another, in a single large housing.
This manual has been made specifically for the horizontal Time Zone Clock. The vertical Time
Zone Clock has a different installation manual. Please make sure to reference the correct
installation manual depending on your time zone clock design layout.
The Time Zone Clocks are typically Network Based Clocks (either IP-PoE or Wi-Fi) depending on
the clocks that were ordered. This manual is to provide installation instructions for mounting
the horizontal mounting pole to the wall, mounting the clocks to the pole, and for mounting
the name plates.
This manual also includes basic configuration for GMT/UTC offset and DST settings. Full
instructions, such as clock wiring, configuration, and any other settings are to be found in the
specific clock model installation manual. The clock series can be found on a sticker located on
the back of the clock (for example: SBP, SAP, SBW, SAW, etc.).