
User`s guide


Essentially, by associating an authorization object with a field within an SAP table, you define that table
as an exception to the Global Lock settings that you have made within the Security Definition Editor.
In other words, once you've associated an authorization object with a field, the parent table is secured
from all users—regardless of your Global Lock settings. You must then use the authorization object
according to your usual SAP security conventions in order to provide particular users with access to
rows of data within the SAP table.
You can secure rows in a table by using authorization objects, custom functions, or both.
Securing rows using authorization objects
In order to define row-level security for tables, you can create an authorization object and use the
Security Definition Editor to associate the object with one of the table's fields. You then apply the new
authorization object to the roles or profiles of SAP users who need to access any of the table's data.
When you apply the authorization object, you specify the rows of data that each user is permitted to
access.
To define row-level security using an authorization object
1.
Create a new authorization object.
For this example, create an authorization object called Z_BUKRS that consists of one authorization
field called BUKRS. This authorization is being used to secure the GLT0 table based on the values
in the BUKRS (Company Codes) field.
Note:
Use transaction SU21 to create the authorization object, or see the SAPGUI Help for more information
on creating authorization objects.
2.
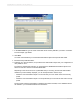
Execute transaction /CRYSTAL/RLS to access the Security Definition Editor.
3.
In the Table name field, type the name of the table that contains the rows you want to secure.
For this example, type GLT0.
Note:
You can now use wildcards to specify the table name. This is an efficient way to apply an authorization
to multiple tables with similar names simultaneously. Use * to specify zero or more characters and
+ to specify one character.
4.
Click Create.
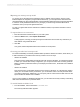
5.
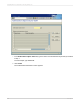
In the "Authorization entries" screen, click Create.
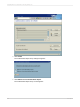
6.
In the "Select authorization entry type" screen, click Reference to an authorization object.
7.
Click OK to access the "Authorization Object entry" screen.
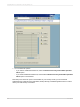
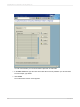
8.
In the Authorization object name field, type the name of the authorization that you created in step
1.
For this example, you would type Z_BUKRS.
9.
Click Create.
2012-03-14619
Integrating Business Applications with Crystal Reports