
User`s guide

When you place multiple fields, they appear in the same order that they appear in the Field Explorer
dialog box. The program marks the position of each field with a rectangular frame. The characters
in the frame indicate whether the field is text (XXX...), number (555...), currency ($555...), date
(12/31/99), time (00:00:00), DateTime (12/31/99 00:00:00), or Boolean (T/F).
Note:
• The field names and field types can be viewed by selecting the Show Field Names check box
on in the Options dialog box (Layout tab).
• The program automatically places field titles in the Page Header section unless the Insert Detail
Field Headings check box is not selected in the Options dialog box (Layout tab).
• If additional Details sections are added to the report, field titles will only be placed in the Page
Header section for fields in the Details A (the original) section of your report.
6.
Once the objects are in place, you may want to adjust the report sections. To do this, right-click the
shaded area to the left of the section ruler and use the shortcut menu that appears:
• To expand a section to accommodate an additional line, choose the Insert Line command.
• To have the program automatically align the objects in the section horizontally, choose the Arrange
Lines command.
• To reduce the size of a section to eliminate unnecessary white space above and below objects,
choose the Fit Section command. See Using white space between rows.
7.
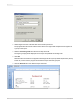
To generate a report title, you must first enter the title in the Document Properties dialog box. On
the File menu, click Summary Info. Enter a title in the Title text box of the Document Properties
dialog box. Click OK.
8.
Choose Report Title from the Special Fields list in the Field Explorer. A rectangular placement frame
appears when you move the cursor over your report. Click once in the Report Header (RH) section
to place the report title. The report title field contains the text that you typed in the Title text box of
the Document Properties dialog box. See Adding a title page to the report.
9.
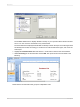
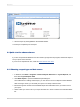
To see how the results will print, click Print Preview on the Standard toolbar.
To speed processing time while building a report, you can preview the report using only a small
subset of the available data. To do this, go to the File menu, point to Print and then click Preview
Sample. See Preview tab.
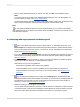
In either case, the program takes you to the Preview tab. You can fine-tune a report in the Preview
tab while viewing the results as actual report data. You can also close the Preview tab and continue
working on the report in the Design tab.
2.4.3 Using other reporting features
1.
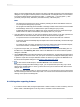
If you want to format a field, change the placement or width of a field, or insert a summary, click the
field to select it. Handles appear on the top, bottom, and sides of each selected field:
2012-03-1448
Quick Start