
User`s guide


Note:
• Once you have created a parameter, access to the Member Selector dialog box is disabled for
the dimension until you delete the parameter.
• If you create a row/column parameter, the View Cube command and the Cube View tab are not
available.
10.
If you want to delete a parameter, select the appropriate dimension and click Delete.
When you click OK in the Delete Link to Parameter Field dialog box, the program removes the
parameter description from the dimension.
11.
Click Next.
The Slice/Page screen appears.
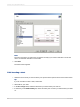
17.2.4 Setting sliced dimensions and specifying the number of grids
Use this screen to set sliced dimensions and to specify the number of grids that are required.
The Slice area determines the boundaries that will be placed on your report. For example, if you have
a time dimension that is made up of fiscal quarter members, you could specify the report return the
results for a specific quarter.
Note:
If all of your members were used in the Rows/Column tab, nothing will appear here.
The Page area enables you to determine the number of grids and the subject of each. For example, if
you have a product dimension, you could put this in the page area and specify two different products.
This would result in two grids with the same rows, columns, and formatting, but each one would be
based on a different product.
17.2.4.1 To specify a slice
1.
To determine the member that is going to be used as the slice, select a dimension in the Slice list
and click Select Slice, or double-click a dimension in the Slice list.
The Member Selector dialog box appears.
2.
Select the appropriate member, expanding the structure if necessary.
3.
Click OK.
4.
Click Next if you do not want to add a page. The Style screen appears.
2012-03-14365
Creating and Updating OLAP Reports