
User`s guide


Tip:
Another way to do this is to click the Insert Cross-Tab button on the Insert Tools toolbar.
An object frame appears with the Arrow cursor as you drag the Cross-Tab object into the report.
4.
Place the object frame in an empty area in the Report Header and click to release it.
An empty Cross-Tab object appears in your report.
5.
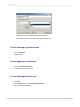
Right-click the Cross-Tab and select Cross-Tab Expert from the shortcut menu.
The Cross-Tab Expert appears. This dialog box is made up of three tabs: Cross-Tab, Style, and
Customize Style.
15.3.9.2 Defining the structure of the Cross-Tab
Add fields to the Rows, Columns, and Summarized Fields areas.
1.
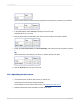
From the Available Fields list, select Country; then click the > arrow next to the Rows area.
The Country field is added to the Rows area.
Tip:
You can also add a field to the different Cross-Tab areas by selecting it and dragging it to the
Columns, Rows, or Summarized Fields areas.
2.
From the Available Fields list, select Last Year's Sales; then click the > arrow next to the
Summarized Fields area.
The Last Year's Sales field is added to the Summarized Fields area.
3.
Apply additional structure:
• Click Country in the Rows area.
• Click Group Options.
• Select in specified order from the drop-down list.
• Type North America for the name of the Named Group.
• Click New.
• Choose is one of from the drop-down list.
• Select Canada, Mexico, and USA from the drop-down list.
2012-03-14327
Cross-Tab Objects