
User`s guide


• The font and style (Bold, Underline, and so on) used in displaying the characters or Xs indicate the
font and style selected for the characters in the field. Later in this tutorial you will learn how to make
changes to these properties.
• The line spacing is adjusted to the point size selected for the characters in the field.
2.3.2.5 Adding additional fields
Next, you will insert two additional fields in the report. This time, however, you will use the Ctrl-click
combination to add them at the same time.
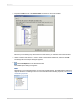
2.3.2.5.1 To add additional fields
1.
Highlight the City field in the Field Explorer dialog box, press the Ctrl key on your keyboard, and
then highlight the Country field. Release the Ctrl key.
If you scroll through the field list, you will notice that both fields remain selected.
Note:
Using the Ctrl-click combination allows you to select a non-continuous range of fields. The Shift-click
combination can be used to select several fields from the list that are contiguous.
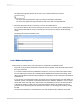
2.
Drag the fields to place them.
As the cursor is moved over the report, an object frame appears along with the Arrow cursor.
3.
Place the fields to the right of the Customer Name field.
Both fields appear in the Details section of the report in the same order in which they are listed in
the Field Explorer dialog box.
2.3.2.6 Selecting fields
When a field is selected, the object frame appears with a handle (box) on its right, left, top, and bottom
edge. These handles indicate that the field is selected, and therefore active. To do anything with a field
(change the font, move it, and so on), you first have to select it:
• Position the cursor inside the object frame and click once. The handles appear, indicating the object
is selected.
• Move the cursor away from the object frame and click in an empty part of the window. The handles
disappear.
That's all it takes to select and deselect objects.
2012-03-1430
Quick Start