
User`s guide


13.3.6.1 To change the geographic map
1.
On the Preview tab, right-click the map to bring up the shortcut menu.
2.
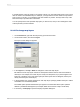
On the shortcut menu, click Resolve Mismatch.
The Resolve Map Mismatch dialog box appears; the Change Map tab displays the name of the
current map you are using, and a list of replacement maps that you can choose from.
3.
In the Available maps list, click the new map you want to use.
4.
Click OK to save your changes.
Crystal Reports returns you to the Preview tab and implements your changes.
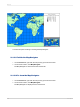
13.3.7 Zooming in and out on a map
1.
On the Preview tab, right-click a map to bring up the shortcut menu.
2.
On the shortcut menu, click Zoom In.
3.
Drag the selection cursor around the map section you want to see.
The map zooms in one level of magnification.
4.
Drag another selection to zoom in further.
5.
To zoom out on a map, right-click the map to bring up the shortcut menu.
6.
On the shortcut menu, click Zoom Out.
7.
Click the map.
The map zooms out a level of magnification.
8.
Click the map again to zoom out further.
Note:
• If a map occurs once for each instance of a group, any panning or zooming settings you specify are
instance-specific. In other words, if you zoom in on the map in one group header, this setting is only
for that group header. None of the headers have been changed. This way you can set each map to
different settings.
• If the Save Data with Report option is selected from the File menu, your panning and zooming
settings will be saved with the report. If the option is not selected, then only the default map settings
will be saved.
2012-03-14297
Mapping