
User`s guide


On the Preview tab, you can find commands for zooming bar charts and line charts within your report.
You have the ability to zoom in and out on these chart types at any time, with each time being referred
to as instance-specific. If you decide to save the instance of the chart that has been zoomed in or out,
you must save the data with the report.
12.3.4.1 To zoom in and out on a bar or line chart
1.
On the Preview tab, right-click the bar or line chart to bring up the shortcut menu.
2.
On the shortcut menu, click Zoom In.
3.
Drag the Zoom In cursor around a section of the chart to enclose it within the tracking rectangle.
The chart zooms in to the section you selected.
4.
Repeat the previous step to zoom in further.
Note:
To see adjacent areas on a zoomed-in chart view (neighboring bars in a bar chart, for example),
use the Pan option on the shortcut menu. Pull the Pan cursor to the left or right to move in that
direction.
5.
To zoom out on a chart, right-click the chart to bring up the shortcut menu.
6.
On the shortcut menu, click Zoom Out.
7.
With the Zoom Out cursor, click the chart.
The chart zooms out one level of magnification.
8.
Click the chart again to zoom out further.
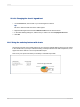
12.3.5 Auto-arranging charts
If you move or resize chart objects on the Preview tab, select the Auto-Arrange Chart feature to reset
the chart.
12.3.5.1 To auto-arrange a chart
1.
On the Preview tab, right-click the chart to bring up the shortcut menu.
2.
On the shortcut menu, click Auto-Arrange Chart.
Crystal Reports resets the chart to its original size and position.
2012-03-14281
Charting