
User`s guide


2.3.2.2 Report sections
The Design tab is divided into five sections: Report Header (RH), Page Header (PH), Details (D), Report
Footer (RF), and Page Footer (PF). If at any time you are unsure of the report section in which you are
working, simply look at the shaded area to the left of the report which always displays either the section
names or the initials that designate the names. See Design tab.
If the Short Section Names check box is selected in the Design View area of the Options dialog box,
then the Report Header, Page Header, Details, Report Footer and Page Footer section names will
appear as RH, PH, D, RF and PF respectively. If this check box is not selected, follow these steps:
2.3.2.3 Inserting a field
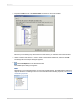
You'll use the Field Explorer dialog box to insert database fields when you create a new report.
This dialog box is set to remain on-screen until you close it. All the tables available for use are listed in
this box.
You will now start placing objects on the report by inserting the Customer Name field.
2.3.2.3.1 To insert a field
1.
Expand the Database Fields node in the Field Explorer dialog box and expand a table.
2.
Highlight a field name by clicking the name once.
When you highlight a field name, you can review a subset of the values for that field as well as the
field type and size by right-clicking the field and selecting Browse Data from the shortcut menu.
3.
Click the Customer Name field and drag it into the Details section of the report.
2012-03-1428
Quick Start