
User`s guide


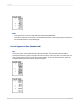

The picture now prints in both the first Group Header and the following few Details sections, next to
(instead of above) the text in the body of the report.
Note:
Using the technique of placing a picture to the right of the body of the report, you can set up a chart
or an employee picture to print beside the details pertaining to that chart or employee.
4.
Once you are finished previewing the report, return to the Design tab.
5.
Resize the picture vertically to make it two or three times larger, then preview the report again.
The bitmap file now underlays more sections.
The area in which the picture underlays depends on the following conditions:
• The size of the picture.
• The section in which the picture was originally placed.
• The position of the picture in the section.
By modifying size and placement of an object, you can create a variety of visual effects, using the
underlay feature.
11.3.3 Pre-printed forms
If you print on pre-printed forms, you will be able to:
• Scan a form.
• Place it in the report as a bitmap.
• Use the underlay feature to line up the bitmap and report, as well as move objects anywhere you
want them to appear.
• Eliminate the need to print the forms separately by printing the report and the form as a single unit.
11.3.4 Multiple columns
Instead of having your data print straight down the page, you can set up multiple columns and have
the data flow from column to column.
2012-03-14216
Formatting