
User`s guide


Group name only
The easiest live header to create is one based on identifying the value of the group field.
8.6.1.2.1 To create a live header by group name only
1.
On the View menu, click Field Explorer.
2.
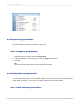
In the Field Explorer dialog box, expand the Group Name Fields folder.
3.
Select the Group Name field that matches the group you are working with and drag it into the Group
Header section for that group.
When you run the report, the group field value identifier will appear as the group header for each
region group.
8.6.1.2.2 Group name with text
A more complex type of live header combines a field value and text. A typical group header of this kind
for data broken down by region would be, "Sales for California" or "Customers in Postal Code 60606".
Creating these headers involves three steps:
• Insert a text object in the Group Header section.
• Type in the text you want to appear.
• Enter the Group Name field in the text field where you want it to appear in the Group Header.
For example, if you want your header to read "Sales for" and then the name of the region in the current
group (Sales for AZ, Sales for CA, and so forth), follow these steps:
To create a live header with group name using text
1.
Click the Insert Text Object button on the Insert Tools toolbar.
2.
Place the object frame into the Group Header section for the group.
3.
Type in the desired text with a space after it.
4.
Click the Field Explorer button on the Standard toolbar.
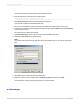
5.
In the Field Explorer dialog box, expand the Group Name Fields folder.
6.
Select the Group Name field that matches the group you are working with and drag it into the text
object, immediately after the text and the space you entered.
Tip:
Expand the size of the text box to fit both the text and the group field.
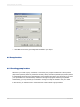
7.
Format the text object as you want it to appear.
When you run the report, the program will create a live header (with text) for each of your groups.
2012-03-14177
Sorting, Grouping, and Totaling