
Operation Manual

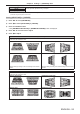
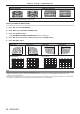
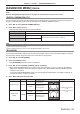
Table Of Contents
- Read this first!
- Chapter 1 Preparation
- Chapter 2 Getting Started
- Chapter 3 Basic Operations
- Switching on/off the projector
- Projecting
- Operating with the remote control
- Switching the input
- Using the shutter function
- Using the on-screen display function
- Using the automatic setup function
- Switching the image aspect ratio
- Using the function button
- Displaying internal test pattern
- Using the status function
- Using the AC voltage monitor function
- Setting ID number of the remote control
- Chapter 4 Settings
- Menu navigation
- [PICTURE] menu
- [POSITION] menu
- [ADVANCED MENU] menu
- [DISPLAY LANGUAGE] menu
- [3D SETTINGS] menu
- [DISPLAY OPTION] menu
- [COLOR MATCHING]
- [LARGE SCREEN CORRECTION]
- [SCREEN SETTING]
- [AUTO SIGNAL]
- [AUTO SETUP]
- [BACKUP INPUT SETTING]
- [SIMUL INPUT SETTING]
- [RGB IN]
- [DVI-D IN]
- [HDMI IN]
- [DIGITAL LINK IN]
- [SDI IN]
- [ON-SCREEN DISPLAY]
- [IMAGE ROTATION]
- [BACK COLOR]
- [STARTUP LOGO]
- [UNIFORMITY]
- [SHUTTER SETTING]
- [FREEZE]
- [WAVEFORM MONITOR]
- [CUT OFF]
- [PROJECTOR SETUP] menu
- [PROJECTOR ID]
- [PROJECTION METHOD]
- [OPERATION SETTING]
- [LIGHT OUTPUT]
- [BRIGHTNESS CONTROL]
- [STANDBY MODE]
- [NO SIGNAL SHUT-OFF]
- [NO SIGNAL LIGHTS-OUT]
- [INITIAL STARTUP]
- [STARTUP INPUT SELECT]
- [DATE AND TIME]
- [SCHEDULE]
- [RS-232C]
- [REMOTE2 MODE]
- [FUNCTION BUTTON]
- [LENS CALIBRATION]
- [LENS MEMORY]
- [STATUS]
- [AC VOLTAGE MONITOR]
- [SAVE ALL USER DATA]
- [LOAD ALL USER DATA]
- [INITIALIZE]
- [SERVICE PASSWORD]
- [P IN P] menu
- [TEST PATTERN] menu
- [SIGNAL LIST] menu
- [SECURITY] menu
- [NETWORK] menu
- Chapter 5 Maintenance
- Chapter 6 Appendix

Chapter 4 Settings — [ADVANCED MENU] menu
ENGLISH - 99
2) Press qw to switch the item.
f The items will switch each time you press the button.
[NORMAL] Standard setting.
[FAST]
*1
Simplies the image processing to reduce image frame delay.
[FIXED]
*2
Sets image frame delay to be constant regardless of the image position or magnication.
*1 When input signals are other than interlaced signals, [FAST] cannot be set.
*2 Only when moving image signals and still image signals with the vertical scanning frequency of 50 Hz or 60 Hz are input
Note
f [DIGITAL CINEMA REALITY] cannot be set when [FRAME RESPONSE] is set to [FAST].
f [FRAME RESPONSE] cannot be set during P IN P.
[FRAME CREATION]
Set the amount of image frame interpolation.
The image with fast movement can be displayed more smoothly by automatically generating the intermediate
frame from the previous and next frame.
1) Press as to select [FRAME CREATION].
2) Press qw to switch the item.
f The items will switch each time you press the button.
[OFF] Disables the frame creation function.
[1] Sets the amount of interpolation weaker.
[2] Sets the amount of interpolation midway. (Factory default)
[3] Sets the amount of interpolation stronger.
Note
f The effect may be difcult to notice depending on the image.
f Switch the setting when the image looks unnatural due to delay of image or generation of noise.
f [FRAME CREATION] is disabled and cannot be selected when [FRAME RESPONSE] is set to [FAST].
f [FRAME CREATION] is disabled and cannot be selected when the [3D SETTINGS] menu → [3D SYSTEM SETTING] (x page 102) is set
to [DUAL (LEFT)] or [DUAL (RIGHT)].
f [FRAME CREATION] is disabled and cannot be selected when the [3D SETTINGS] menu → [3D INPUT FORMAT] (x page 103) is set to
[AUTO], [SIMULTANEOUS], [SIDE BY SIDE], [TOP AND BOTTOM], [LINE BY LINE], or [FRAME SEQUENTIAL]. In [AUTO], however, this
only occurs when 3D format can be recognized.
f The [FRAME CREATION] setting will be disabled and cannot be selected when the [DISPLAY OPTION] menu → [SIMUL INPUT SETTING]
(x page 111) is set to [AUTO(3D)] or [AUTO(2D)] and the image in simultaneous format is displayed.
f This function is disabled when the internal test pattern or [3D TEST PATTERN] is displayed.
[FRAME LOCK]
Set this function to display the image in 3D when the vertical scanning frequency of the signal is 25 Hz, 50 Hz,
and 100 Hz.
1) Press as to select [FRAME LOCK].
2) Press qw to switch the item.
f The items will switch each time you press the button.
[OFF] Decreases the ickering of the displayed image.
[ON] Synchronizes the displayed image to the vertical scanning frequency of the input signal.
Note
f [FRAME LOCK] is not displayed when a signal with the vertical scanning frequency other than the above is input or 2D images are
displayed.
f The image may icker when [FRAME LOCK] is set to [ON].
f The displayed image may look discontinuous when [FRAME LOCK] is set to [OFF].