
Operation Manual
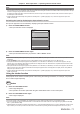

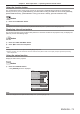
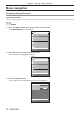

Table Of Contents
- Read this first!
- Chapter 1 Preparation
- Chapter 2 Getting Started
- Chapter 3 Basic Operations
- Switching on/off the projector
- Projecting
- Operating with the remote control
- Switching the input
- Using the shutter function
- Using the on-screen display function
- Using the automatic setup function
- Switching the image aspect ratio
- Using the function button
- Displaying internal test pattern
- Using the status function
- Using the AC voltage monitor function
- Setting ID number of the remote control
- Chapter 4 Settings
- Menu navigation
- [PICTURE] menu
- [POSITION] menu
- [ADVANCED MENU] menu
- [DISPLAY LANGUAGE] menu
- [3D SETTINGS] menu
- [DISPLAY OPTION] menu
- [COLOR MATCHING]
- [LARGE SCREEN CORRECTION]
- [SCREEN SETTING]
- [AUTO SIGNAL]
- [AUTO SETUP]
- [BACKUP INPUT SETTING]
- [SIMUL INPUT SETTING]
- [RGB IN]
- [DVI-D IN]
- [HDMI IN]
- [DIGITAL LINK IN]
- [SDI IN]
- [ON-SCREEN DISPLAY]
- [IMAGE ROTATION]
- [BACK COLOR]
- [STARTUP LOGO]
- [UNIFORMITY]
- [SHUTTER SETTING]
- [FREEZE]
- [WAVEFORM MONITOR]
- [CUT OFF]
- [PROJECTOR SETUP] menu
- [PROJECTOR ID]
- [PROJECTION METHOD]
- [OPERATION SETTING]
- [LIGHT OUTPUT]
- [BRIGHTNESS CONTROL]
- [STANDBY MODE]
- [NO SIGNAL SHUT-OFF]
- [NO SIGNAL LIGHTS-OUT]
- [INITIAL STARTUP]
- [STARTUP INPUT SELECT]
- [DATE AND TIME]
- [SCHEDULE]
- [RS-232C]
- [REMOTE2 MODE]
- [FUNCTION BUTTON]
- [LENS CALIBRATION]
- [LENS MEMORY]
- [STATUS]
- [AC VOLTAGE MONITOR]
- [SAVE ALL USER DATA]
- [LOAD ALL USER DATA]
- [INITIALIZE]
- [SERVICE PASSWORD]
- [P IN P] menu
- [TEST PATTERN] menu
- [SIGNAL LIST] menu
- [SECURITY] menu
- [NETWORK] menu
- Chapter 5 Maintenance
- Chapter 6 Appendix
Chapter 3 Basic Operations — Operating with the remote control
74 - ENGLISH
Using the AC voltage monitor function
The value of input supply voltage can be displayed on the self-diagnosis display at the side of the projector.
r To display during projection
1) Press the power on <b> button.
f The value of the input supply voltage is displayed only as numeric value on the self-diagnosis display.
f The display will turn off automatically after approximately 3 seconds.
r To display during standby mode
1) Press the power standby <v> button.
f The value of the input supply voltage is displayed only as numeric value on the self-diagnosis display.
f The display will turn off automatically after approximately 3 seconds.
Note
f It can be set using the [PROJECTOR SETUP] menu → [AC VOLTAGE MONITOR] (x page 143).
f The value of input supply voltage cannot be displayed in the self-diagnosis display during standby when the [PROJECTOR SETUP] menu
→ [STANDBY MODE] (x page 134) is set to [ECO].
f Operation can also be performed by the power on <b> button or power standby <v> button on the control panel.
Setting ID number of the remote control
When you use the multiple projectors together, you can operate all the projectors simultaneously or each projector
individually using a single remote control, if a unique ID number is assigned to each projector.
After setting the ID number of the projector, set same ID number on the remote control.
The factory default ID number of the projector is set to [ALL]. When using a single projector, press the <ID
ALL> button on the remote control. Also, you can control a projector by pressing the <ID ALL> button on
the remote control even if you do not know the projector ID.
button
1) Press the <ID SET> button on the remote control.
2) Within five seconds, press and set the one-digit or two-digit ID number set on the projector body
using the number (<0> - <9>) buttons.
f If you press the <ID ALL> button, you can control the projectors regardless of the ID number setting of the
projector body.
Attention
f Since the ID number of the remote control can be set without the projector body, do not press the <ID SET> button on the remote control
carelessly. If the <ID SET> button is pressed and no number (<0> - <9>) buttons are pressed within ve seconds, the ID number returns to
its original value before the <ID SET> button was pressed.
f The ID number set on the remote control will be stored unless it is set again. However, it will be erased if the remote control is left with dead
batteries. Set the same ID number again when the batteries are replaced.
Note
f When the ID number of the remote control is set to [0], you can control the projector regardless of the ID number setting of the projector
body, as same as when [ALL] is set.
f Set the ID number of the projector body from the [PROJECTOR SETUP] menu → [PROJECTOR ID].