
Operation Manual
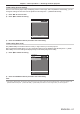
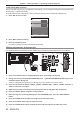
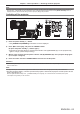
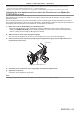
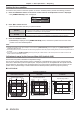
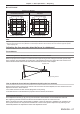
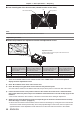

Table Of Contents
- Read this first!
- Chapter 1 Preparation
- Chapter 2 Getting Started
- Chapter 3 Basic Operations
- Switching on/off the projector
- Projecting
- Operating with the remote control
- Switching the input
- Using the shutter function
- Using the on-screen display function
- Using the automatic setup function
- Switching the image aspect ratio
- Using the function button
- Displaying internal test pattern
- Using the status function
- Using the AC voltage monitor function
- Setting ID number of the remote control
- Chapter 4 Settings
- Menu navigation
- [PICTURE] menu
- [POSITION] menu
- [ADVANCED MENU] menu
- [DISPLAY LANGUAGE] menu
- [3D SETTINGS] menu
- [DISPLAY OPTION] menu
- [COLOR MATCHING]
- [LARGE SCREEN CORRECTION]
- [SCREEN SETTING]
- [AUTO SIGNAL]
- [AUTO SETUP]
- [BACKUP INPUT SETTING]
- [SIMUL INPUT SETTING]
- [RGB IN]
- [DVI-D IN]
- [HDMI IN]
- [DIGITAL LINK IN]
- [SDI IN]
- [ON-SCREEN DISPLAY]
- [IMAGE ROTATION]
- [BACK COLOR]
- [STARTUP LOGO]
- [UNIFORMITY]
- [SHUTTER SETTING]
- [FREEZE]
- [WAVEFORM MONITOR]
- [CUT OFF]
- [PROJECTOR SETUP] menu
- [PROJECTOR ID]
- [PROJECTION METHOD]
- [OPERATION SETTING]
- [LIGHT OUTPUT]
- [BRIGHTNESS CONTROL]
- [STANDBY MODE]
- [NO SIGNAL SHUT-OFF]
- [NO SIGNAL LIGHTS-OUT]
- [INITIAL STARTUP]
- [STARTUP INPUT SELECT]
- [DATE AND TIME]
- [SCHEDULE]
- [RS-232C]
- [REMOTE2 MODE]
- [FUNCTION BUTTON]
- [LENS CALIBRATION]
- [LENS MEMORY]
- [STATUS]
- [AC VOLTAGE MONITOR]
- [SAVE ALL USER DATA]
- [LOAD ALL USER DATA]
- [INITIALIZE]
- [SERVICE PASSWORD]
- [P IN P] menu
- [TEST PATTERN] menu
- [SIGNAL LIST] menu
- [SECURITY] menu
- [NETWORK] menu
- Chapter 5 Maintenance
- Chapter 6 Appendix

Chapter 3 Basic Operations — Projecting
64 - ENGLISH
Projecting
Check the projection lens attachment (x page 46), external device connection (x page 48), power cord
connection (x page 54), switch on the power (x page 55) to start projecting. Select the video for projection,
and adjust appearance of the projected image.
Selecting the input signal
Select an input signal.
1) Press the input selection button (<RGB1>, <RGB2>, <DIGITAL LINK>, <DVI-D>, <HDMI>, <SDI 1/2>, or
<SDI>) on the remote control or the control panel.
f The image of the signal being input in the selected terminal is projected.
Attention
f Images may not be projected properly depending on the external device, or the blu-ray disc or DVD disc, to be played back.
Set the [PICTURE] menu → [SYSTEM SELECTOR].
f Conrm the aspect ratio of the projection screen and the image, and switch to an optimum aspect ratio from the [POSITION] menu →
[ASPECT].
How to adjust focus, zoom, and shift
If the projected image or the position is not correct when the positioning of the projector and the screen is correctly
installed, adjust the focus, zoom, and shift.
This section describes the adjustment method when anything other than the Fixed-focus Lens (Model No.:
ET-D75LE90) is used. When the Fixed-focus Lens (Model No.: ET-D75LE90) is used, refer to “Adjusting the lens
position and focus when the Fixed-focus Lens (Model No.: ET-D75LE90) is used” (x page 65).
Using the control panel
1) Press the <LENS> button on the control panel.
f Pressing the button changes the adjustment screen in the order of [FOCUS], [ZOOM], and [SHIFT].
2) Select each item and press asqw to adjust it.
Using the remote control
1) Press the lens buttons (<FOCUS>, <ZOOM>, <SHIFT>) on the remote control.
f <FOCUS> button: Adjusts focus.
f <ZOOM> button: Adjusts zoom.
f <SHIFT> button: Adjusts shift.
2) Select each item and press asqw to adjust it.
CAUTION
During the lens shift operation, do not insert your hand in any opening around the lens.
Your hand may be caught in between, resulting to injury.
Note
f When the projection lens without the zoom function is attached, the zoom adjustment screen will be displayed. However, operation is not
possible.
f When the Fixed-focus Lens (Model No.: ET-D75LE50) is used, do not use the shift adjustment, and use the projector with the lens position
at the home position. (x page 66)
f The adjustment can be performed faster by pressing and holding asqw for approximately three seconds or longer while adjusting the
focus and shift.
f It is recommended that images be projected continuously for at least 30 minutes before the focus is adjusted.
f Only [FOCUS] is shown in yellow so that the displayed menu item can be recognized by color, even when the projector is not focused and
displayed characters are unreadable. (Factory default)
The display color of [FOCUS] depends on the setting of the [DISPLAY OPTION] menu → [ON-SCREEN DISPLAY] → [OSD DESIGN].
f When the power is switched off during focus and shift adjustment, lens calibration needs to be performed the next time the power is
switched on. (x page 140)
f When the main power is switched off during focus adjustment, lens calibration is performed automatically during the next focus adjustment.