
Operation Manual


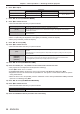
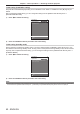
Table Of Contents
- Read this first!
- Chapter 1 Preparation
- Chapter 2 Getting Started
- Chapter 3 Basic Operations
- Switching on/off the projector
- Projecting
- Operating with the remote control
- Switching the input
- Using the shutter function
- Using the on-screen display function
- Using the automatic setup function
- Switching the image aspect ratio
- Using the function button
- Displaying internal test pattern
- Using the status function
- Using the AC voltage monitor function
- Setting ID number of the remote control
- Chapter 4 Settings
- Menu navigation
- [PICTURE] menu
- [POSITION] menu
- [ADVANCED MENU] menu
- [DISPLAY LANGUAGE] menu
- [3D SETTINGS] menu
- [DISPLAY OPTION] menu
- [COLOR MATCHING]
- [LARGE SCREEN CORRECTION]
- [SCREEN SETTING]
- [AUTO SIGNAL]
- [AUTO SETUP]
- [BACKUP INPUT SETTING]
- [SIMUL INPUT SETTING]
- [RGB IN]
- [DVI-D IN]
- [HDMI IN]
- [DIGITAL LINK IN]
- [SDI IN]
- [ON-SCREEN DISPLAY]
- [IMAGE ROTATION]
- [BACK COLOR]
- [STARTUP LOGO]
- [UNIFORMITY]
- [SHUTTER SETTING]
- [FREEZE]
- [WAVEFORM MONITOR]
- [CUT OFF]
- [PROJECTOR SETUP] menu
- [PROJECTOR ID]
- [PROJECTION METHOD]
- [OPERATION SETTING]
- [LIGHT OUTPUT]
- [BRIGHTNESS CONTROL]
- [STANDBY MODE]
- [NO SIGNAL SHUT-OFF]
- [NO SIGNAL LIGHTS-OUT]
- [INITIAL STARTUP]
- [STARTUP INPUT SELECT]
- [DATE AND TIME]
- [SCHEDULE]
- [RS-232C]
- [REMOTE2 MODE]
- [FUNCTION BUTTON]
- [LENS CALIBRATION]
- [LENS MEMORY]
- [STATUS]
- [AC VOLTAGE MONITOR]
- [SAVE ALL USER DATA]
- [LOAD ALL USER DATA]
- [INITIALIZE]
- [SERVICE PASSWORD]
- [P IN P] menu
- [TEST PATTERN] menu
- [SIGNAL LIST] menu
- [SECURITY] menu
- [NETWORK] menu
- Chapter 5 Maintenance
- Chapter 6 Appendix

Chapter 3 Basic Operations — Switching on/off the projector
ENGLISH - 55
Note
f While the power indicator <ON (G)/STANDBY (R)> lights in orange, the fan is running to cool the projector.
f For approximately 15 seconds after the projector is switched off, the indicator does not light up even if the power is switched on. Turn on the
power again after the power indicator <ON (G)/STANDBY (R)> lights in red.
f The projector consumes power even in standby mode (power indicator <ON (G)/STANDBY (R)> lit in red). Refer to “Power consumption”
(x page 212) for the power consumption.
f When the projector receives the signal from the remote control, the power indicator <ON (G)/STANDBY (R)> will blink in the following color
according to the status of the projector.
g When the projector is in projection mode: Green
g When the projector is in standby mode: Orange
However, if the [PROJECTOR SETUP] menu → [STANDBY MODE] is set to [ECO], the indicator will stay lit in red and will not blink if the
projector is in standby mode.
f The power indicator <ON (G)/STANDBY (R)> will blink slowly in green while the shutter function is in use (shutter: closed), or while the
function of the [PROJECTOR SETUP] menu → [NO SIGNAL LIGHTS-OUT] (x page 134) is operating and the light source is turned off.
f If the power indicator <ON (G)/STANDBY (R)> is blinking in red, consult your dealer.
Switching on the projector
Install the projection lens before switching on the projector.
Remove the lens cover rst.
2)
4)
4)
3)
1)
1) Connect the power cord to the projector.
2) Connect the power plug to an outlet.
3) Press the <ON> side of the <MAIN POWER> switch to turn on the power.
f The power indicator <ON (G)/STANDBY (R)> lights in red, and the projector enters the standby mode.
4) Press the power on <b> button.
f The power indicator <ON (G)/STANDBY (R)> lights in green and the image is soon projected on the screen.
Attention
f Always remove the lens cover before starting the projection. Projecting continuously while the lens cover is attached may cause the lens
cover to heat up and result in a re.
Note
f A warm-up period of up to approximately ve minutes may be necessary until an image is displayed when the projector is switched on at
around 0 °C (32 °F).
The temperature indicator <TEMP> lights during the warm-up period. When the warm-up is completed, the temperature indicator <TEMP>
turns off and the projection starts. Refer to “When an indicator lights up” (x page 182) for the indicator status display.
f If the operating environment temperature is low and warm-up takes more than ve minutes, the projector will judge that a problem has
occurred and the power will automatically be set to standby mode. In such case, increase the operating environment temperature to 0 °C
(32 °F) or higher, turn off the main power, and then turn on the power again.
f It may take longer to start the projection after the power is turned on when the [PROJECTOR SETUP] menu → [STANDBY MODE] is set to
[ECO], compared to when it is set to [NORMAL].
f When the [PROJECTOR SETUP] menu → [INITIAL STARTUP] is set to [LAST MEMORY], and the power was turned off at the previous
use by pressing the <OFF> side of the <MAIN POWER> switch while projecting or with the power breaker, the power indicator <ON (G)/
STANDBY (R)> will light up in green and the image is projected after a while when the power is turned on by pressing <ON> side of the
<MAIN POWER> switch while the power plug is plugged into the outlet, or when the power breaker is turned on.