
Operation Manual
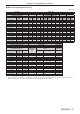
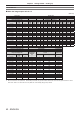
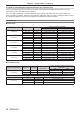
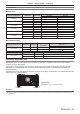
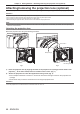
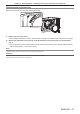

Table Of Contents
- Read this first!
- Chapter 1 Preparation
- Chapter 2 Getting Started
- Chapter 3 Basic Operations
- Switching on/off the projector
- Projecting
- Operating with the remote control
- Switching the input
- Using the shutter function
- Using the on-screen display function
- Using the automatic setup function
- Switching the image aspect ratio
- Using the function button
- Displaying internal test pattern
- Using the status function
- Using the AC voltage monitor function
- Setting ID number of the remote control
- Chapter 4 Settings
- Menu navigation
- [PICTURE] menu
- [POSITION] menu
- [ADVANCED MENU] menu
- [DISPLAY LANGUAGE] menu
- [3D SETTINGS] menu
- [DISPLAY OPTION] menu
- [COLOR MATCHING]
- [LARGE SCREEN CORRECTION]
- [SCREEN SETTING]
- [AUTO SIGNAL]
- [AUTO SETUP]
- [BACKUP INPUT SETTING]
- [SIMUL INPUT SETTING]
- [RGB IN]
- [DVI-D IN]
- [HDMI IN]
- [DIGITAL LINK IN]
- [SDI IN]
- [ON-SCREEN DISPLAY]
- [IMAGE ROTATION]
- [BACK COLOR]
- [STARTUP LOGO]
- [UNIFORMITY]
- [SHUTTER SETTING]
- [FREEZE]
- [WAVEFORM MONITOR]
- [CUT OFF]
- [PROJECTOR SETUP] menu
- [PROJECTOR ID]
- [PROJECTION METHOD]
- [OPERATION SETTING]
- [LIGHT OUTPUT]
- [BRIGHTNESS CONTROL]
- [STANDBY MODE]
- [NO SIGNAL SHUT-OFF]
- [NO SIGNAL LIGHTS-OUT]
- [INITIAL STARTUP]
- [STARTUP INPUT SELECT]
- [DATE AND TIME]
- [SCHEDULE]
- [RS-232C]
- [REMOTE2 MODE]
- [FUNCTION BUTTON]
- [LENS CALIBRATION]
- [LENS MEMORY]
- [STATUS]
- [AC VOLTAGE MONITOR]
- [SAVE ALL USER DATA]
- [LOAD ALL USER DATA]
- [INITIALIZE]
- [SERVICE PASSWORD]
- [P IN P] menu
- [TEST PATTERN] menu
- [SIGNAL LIST] menu
- [SECURITY] menu
- [NETWORK] menu
- Chapter 5 Maintenance
- Chapter 6 Appendix
Chapter 2 Getting Started — Setting up
ENGLISH - 45
For PT-RS11K
r Zoom Lens
Projection lens Model No. Throw ratio Aspect ratio
Projection distance (L) formula
Min. (LW) Max. (LT)
ET-D75LE6
1.0 - 1.2:1 4:3 = 0.8150 x SD
-
0.0566 = 0.9764 x SD
-
0.0736
1.0 - 1.2:1 16:9 = 0.8976 x SD
-
0.0566 = 1.0748 x SD
-
0.0736
ET-D75LE10
1.4 - 1.8:1 4:3 =1.1425 x SD
-
0.0857 = 1.4767 x SD
-
0.1085
1.4 - 1.8:1 16:9 = 1.2446 x SD
-
0.0857 = 1.6086 x SD
-
0.1085
ET-D75LE20
1.8 - 2.6:1 4:3 = 1.4618 x SD
-
0.0832 = 2.1241 x SD
-
0.1162
1.8 - 2.6:1 16:9 = 1.5924 x SD
-
0.0832 = 2.3137 x SD
-
0.1162
ET-D75LE30
2.6 - 5.1:1 4:3 = 2.1089 x SD
-
0.1131 = 4.0899 x SD
-
0.1765
2.6 - 5.1:1 16:9 = 2.2972 x SD
-
0.1131 = 4.4552 x SD
-
0.1765
ET-D75LE40
5.0 - 8.0:1 4:3 = 4.0379 x SD
-
0.1577 = 6.4377 x SD
-
0.1615
5.0 - 8.0:1 16:9 = 4.3985 x SD
-
0.1577 = 7.0126 x SD
-
0.1615
ET-D75LE8
7.9 - 15.0:1 4:3 = 6.4567 x SD
-
0.3862 = 12.0945 x SD
-
0.3598
8.0 - 15.0:1 16:9 = 7.1102 x SD
-
0.3862 = 13.3189 x SD
-
0.3598
r Fixed-focus Lens
Projection lens Model No. Throw ratio Aspect ratio
Projection distance
(L1) formula
Formula for distance between projector and
screen (A1)
Min. Max.
ET-D75LE90
0.39:1 4:3 = 0.310 x SD + 0.020 = 0.206 x SH
-
0.128
0.39:1 16:9 = 0.337 x SD + 0.020 = 0.275 x SH
-
0.128 = 0.441 x SH
-
0.128
Projection lens Model No. Throw ratio Aspect ratio Projection distance (L) formula
ET-D75LE50
0.8:1 4:3 = 0.6202 x SD
-
0.0713
0.8:1 16:9 = 0.6755 x SD
-
0.0713
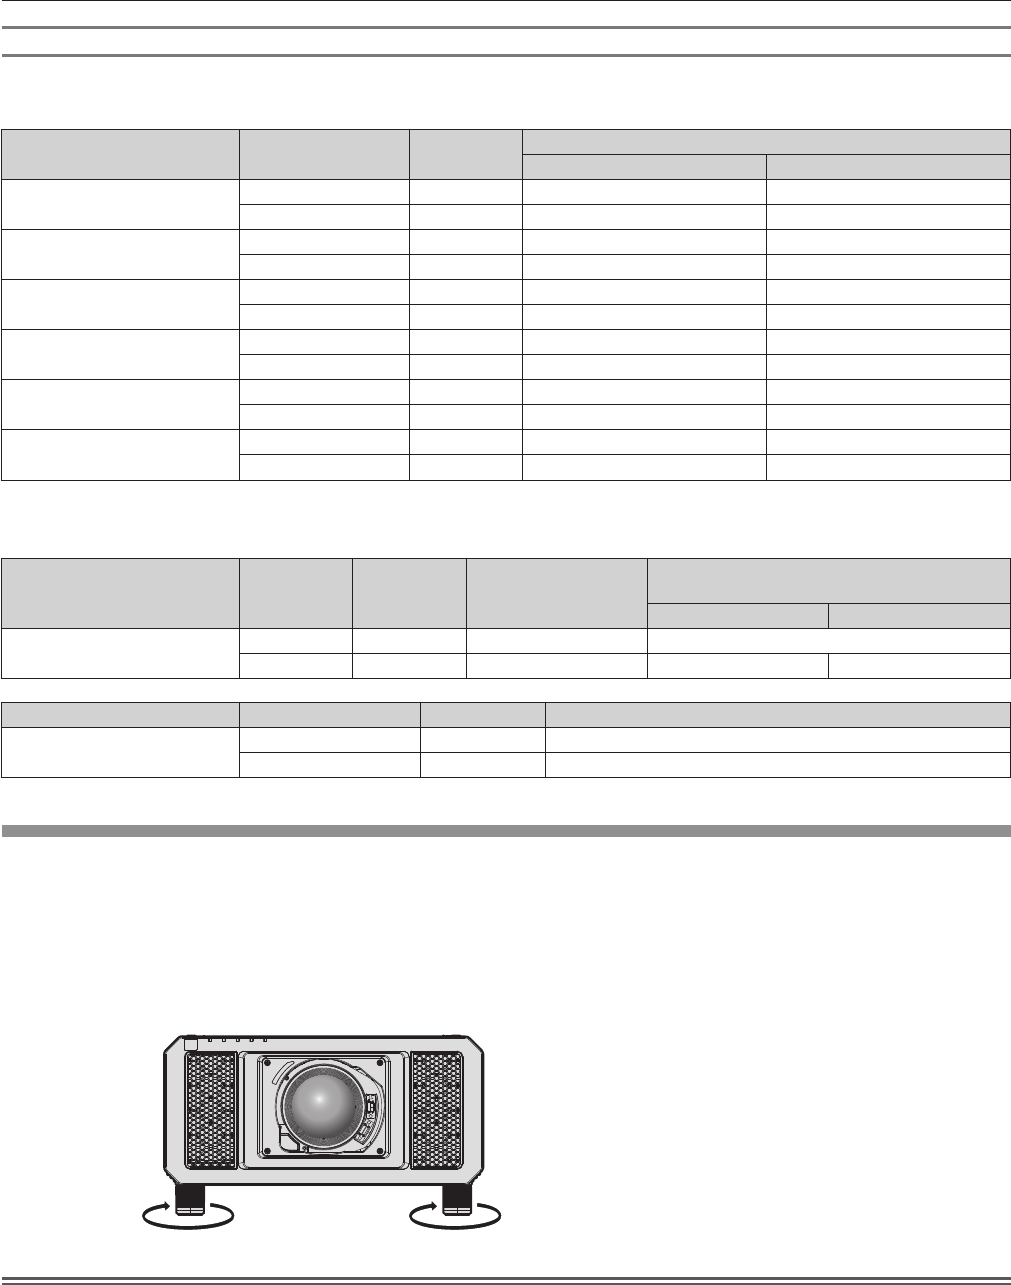
Adjusting adjustable feet
Install the projector on a at surface so that the front of the projector is parallel to the screen surface and the
projection screen is rectangular.
If the screen is tilted downward, the projection screen can be adjusted to be rectangular by adjusting the front
adjustable feet. The adjustable feet can also be used to adjust the projector to be level when it is tilted in the
horizontal direction.
Adjustable feet can be extended by turning them as shown in the gure. Turning them in the opposite direction will
return them to the original position.
Adjustable range
Adjustable feet: Approx. 12 mm (15/32") each
Attention
f Be careful not to block the intake/exhaust ports with your hands or any objects when adjusting the adjustable feet while the light source is
on. (x page 28)