
Operation Manual

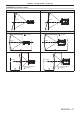
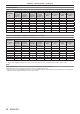
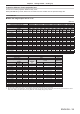
Table Of Contents
- Read this first!
- Chapter 1 Preparation
- Chapter 2 Getting Started
- Chapter 3 Basic Operations
- Switching on/off the projector
- Projecting
- Operating with the remote control
- Switching the input
- Using the shutter function
- Using the on-screen display function
- Using the automatic setup function
- Switching the image aspect ratio
- Using the function button
- Displaying internal test pattern
- Using the status function
- Using the AC voltage monitor function
- Setting ID number of the remote control
- Chapter 4 Settings
- Menu navigation
- [PICTURE] menu
- [POSITION] menu
- [ADVANCED MENU] menu
- [DISPLAY LANGUAGE] menu
- [3D SETTINGS] menu
- [DISPLAY OPTION] menu
- [COLOR MATCHING]
- [LARGE SCREEN CORRECTION]
- [SCREEN SETTING]
- [AUTO SIGNAL]
- [AUTO SETUP]
- [BACKUP INPUT SETTING]
- [SIMUL INPUT SETTING]
- [RGB IN]
- [DVI-D IN]
- [HDMI IN]
- [DIGITAL LINK IN]
- [SDI IN]
- [ON-SCREEN DISPLAY]
- [IMAGE ROTATION]
- [BACK COLOR]
- [STARTUP LOGO]
- [UNIFORMITY]
- [SHUTTER SETTING]
- [FREEZE]
- [WAVEFORM MONITOR]
- [CUT OFF]
- [PROJECTOR SETUP] menu
- [PROJECTOR ID]
- [PROJECTION METHOD]
- [OPERATION SETTING]
- [LIGHT OUTPUT]
- [BRIGHTNESS CONTROL]
- [STANDBY MODE]
- [NO SIGNAL SHUT-OFF]
- [NO SIGNAL LIGHTS-OUT]
- [INITIAL STARTUP]
- [STARTUP INPUT SELECT]
- [DATE AND TIME]
- [SCHEDULE]
- [RS-232C]
- [REMOTE2 MODE]
- [FUNCTION BUTTON]
- [LENS CALIBRATION]
- [LENS MEMORY]
- [STATUS]
- [AC VOLTAGE MONITOR]
- [SAVE ALL USER DATA]
- [LOAD ALL USER DATA]
- [INITIALIZE]
- [SERVICE PASSWORD]
- [P IN P] menu
- [TEST PATTERN] menu
- [SIGNAL LIST] menu
- [SECURITY] menu
- [NETWORK] menu
- Chapter 5 Maintenance
- Chapter 6 Appendix
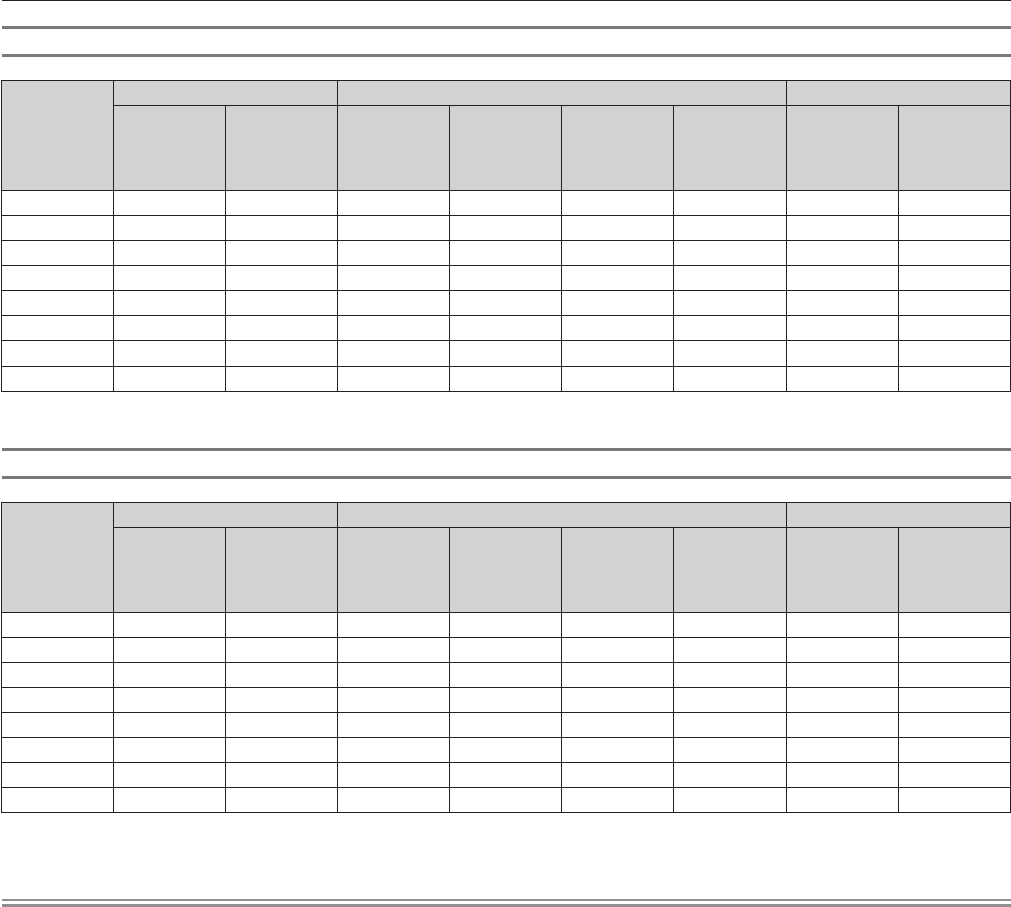
Chapter 2 Getting Started — Setting up
38 - ENGLISH
Standard status
Projection
lens Model
No.
Only [KEYSTONE] used [KEYSTONE] and [CURVED] used together Only [CURVED] used
Vertical
keystone
correction
angle α (°)
Horizontal
keystone
correction
angle β (°)
Vertical
keystone
correction
angle α (°)
Horizontal
keystone
correction
angle β (°)
Min. value of
R2/L2
Min. value of
R3/L3
Min. value of
R2/L2
Min. value of
R3/L3
ET-D75LE6 ±28 ±15 ±10 ±10 1.6 3.9 0.9 2.3
ET-D75LE8 ±40 ±15 ±20 ±15 0.2 0.4 0.2 0.3
ET-D75LE10 ±40 ±15 ±20 ±15 1.1 2.6 0.6 1.5
ET-D75LE20 ±40 ±15 ±20 ±15 0.9 1.7 0.5 1.0
ET-D75LE30 ±40 ±15 ±20 ±15 0.6 1.2 0.4 0.7
ET-D75LE40 ±40 ±15 ±20 ±15 0.4 0.7 0.2 0.4
ET-D75LE50 ±22 ±15 ±8 ±8 2.0 4.9 1.2 2.9
ET-D75LE90
*1
+5 /
-
0 0 ― ― ― ― ― ―
*1 Only the vertical keystone correction angle can be corrected in the direction in which the projector body moves away from the screen.
When using the optional Upgrade Kit (Model No.: ET-UK20)
Projection
lens Model
No.
Only [KEYSTONE] used
*1
[KEYSTONE] and [CURVED] used together Only [CURVED] used
Vertical
keystone
correction
angle α (°)
Horizontal
keystone
correction
angle β (°)
Vertical
keystone
correction
angle α (°)
Horizontal
keystone
correction
angle β (°)
Min. value of
R2/L2
Min. value of
R3/L3
Min. value of
R2/L2
Min. value of
R3/L3
ET-D75LE6 ±28 ±15 ±10 ±10 1.2 3.0 0.7 1.7
ET-D75LE8 ±45 ±40 ±20 ±15 0.2 0.3 0.1 0.2
ET-D75LE10 ±40 ±40 ±20 ±15 0.9 2.0 0.5 1.1
ET-D75LE20 ±40 ±40 ±20 ±15 0.7 1.3 0.4 0.7
ET-D75LE30 ±45 ±40 ±20 ±15 0.5 0.9 0.3 0.5
ET-D75LE40 ±45 ±40 ±20 ±15 0.3 0.5 0.2 0.3
ET-D75LE50 ±22 ±15 ±8 ±8 1.5 3.7 0.9 2.2
ET-D75LE90
*2
+5 /
-
0 0 ― ― ― ― ― ―
*1 When [VERTICAL KEYSTONE] and [HORIZONTAL KEYSTONE] are used simultaneously, correction cannot be made exceeding total of 55°.
*2 Only the vertical keystone correction angle can be corrected in the direction in which the projector body moves away from the screen.
Note
f When [GEOMETRY] is used, the focus of the entire screen may be lost as correction increases.
f Make the curved screen a circular arc shape with one part of a perfect circle removed.
f Adjustment range of the [GEOMETRY] items may not match the listed projection range depending on the projection lens. Use this projector
within the projection range, otherwise the correction may not work.