
Operation Manual

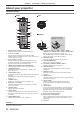

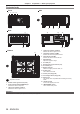

Table Of Contents
- Read this first!
- Chapter 1 Preparation
- Chapter 2 Getting Started
- Chapter 3 Basic Operations
- Switching on/off the projector
- Projecting
- Operating with the remote control
- Switching the input
- Using the shutter function
- Using the on-screen display function
- Using the automatic setup function
- Switching the image aspect ratio
- Using the function button
- Displaying internal test pattern
- Using the status function
- Using the AC voltage monitor function
- Setting ID number of the remote control
- Chapter 4 Settings
- Menu navigation
- [PICTURE] menu
- [POSITION] menu
- [ADVANCED MENU] menu
- [DISPLAY LANGUAGE] menu
- [3D SETTINGS] menu
- [DISPLAY OPTION] menu
- [COLOR MATCHING]
- [LARGE SCREEN CORRECTION]
- [SCREEN SETTING]
- [AUTO SIGNAL]
- [AUTO SETUP]
- [BACKUP INPUT SETTING]
- [SIMUL INPUT SETTING]
- [RGB IN]
- [DVI-D IN]
- [HDMI IN]
- [DIGITAL LINK IN]
- [SDI IN]
- [ON-SCREEN DISPLAY]
- [IMAGE ROTATION]
- [BACK COLOR]
- [STARTUP LOGO]
- [UNIFORMITY]
- [SHUTTER SETTING]
- [FREEZE]
- [WAVEFORM MONITOR]
- [CUT OFF]
- [PROJECTOR SETUP] menu
- [PROJECTOR ID]
- [PROJECTION METHOD]
- [OPERATION SETTING]
- [LIGHT OUTPUT]
- [BRIGHTNESS CONTROL]
- [STANDBY MODE]
- [NO SIGNAL SHUT-OFF]
- [NO SIGNAL LIGHTS-OUT]
- [INITIAL STARTUP]
- [STARTUP INPUT SELECT]
- [DATE AND TIME]
- [SCHEDULE]
- [RS-232C]
- [REMOTE2 MODE]
- [FUNCTION BUTTON]
- [LENS CALIBRATION]
- [LENS MEMORY]
- [STATUS]
- [AC VOLTAGE MONITOR]
- [SAVE ALL USER DATA]
- [LOAD ALL USER DATA]
- [INITIALIZE]
- [SERVICE PASSWORD]
- [P IN P] menu
- [TEST PATTERN] menu
- [SIGNAL LIST] menu
- [SECURITY] menu
- [NETWORK] menu
- Chapter 5 Maintenance
- Chapter 6 Appendix

Chapter 1 Preparation — About your projector
ENGLISH - 27
f Avoid contact with liquids or moisture.
f Do not attempt to modify or disassemble the remote control.
f Do not swing the remote control holding onto the strap when a strap is attached.
f Observe the following instructions that are indicated on the caution label at the back of the remote control:
g Do not use old battery with new one.
g Do not use batteries other than the type specied.
g Be sure the batteries are inserted properly.
For other instructions, read the instructions related to batteries that are described in “Read this rst!”.
1.Do not use old battery with new one.
2.Do not use batteries other than the
type specified.
3.Be sure the batteries are inserted properly.
Made in China
N2QAYB001052
Caution label at the back of the remote control
Note
f When operating the remote control by directly pointing the remote control signal receiver of the projector, operate the remote control at
a distance approx. 30 m (98'5") or shorter from the remote control signal receiver. The remote control can control at angles of up to ±15°
vertically and ±30° horizontally, but the effective control range may be reduced.
f If there are any obstacles between the remote control and the remote control signal receiver, the remote control may not operate properly.
f The signal will be reected off the screen. However, the operating range may be limited from light reection loss due to the screen material.
f If the remote control signal receiver directly receives strong light, such as uorescent light, the remote control may not operate properly. Use
it in a place distant from the light source.
f The power indicator <ON (G)/STANDBY (R)> will blink if the projector receives a remote control signal.