
Operation Manual
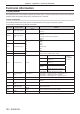
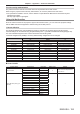
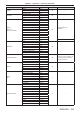
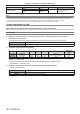
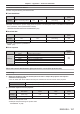
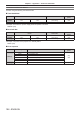
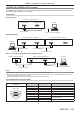
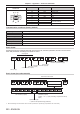
Table Of Contents
- Read this first!
- Chapter 1 Preparation
- Chapter 2 Getting Started
- Chapter 3 Basic Operations
- Switching on/off the projector
- Projecting
- Operating with the remote control
- Switching the input
- Using the shutter function
- Using the on-screen display function
- Using the automatic setup function
- Switching the image aspect ratio
- Using the function button
- Displaying internal test pattern
- Using the status function
- Using the AC voltage monitor function
- Setting ID number of the remote control
- Chapter 4 Settings
- Menu navigation
- [PICTURE] menu
- [POSITION] menu
- [ADVANCED MENU] menu
- [DISPLAY LANGUAGE] menu
- [3D SETTINGS] menu
- [DISPLAY OPTION] menu
- [COLOR MATCHING]
- [LARGE SCREEN CORRECTION]
- [SCREEN SETTING]
- [AUTO SIGNAL]
- [AUTO SETUP]
- [BACKUP INPUT SETTING]
- [SIMUL INPUT SETTING]
- [RGB IN]
- [DVI-D IN]
- [HDMI IN]
- [DIGITAL LINK IN]
- [SDI IN]
- [ON-SCREEN DISPLAY]
- [IMAGE ROTATION]
- [BACK COLOR]
- [STARTUP LOGO]
- [UNIFORMITY]
- [SHUTTER SETTING]
- [FREEZE]
- [WAVEFORM MONITOR]
- [CUT OFF]
- [PROJECTOR SETUP] menu
- [PROJECTOR ID]
- [PROJECTION METHOD]
- [OPERATION SETTING]
- [LIGHT OUTPUT]
- [BRIGHTNESS CONTROL]
- [STANDBY MODE]
- [NO SIGNAL SHUT-OFF]
- [NO SIGNAL LIGHTS-OUT]
- [INITIAL STARTUP]
- [STARTUP INPUT SELECT]
- [DATE AND TIME]
- [SCHEDULE]
- [RS-232C]
- [REMOTE2 MODE]
- [FUNCTION BUTTON]
- [LENS CALIBRATION]
- [LENS MEMORY]
- [STATUS]
- [AC VOLTAGE MONITOR]
- [SAVE ALL USER DATA]
- [LOAD ALL USER DATA]
- [INITIALIZE]
- [SERVICE PASSWORD]
- [P IN P] menu
- [TEST PATTERN] menu
- [SIGNAL LIST] menu
- [SECURITY] menu
- [NETWORK] menu
- Chapter 5 Maintenance
- Chapter 6 Appendix

Chapter 6 Appendix — Technical information
196 - ENGLISH
Control details Performance Parameter Default value Remark
ENABLE/DISABLE
Disable 0-127
0
When “Disable” is set, operations
of all channels become
unacceptable.
Enable 128-255
Note
f If the projector is operated with the remote control or on the control panel, or by the control command while controlling the projector using
the Art-Net function, the setting of the DMX controller or computer application may be different from the projector status. To reect the
controls of all channels to the projector, set “ENABLE/DISABLE” of channel 11 to “Disable” and then set back to “Enable”.
f To create/register the USER LOGO image, use “Logo Transfer Software” included in the supplied CD-ROM.
Control commands via LAN
When web control administrator rights password is set (Protect mode)
Connecting
1) Obtain the IP address and port number (Initial set value = 1024) of the projector and request a
connection to the projector.
f You can obtain both the IP address and the port number from the menu screen of the projector.
IP address
Obtain from the [NETWORK] menu → [NETWORK STATUS].
Port number
Obtain from the [NETWORK] menu → [NETWORK CONTROL] → [COMMAND PORT].
2) Check the response from the projector.
Data section Blank Mode Blank Random number section
Termination
symbol
Command
example
“NTCONTROL”
(ASCII string)
‘ ’
0x20
‘1’
0x31
‘ ’
0x20
“zzzzzzzz”
(ASCII code hex number)
(CR)
0x0d
Data length 9 bytes 1 byte 1 byte 1 byte 8 bytes 1 byte
f Mode: 1 = Protect mode
f Example: Response during protect mode (random number section is undened value)
“NTCONTROL 1 23181e1e” (CR)
3) Generate a 32-byte hash value from the following data using MD5 algorithm.
f “xxxxxx:yyyyy:zzzzzzzz”
xxxxxx Administrator rights user name for the web control (default user name is “admin1”)
yyyyy Password of above administrator rights user (default password is “panasonic”)
zzzzzzzz 8-byte random number obtained in Step 2)