
Operation Manual

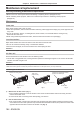
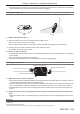


Table Of Contents
- Read this first!
- Chapter 1 Preparation
- Chapter 2 Getting Started
- Chapter 3 Basic Operations
- Switching on/off the projector
- Projecting
- Operating with the remote control
- Switching the input
- Using the shutter function
- Using the on-screen display function
- Using the automatic setup function
- Switching the image aspect ratio
- Using the function button
- Displaying internal test pattern
- Using the status function
- Using the AC voltage monitor function
- Setting ID number of the remote control
- Chapter 4 Settings
- Menu navigation
- [PICTURE] menu
- [POSITION] menu
- [ADVANCED MENU] menu
- [DISPLAY LANGUAGE] menu
- [3D SETTINGS] menu
- [DISPLAY OPTION] menu
- [COLOR MATCHING]
- [LARGE SCREEN CORRECTION]
- [SCREEN SETTING]
- [AUTO SIGNAL]
- [AUTO SETUP]
- [BACKUP INPUT SETTING]
- [SIMUL INPUT SETTING]
- [RGB IN]
- [DVI-D IN]
- [HDMI IN]
- [DIGITAL LINK IN]
- [SDI IN]
- [ON-SCREEN DISPLAY]
- [IMAGE ROTATION]
- [BACK COLOR]
- [STARTUP LOGO]
- [UNIFORMITY]
- [SHUTTER SETTING]
- [FREEZE]
- [WAVEFORM MONITOR]
- [CUT OFF]
- [PROJECTOR SETUP] menu
- [PROJECTOR ID]
- [PROJECTION METHOD]
- [OPERATION SETTING]
- [LIGHT OUTPUT]
- [BRIGHTNESS CONTROL]
- [STANDBY MODE]
- [NO SIGNAL SHUT-OFF]
- [NO SIGNAL LIGHTS-OUT]
- [INITIAL STARTUP]
- [STARTUP INPUT SELECT]
- [DATE AND TIME]
- [SCHEDULE]
- [RS-232C]
- [REMOTE2 MODE]
- [FUNCTION BUTTON]
- [LENS CALIBRATION]
- [LENS MEMORY]
- [STATUS]
- [AC VOLTAGE MONITOR]
- [SAVE ALL USER DATA]
- [LOAD ALL USER DATA]
- [INITIALIZE]
- [SERVICE PASSWORD]
- [P IN P] menu
- [TEST PATTERN] menu
- [SIGNAL LIST] menu
- [SECURITY] menu
- [NETWORK] menu
- Chapter 5 Maintenance
- Chapter 6 Appendix

Chapter 5 Maintenance — Maintenance/replacement
186 - ENGLISH
Note
f Make sure that the air lter unit is properly attached before using the projector. If it is not properly attached, the projector will suck in dirt and
dust causing a malfunction.
f If you use the projector without attaching the air lter unit, the lter indicator <FILTER> blinks in red and the message appears on the
projected image for approximately 30 seconds.
f Replace the air lter unit with the new optional Replacement Filter Unit (Model No.: ET-EMF330) if it is damaged or if the dirt does not come
off even after washing.
f Air lter replacement is recommended after cleaning the unit two times.
f The dust-proof properties may be reduced after each cleaning.
Replacing the unit
Air lter unit
If dirt does not come off even after the unit is maintained, it is time for the unit to be replaced.
The Replacement Filter Unit (Model No.: ET-EMF330) is an optional accessory. To purchase the product, consult
your dealer.
Replacing the air lter unit
Attention
f Make sure to turn off the power before replacing the air lter unit.
f When attaching the unit, make sure that the projector is stable, and perform the replacement in a safe place even if you drop it accidentally.
1) Remove the air filter unit.
f Refer to “Removing the air lter unit” (x page 184).
2) Attach the optional Replacement Filter Unit (Model No.: ET-EMF330) to the projector.
f The air lter unit has no difference between top and bottom, but is two-sided. Match the protrusion position
of the air lter unit with the grooves on the projector body.
f Refer to “Attaching the air lter unit” (x page 185).
Attention
f When switching on the projector, make sure that the air lter unit is attached. If it is not properly attached, the projector will suck in dirt and
dust causing a malfunction.
f If you use the projector without attaching the air lter unit, the lter indicator <FILTER> blinks in red and the message appears on the
projected image for approximately 30 seconds.
Note
f The replacement cycle of the air lter unit varies greatly depending on the usage environment.