
Operation Manual

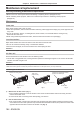
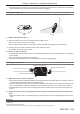
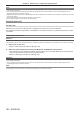


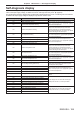

Table Of Contents
- Read this first!
- Chapter 1 Preparation
- Chapter 2 Getting Started
- Chapter 3 Basic Operations
- Switching on/off the projector
- Projecting
- Operating with the remote control
- Switching the input
- Using the shutter function
- Using the on-screen display function
- Using the automatic setup function
- Switching the image aspect ratio
- Using the function button
- Displaying internal test pattern
- Using the status function
- Using the AC voltage monitor function
- Setting ID number of the remote control
- Chapter 4 Settings
- Menu navigation
- [PICTURE] menu
- [POSITION] menu
- [ADVANCED MENU] menu
- [DISPLAY LANGUAGE] menu
- [3D SETTINGS] menu
- [DISPLAY OPTION] menu
- [COLOR MATCHING]
- [LARGE SCREEN CORRECTION]
- [SCREEN SETTING]
- [AUTO SIGNAL]
- [AUTO SETUP]
- [BACKUP INPUT SETTING]
- [SIMUL INPUT SETTING]
- [RGB IN]
- [DVI-D IN]
- [HDMI IN]
- [DIGITAL LINK IN]
- [SDI IN]
- [ON-SCREEN DISPLAY]
- [IMAGE ROTATION]
- [BACK COLOR]
- [STARTUP LOGO]
- [UNIFORMITY]
- [SHUTTER SETTING]
- [FREEZE]
- [WAVEFORM MONITOR]
- [CUT OFF]
- [PROJECTOR SETUP] menu
- [PROJECTOR ID]
- [PROJECTION METHOD]
- [OPERATION SETTING]
- [LIGHT OUTPUT]
- [BRIGHTNESS CONTROL]
- [STANDBY MODE]
- [NO SIGNAL SHUT-OFF]
- [NO SIGNAL LIGHTS-OUT]
- [INITIAL STARTUP]
- [STARTUP INPUT SELECT]
- [DATE AND TIME]
- [SCHEDULE]
- [RS-232C]
- [REMOTE2 MODE]
- [FUNCTION BUTTON]
- [LENS CALIBRATION]
- [LENS MEMORY]
- [STATUS]
- [AC VOLTAGE MONITOR]
- [SAVE ALL USER DATA]
- [LOAD ALL USER DATA]
- [INITIALIZE]
- [SERVICE PASSWORD]
- [P IN P] menu
- [TEST PATTERN] menu
- [SIGNAL LIST] menu
- [SECURITY] menu
- [NETWORK] menu
- Chapter 5 Maintenance
- Chapter 6 Appendix
Chapter 5 Maintenance — Maintenance/replacement
ENGLISH - 185
f After pulling out the air lter unit, remove large foreign objects and dust from the air lter unit compartment
and the air intake port of the projector body if there are any. (Fig. 3)
Cleaning the air lter unit
Remove the air lter unit beforehand with the previously described procedure of “Removing the air lter unit”.
Fig. 1 Fig. 2
1) Wash the air filter unit. (Fig. 1)
i) Soak the air filter unit in cold or warm water and then lightly rinse it.
f Do not use cleaning tools such as brushes.
f When rinsing, hold the frame of the air lter unit without putting strong pressure on the lter unit.
ii) Rinse the air filter unit two to three times using fresh water each time.
f Insufcient rinsing may result in odors.
2) Dry the air filter unit. (Fig. 2)
f Let the air lter unit naturally dry off in a well-ventilated place where there is little dust and is not exposed to
direct sunlight.
f Do not dry using drying devices such as dryers.
f After the air lter is dried, proceed to “Attaching the air lter unit” (x page 185).
Attaching the air lter unit
Protrusion of the air filter unit
Tabs on the projector body
Tabs on the projector body
Groove on the projector body
Protrusion of the air filter unit
Groove on the projector body
1) Attach the air filter unit to the projector.
f The air lter unit has no difference between top and bottom, but is two-sided. Match the protrusion position
of the air lter unit with the grooves on the projector body.
f Hook the air lter unit frame at the air exhaust port side to the two tabs of the back side of the projector’s air
lter unit compartment and perform Step 2) in “Removing the air lter unit” in the reverse order to attach.
f Conrm that the tabs of the air lter unit compartment of the projector body are hooked to the air lter unit
frame.
2) Attach the air filter cover to the projector and use a Phillips screwdriver to tighten the air filter cover
screw.
f Attach the air lter cover by performing Step 1) in “Removing the air lter unit” (x page 184) in the reverse
order.
Attention
f After washing the air lter unit, dry it thoroughly before attaching it back to the projector. Attaching a wet unit will cause an electric shock or
malfunction.
f Do not disassemble the air lter unit.
f Take care not to touch the air intake fan in the air lter unit compartment when removing dirt or dust.