
Operation Manual
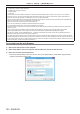
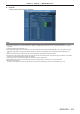
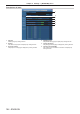
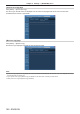
Table Of Contents
- Read this first!
- Chapter 1 Preparation
- Chapter 2 Getting Started
- Chapter 3 Basic Operations
- Switching on/off the projector
- Projecting
- Operating with the remote control
- Switching the input
- Using the shutter function
- Using the on-screen display function
- Using the automatic setup function
- Switching the image aspect ratio
- Using the function button
- Displaying internal test pattern
- Using the status function
- Using the AC voltage monitor function
- Setting ID number of the remote control
- Chapter 4 Settings
- Menu navigation
- [PICTURE] menu
- [POSITION] menu
- [ADVANCED MENU] menu
- [DISPLAY LANGUAGE] menu
- [3D SETTINGS] menu
- [DISPLAY OPTION] menu
- [COLOR MATCHING]
- [LARGE SCREEN CORRECTION]
- [SCREEN SETTING]
- [AUTO SIGNAL]
- [AUTO SETUP]
- [BACKUP INPUT SETTING]
- [SIMUL INPUT SETTING]
- [RGB IN]
- [DVI-D IN]
- [HDMI IN]
- [DIGITAL LINK IN]
- [SDI IN]
- [ON-SCREEN DISPLAY]
- [IMAGE ROTATION]
- [BACK COLOR]
- [STARTUP LOGO]
- [UNIFORMITY]
- [SHUTTER SETTING]
- [FREEZE]
- [WAVEFORM MONITOR]
- [CUT OFF]
- [PROJECTOR SETUP] menu
- [PROJECTOR ID]
- [PROJECTION METHOD]
- [OPERATION SETTING]
- [LIGHT OUTPUT]
- [BRIGHTNESS CONTROL]
- [STANDBY MODE]
- [NO SIGNAL SHUT-OFF]
- [NO SIGNAL LIGHTS-OUT]
- [INITIAL STARTUP]
- [STARTUP INPUT SELECT]
- [DATE AND TIME]
- [SCHEDULE]
- [RS-232C]
- [REMOTE2 MODE]
- [FUNCTION BUTTON]
- [LENS CALIBRATION]
- [LENS MEMORY]
- [STATUS]
- [AC VOLTAGE MONITOR]
- [SAVE ALL USER DATA]
- [LOAD ALL USER DATA]
- [INITIALIZE]
- [SERVICE PASSWORD]
- [P IN P] menu
- [TEST PATTERN] menu
- [SIGNAL LIST] menu
- [SECURITY] menu
- [NETWORK] menu
- Chapter 5 Maintenance
- Chapter 6 Appendix

Chapter 4 Settings — [NETWORK] menu
162 - ENGLISH
f For the LAN cable between the twisted-pair-cable transmitter and the projector, use a cable that meets the following criteria:
g Conforming to CAT5e or higher standards
g Shielded type (including connectors)
g Straight-through
g Single wire
f The maximum transmission distance between the twisted-pair-cable transmitter and the projector is 100 m (328'1"). It is possible to
transmit up to 150 m (492'2") if the twisted-pair-cable transmitter supports the long-reach communication method. If this distance is
exceeded, image may be disrupted or a malfunction may occur in LAN communication.
f When laying cables between the twisted-pair-cable transmitter and the projector, conrm that cable characteristics are compatible with
CAT5e or higher using tools such as a cable tester or cable analyzer.
When a relay connector is used, include it in the measurement.
f Do not use a hub between the twisted-pair-cable transmitter and the projector.
f Do not pull cables forcefully. Also, do not bend or fold cables unnecessarily.
f To reduce the effects of noise as much as possible, stretch out the cables between the twisted-pair-cable transmitter and the projector
without any loops.
f Lay the cables between the twisted-pair-cable transmitter and the projector away from other cables, particularly power cables.
f When laying multiple cables, run them side by side along the shortest distance possible without bundling them together.
f After laying the cables, go to the [NETWORK] menu → [DIGITAL LINK STATUS] and conrm that the value of [SIGNAL QUALITY] is
displayed in green which indicates normal quality. (x page 157)
f For twisted-pair-cable transmitters of other manufacturers of which the operation has been veried with the projector, visit the Panasonic
website (http://panasonic.net/avc/projector/). Note that the verication for devices of other manufacturers has been made for the items set
by Panasonic Corporation, and not all the operations have been veried. For operation or performance problems caused by the devices of
other manufacturers, contact the respective manufacturers.
Accessing from the web browser
1) Start up the web browser on the computer.
2) Enter the IP address set on the projector into the URL entry field of the web browser.
3) Enter the user name and the password.
f The factory default setting of the user name is user1 (user rights)/admin1 (administrator rights) and the
password is panasonic (lower case).