
Operation Manual
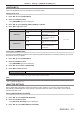


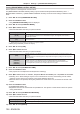
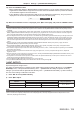
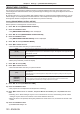
Table Of Contents
- Read this first!
- Chapter 1 Preparation
- Chapter 2 Getting Started
- Chapter 3 Basic Operations
- Switching on/off the projector
- Projecting
- Operating with the remote control
- Switching the input
- Using the shutter function
- Using the on-screen display function
- Using the automatic setup function
- Switching the image aspect ratio
- Using the function button
- Displaying internal test pattern
- Using the status function
- Using the AC voltage monitor function
- Setting ID number of the remote control
- Chapter 4 Settings
- Menu navigation
- [PICTURE] menu
- [POSITION] menu
- [ADVANCED MENU] menu
- [DISPLAY LANGUAGE] menu
- [3D SETTINGS] menu
- [DISPLAY OPTION] menu
- [COLOR MATCHING]
- [LARGE SCREEN CORRECTION]
- [SCREEN SETTING]
- [AUTO SIGNAL]
- [AUTO SETUP]
- [BACKUP INPUT SETTING]
- [SIMUL INPUT SETTING]
- [RGB IN]
- [DVI-D IN]
- [HDMI IN]
- [DIGITAL LINK IN]
- [SDI IN]
- [ON-SCREEN DISPLAY]
- [IMAGE ROTATION]
- [BACK COLOR]
- [STARTUP LOGO]
- [UNIFORMITY]
- [SHUTTER SETTING]
- [FREEZE]
- [WAVEFORM MONITOR]
- [CUT OFF]
- [PROJECTOR SETUP] menu
- [PROJECTOR ID]
- [PROJECTION METHOD]
- [OPERATION SETTING]
- [LIGHT OUTPUT]
- [BRIGHTNESS CONTROL]
- [STANDBY MODE]
- [NO SIGNAL SHUT-OFF]
- [NO SIGNAL LIGHTS-OUT]
- [INITIAL STARTUP]
- [STARTUP INPUT SELECT]
- [DATE AND TIME]
- [SCHEDULE]
- [RS-232C]
- [REMOTE2 MODE]
- [FUNCTION BUTTON]
- [LENS CALIBRATION]
- [LENS MEMORY]
- [STATUS]
- [AC VOLTAGE MONITOR]
- [SAVE ALL USER DATA]
- [LOAD ALL USER DATA]
- [INITIALIZE]
- [SERVICE PASSWORD]
- [P IN P] menu
- [TEST PATTERN] menu
- [SIGNAL LIST] menu
- [SECURITY] menu
- [NETWORK] menu
- Chapter 5 Maintenance
- Chapter 6 Appendix
Chapter 4 Settings — [PROJECTOR SETUP] menu
ENGLISH - 127
3) Press as to select [LIGHT OUTPUT].
4) Press qw to adjust.
Operation
Adjustment
Range of adjustment
Brightness Runtime (estimate)
Press w.
The screen becomes brighter. The runtime becomes shorter.
8.0 % - 100.0 %
Press q.
The screen becomes darker. The runtime becomes longer.
5) Press as to select [APPLY].
6) Press the <ENTER> button.
7) When the confirmation screen is displayed, press qw to select [OK], and press the <ENTER> button.
Note
f [LIGHT OUTPUT] can be adjusted individually for each setting item of [OPERATING MODE].
f In such a case when conguring multiple screens with multiple projectors, uniformity of brightness between multiple screens can be
obtained by adjusting [LIGHT OUTPUT].
Interrelation of luminance and runtime
You can use the projector with desired brightness and duration of use by combining the settings of [MAX LIGHT
OUTPUT LEVEL], [LIGHT OUTPUT], and [CONSTANT MODE] in [BRIGHTNESS CONTROL SETUP].
Interrelation of luminance and runtime is as follows. Make the settings depending on your desired duration of use
and brightness of the projected image.
Values of the luminance and runtime are rough estimations.
r To set the projector based on the duration of use
Duration of use
(hour)
When [CONSTANT MODE] is set to [OFF] When [CONSTANT MODE] is set to [AUTO] or [PC]
[MAX LIGHT
OUTPUT LEVEL]
(%)
[LIGHT OUTPUT]
(%)
Luminance (lm)
[MAX LIGHT
OUTPUT LEVEL]
(%)
[LIGHT OUTPUT]
(%)
Luminance (lm)
20 000 100.0 100.0 12 000 100.0 58.0 7 000
24 000 100.0 83.0 10 000 100.0 54.0 6 500
27 000 100.0 65.0 7 800 100.0 51.0 6 100
31 000 100.0 ― ― 100.0 47.0 5 600
35 000 100.0 ― ― 100.0 44.0 5 300
40 000 100.0 ― ― 100.0 41.0 4 900
r To set the projector based on luminance
Luminance (lm)
When [CONSTANT MODE] is set to [OFF] When [CONSTANT MODE] is set to [AUTO] or [PC]
[MAX LIGHT
OUTPUT LEVEL]
(%)
[LIGHT OUTPUT]
(%)
Runtime (hour)
[MAX LIGHT
OUTPUT LEVEL]
(%)
[LIGHT OUTPUT]
(%)
Runtime (hour)
12 000 100.0 100.0 20 000 ― ― ―
11 000 100.0 92.0 23 000 100.0 92.0 1 500
10 000 100.0 83.0 24 000 100.0 83.0 4 500
9 000 100.0 75.0 25 500 100.0 75.0 8 500
8 000 100.0 67.0 26 500 100.0 67.0 14 000
7 000 100.0 58.0 28 000 100.0 58.0 20 000
6 000 100.0 50.0 29 500 100.0 50.0 28 000
5 000 100.0 ― ― 100.0 42.0 38 500
4 000 100.0 ― ― 100.0 33.0 52 500
Note
f Under inuence of characteristics of each light source, conditions of use, installation environment, etc., the runtime may be shorter than the
estimation.
f The duration of use is referred to as the runtime when you use the projector successively. The duration of use is an estimated duration and
is not the warranty period.
f If the runtime exceeds 20 000 hours, replacement of the components inside the projector may be required. Consult your dealer for details.