Operation Manual
Table Of Contents
- Read this first!
- Chapter 1 Preparation
- Chapter 2 Getting Started
- Chapter 3 Basic Operations
- Switching on/off the projector
- Projecting
- Operating with the remote control
- Switching the input
- Using the shutter function
- Using the on-screen display function
- Using the automatic setup function
- Switching the image aspect ratio
- Using the function button
- Displaying internal test pattern
- Using the status function
- Using the AC voltage monitor function
- Setting ID number of the remote control
- Chapter 4 Settings
- Menu navigation
- [PICTURE] menu
- [POSITION] menu
- [ADVANCED MENU] menu
- [DISPLAY LANGUAGE] menu
- [3D SETTINGS] menu
- [DISPLAY OPTION] menu
- [COLOR MATCHING]
- [LARGE SCREEN CORRECTION]
- [SCREEN SETTING]
- [AUTO SIGNAL]
- [AUTO SETUP]
- [BACKUP INPUT SETTING]
- [SIMUL INPUT SETTING]
- [RGB IN]
- [DVI-D IN]
- [HDMI IN]
- [DIGITAL LINK IN]
- [SDI IN]
- [ON-SCREEN DISPLAY]
- [IMAGE ROTATION]
- [BACK COLOR]
- [STARTUP LOGO]
- [UNIFORMITY]
- [SHUTTER SETTING]
- [FREEZE]
- [WAVEFORM MONITOR]
- [CUT OFF]
- [PROJECTOR SETUP] menu
- [PROJECTOR ID]
- [PROJECTION METHOD]
- [OPERATION SETTING]
- [LIGHT OUTPUT]
- [BRIGHTNESS CONTROL]
- [STANDBY MODE]
- [NO SIGNAL SHUT-OFF]
- [NO SIGNAL LIGHTS-OUT]
- [INITIAL STARTUP]
- [STARTUP INPUT SELECT]
- [DATE AND TIME]
- [SCHEDULE]
- [RS-232C]
- [REMOTE2 MODE]
- [FUNCTION BUTTON]
- [LENS CALIBRATION]
- [LENS MEMORY]
- [STATUS]
- [AC VOLTAGE MONITOR]
- [SAVE ALL USER DATA]
- [LOAD ALL USER DATA]
- [INITIALIZE]
- [SERVICE PASSWORD]
- [P IN P] menu
- [TEST PATTERN] menu
- [SIGNAL LIST] menu
- [SECURITY] menu
- [NETWORK] menu
- Chapter 5 Maintenance
- Chapter 6 Appendix

Chapter 4 Settings — [DISPLAY OPTION] menu
ENGLISH - 123
[OPEN]
The projector goes into standby mode with the mechanical shutter opened when the projector is
switched off.
[CLOSE]
The projector goes into standby mode with the mechanical shutter closed when the projector is
switched off.
[FREEZE]
Pause the projected image temporarily regardless of the playback of the external device.
1) Press as to select [FREEZE].
2) Press the <ENTER> button.
f Press the <MENU> button to release.
Note
f [FREEZE] is displayed on the screen when video is paused.
[WAVEFORM MONITOR]
Use the input signals from a connected external device to display in a waveform. Check whether video output
(luminance) signal level is within the recommended range for the projector and adjust.
1) Press as to select [WAVEFORM MONITOR].
2) Press qw to switch the item.
[OFF] Does not display the waveform monitor.
[ON] Displays the waveform monitor.
3) Press the <MENU> button two times to clear.
4) Press as to select any horizontal line.
5) Press the <ENTER> button to switch the Select line to either luminance, red, green, or blue.
f Line selection items switch each time the <ENTER> is pressed only when the waveform monitor is
displayed.
“Select line (luminance)” Displayed in white waveform.
“Select line (red)” Displayed in red waveform.
“Select line (green)” Displayed in green waveform.
“Select line (blue)” Displayed in blue waveform.
Note
f Setting is also available with [FUNCTION BUTTON] (x page 140).
f Waveform monitor cannot be displayed while in [P IN P].
f The waveform monitor turns off when [P IN P] is executed during waveform monitoring.
f The waveform monitor is not displayed when on-screen display is hidden (off).
f Use [3D WAVEFORM MONITOR] to display the waveform monitor with the 3D image.
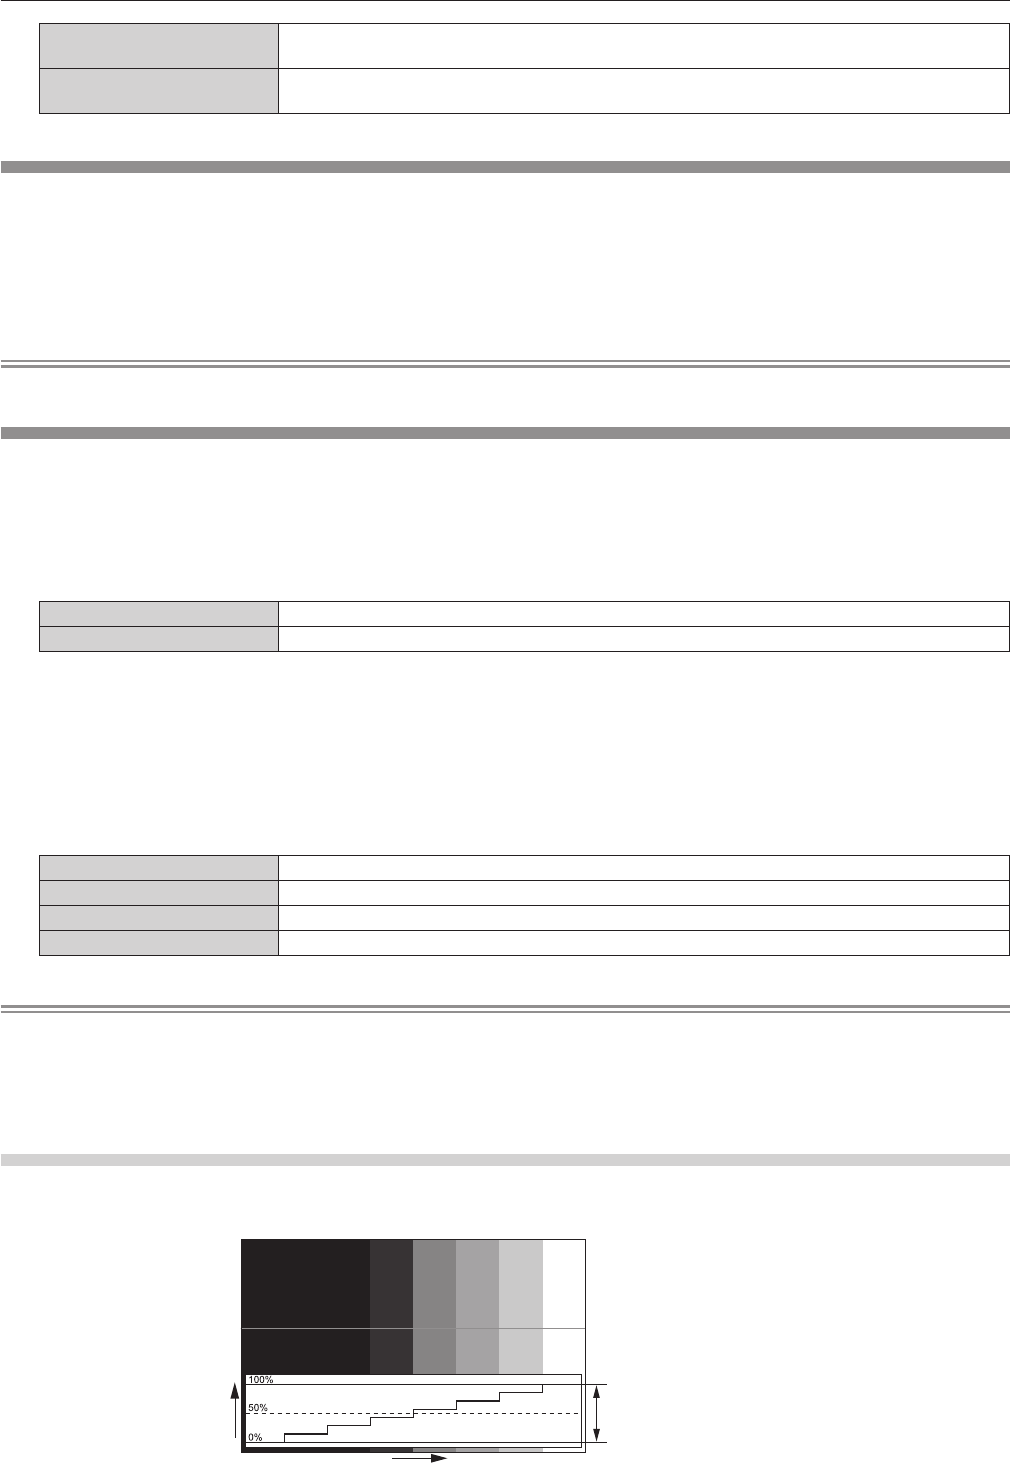
Adjusting the waveform
Project the luminance adjustment signal of a commercial test disk (0 % (0 IRE or 7.5 IRE) – 100 % (100 IRE)) and
adjust.
Signal level
Image displayable area
Image position


