
Operation Manual

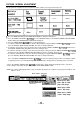

PICTURE SCREEN ADJUSTMENT
This projector has a picture screen resize function, which enables you to project the image size.
Input image
Less
than XGA
024 x
768) image
1.
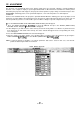
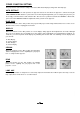
Press the MENU BUTTON and the MAIN MENU DISPLAY dialog box will appear.
2. Press the POINT LEFT/RIGHT
BUTTON(s)
to select SCREEN and press the SELECT (REAR CLICK) BUTTON.
Another dialog box SCREEN ADJUST DISPLAY will appear.
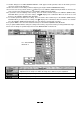
3. Press the POINT DOWN
BUTTON
and a red arrow will appear.
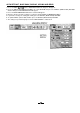
4. To switch to “Expand mode”, move the arrow to Expand by pressing the POINT UP/DOWN
BUTTON(s)
and then
press the SELECT (REAR CLICK) BUTTON. The mode is changed “Expand”.
5. To switch to “True mode”, move the arrow to True by pressing the POINT UP/DOWN
BUTTON(s)
and then press
the SELECT (REAR CLICK) BUTTON. The mode is changed “True”.
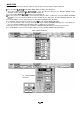
6. To switch to “Compressed mode”, move the arrow to Compressed by pressing the POINT UP/DOWN
BUTTON(s)
and then press the SELECT (REAR CLICK) BUTTON. The mode is changed “Compressed”.
7. To switch to “Panning mode”, move the arrow to Panning by pressing the POINT UP/DOWN
BUTTON(s)
and then
press the SELECT (REAR CLICK) BUTTON. The mode is changed “Panning”.
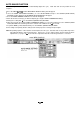
Press the POINT UP/DOWN/LEFT/RIGHT
BUTTON(s)
to move the panning image position. The display of “Quit”
is appearing on the screen during panning mode. If this display is disappeared, the panning mode is cancelled.
8. Press the SELECT (REAR CLICK)
BUTTON
to disappear the “Quit” display and panning mode is cancelled.
9. This setting is temporarily effective until you turn off the MAIN ON/OFF switch.
NOTE: The normal “Panning Operation” may not function properly if the computer system prepared with the “PC
Adjust” is used.
MAIN MENU DISPLAY
SCREEN
SCREEN
ADJUST
DISPLAY
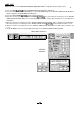
When input is VGA
(640 x 480) or SVGA
(800 x 600) image.
When input is XGA
(1024
X
768) image.
When input is SXGA
(1280 x 1024) image.
-36-