
Operation Manual

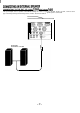


c
a
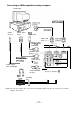
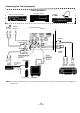
LAMP REPLACEMENT INDICATOR
Light is orange when projection lamp is nearing end of service life.
0
TEMPERATURE WARNING INDICATOR
Flashes red when internal projector temperature is too high.
0
READY INDICATOR
Light is green when projector lamp is ready to be turned on.
0
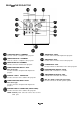
A
LAMP POWER INDICATOR
Light is dim when the projector is on.
Light is brightened when the projector is in stand-by mode.
0
LAMP POWER ON/OFF BUTTON
Used to turn projection lamp on or off.
0
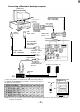
l VOLUME
BUlTONS
Used to adjust volume.
e
FINE SYNC
BUlTONS
Used to adjust fine sync.
0
: MODE BUTTON
Used to select video source.
(Computer 1, Computer 2 or Video 1 Input)
0
’
NORMAL BUTTON
Used to reset to normal picture adjustment preset by factory.
SYSTEM BUTTON
0
Computer Mode
Use this button, the POINT UP/DOWN/LEFT/RIGHT buttons and the SELECT button
t’o
select computer system.
0
VIDEO Mode
Use this button, the POINT UP/DOWN/LEFT/RIGHT buttons and the SELECT button to select colour system.
MENU
BUlTON
This button will activate the MENU operation.
Use this button, the POINT UP/DOWN/LEFT/RIGHT buttons and the SELECT button to make adjustments to the
projector’s setting in MENU operation.
ZOOM
BUlTON
Used to select power zoom lens adjust.
FOCUS
BUl-rON
Used to select focus adjust.
l To select an item on the MENU that you want to adjust. To select an item, move the arrow by pressing these
buttons (UP, DOWN, LEFT or RIGHT).
0
Used to operate power zoom lens or power focus system. (Pressing these button either UP or DOWN)
SELECT BUTTON
This button has different functions depending on when used. This button is used to execute the item selected, to
increase or decrease the values in certain items such as CONTRAST or BRIGHTNESS.
-
19-