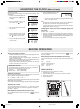
INSTRUCTION MANUAL DC-MP9500 Micro Component System DISPLAY FM MODE/ REPEAT REMOTE CONTROLLER RB-MP8000 9500UK(En)-cover 1 01/24/2005, 6:10 PM
9500UK(En)P1-10 11 03/2/2005, 9:27 AM
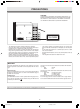
PRECAUTIONS CAUTION THIS PRODUCT CONTAINS A LOW POWER LASER DEVICE. TO ENSURE CONTINUED SAFETY DO NOT REMOVE ANY COVERS OR ATTEMPT TO GAIN ACCESS TO THE INSIDE OF THE PRODUCT. REFER ALL SERVICING TO QUALIFIED PERSONNEL. CLASS 1 LASER PRODUCT LUOKAN 1 LASERLAITE KLASS 1 LASERAPPARAT CAUTION RISK OF ELECTRIC SHOCK DO NOT OPEN AVIS: RISQUE DE CHOC ÉLECTRIQUE - NE PAS OVRIR. - - The apparatus shall not be exposed to dripping or splashing.
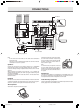
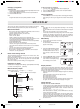
CONNECTIONS L ch speaker R ch speaker FM Aerial AM loop Aerial AM LOOP + LEFT _ FM ANT _ + RIGHT LEFT + _ SPEAKERS (6Ω MIN.) _ SPEAKERS (6Ω MIN) PHONES LINE IN R RIGHT L RESET + To an AC outlet Video/Auxiliary equipment Note: - Do not connect the mains lead to an AC outlet until all connections have been made. - The system is not completely disconnected from the mains when the z/ON button is set to the z position. Unwind the aerial wires, then connect them to the AM LOOP terminals.
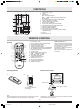
CONTROLS 3 4 5 2 1 6 15 7 8 9 10 11 12 14 13 1. Power button ( z/ON) 2. Display 3. Control panel i : CD play/pause button f / _ ,+ / e : Skip/search/tuning/file select buttons n : Stop button 4. Tuner function/band select button (TUNER/BAND) 5. Volume control button (VOLUME) 6. Function select button (FUNCTION) 7. Memory button (MEMORY) 8. Disc tray open/close button (OPEN/CLOSE) 9. FM mode/Display button (FM MODE/DISPLAY) 10. Random play button (RANDOM) 11. Repeat play button (REPEAT) 12.
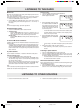
ADJUSTING THE CLOCK (Main unit only) Example: To set “6:30”. Turn the power off before setting. If this is the first time for setting, “0:00” display blinks. 1. Press the CLOCK/TIMER button for more than 3 seconds, “ ” blinks on the display. 6. Press the MEMORY button to finish all settings and the clock starts. 2. Press the MEMORY button. The “hour” section and “ ” blinks. Note: - To display the clock during operation, press the CLOCK/TIMER button briefly.
CD PLAY Use compact discs bearing the symbol shown. In addition to conventional 12 cm CDs, this system can be used to play 8 cm CDs without an adapter. - - Search play (forward/reverse) - This unit can play back the CD-R/RW that have recorded music data as well. However, some CD-R/RWs cannot be played back depending on the recording conditions. The CD-R/RW cannot be recorded in this unit. 1. Press the FUNCTION button to select CD function. 2.
Changing a programme To change a track 1. In the stop mode, press the MEMORY button repeatedly until the track number to be replaced is displayed. 2. Press the f or e button to select a track as explained above. 3. Press the MEMORY button. Note: - Programmed details cannot be partially deleted or inserted. To add a new track to a programme 1. In the stop mode, press the MEMORY button repeatedly till “-- -- -- -- . -- --” appears. 2. Press the f or e button to select a track as explained above. 3.
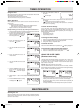
LISTENING TO THE RADIO Before use When the unit is shipped from the factory, its AM frequency band is set as “522 ~ 1611 kHz (in 9 kHz steps)”. If your local AM broadcast system is organized in 10 kHz steps, change the frequency band to “520 ~ 1610 kHz (in 10 kHz steps)” as follows. 1. Press the TUNER/BAND button to select AM. 2. Press the n and the RANDOM buttons on the main unit at the same time, the frequency band will be changed to “520 ~ 1610 kHz (in 10 kHz steps)”.
TIMER OPERATION Using the timer Set the on and off times, and function to be used. Operation will start with the selected function at the on time. The power will be switched off at the off time. The timer will function every day unless it is released. Before Operation Make absolutely sure that the clock is set to the correct time before setting the timer. - Prepare the sources to be used. - Adjust the tuner or band of radio if choose TUNER function. - Place the disc in advance if choose CD function.
SPECIFICATIONS CD player Type: 2-channel stereo Pick-up: Optical 3-beam semiconductor laser Laser output: 0.6mW (Maximum continuous wave) Wave length: 790nm Wow/flutter: Below measurable limits Power requirement: AC 230V, 50Hz Power consumption: 70 W Dimensions: 165(W) x 205(H) x 305(D) mm Weight: 4.5kg Speaker systems Type: Bass reflex Unit used: Woofer: 12 cm cone type Tweeter: 2.
GUARANTEE TO CUSTOMER Sanyo Europe Ltd. (the Company) guarantees to the initial retail purchaser that if this equipment is or becomes defective and that, in the opinion of the Company, the defect is due to faulty material or workmanship the Company will, for a period of 12 calendar months from the date of sale to the original purchaser repair or replace, at its sole option, free of charge, any such defective component part of the equipment, always provided that: 1.