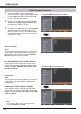
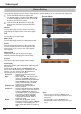
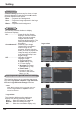
Video Input Video System Selection 1 Press the MENU button to display the On-Screen Menu. Use the Point ▲▼ buttons to select Input and then press the Point ► button or the SELECT button. 2 Use the Point ▲▼ buttons to select Video, S-video or Computer 1(Component) and then press the SELECT button. 3 Use the Point ▲▼ buttons to select System and then press the Point ► button or the SELECT button. Use the Point ▲▼ buttons to select the desired system and then press the SELECT button.
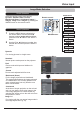
Video Input Image Mode Selection Direct Operation Select the desired image mode among Dynamic, Standard, Real, Cinema, Blackboard (Green), Colorboard, Image 1, Image 2, Image 3 and Image 4 by pressing the IMAGE button on the remote control. Remote control IMAGE button Dynamic Standard Real Cinema Menu Operation 1 2 Press the MENU button to display the On-Screen Menu. Use the Point ▲▼ buttons to select Image select and then press the Point ► button or the SELECT button.
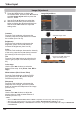
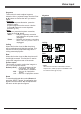
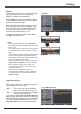
Video Input Image Adjustment 1 Press the MENU button to display the On-Screen Menu. Use the Point ▲▼ buttons to select Image adjust and then press the SELECT button. 2 Use the Point ▲▼ buttons to select the desired item and then press the SELECT button to display the adjustment dialog box. Use the Point ◄► buttons to adjust the setting value. Contrast Press the Point ◄ button to decrease the contrast, press the Point ► button to increase the contrast (from 0 to 63).
Video Input Noise reduction Noise interference on the screen can be reduced. Select one of the following options to get smoother images. Off......... Disabled. L 1......... Lower reduction L 2......... Higher reduction Progressive An interlaced video signal can be displayed in progressive mode. Select one of the following options. Off......... Disabled. L 1......... For an active picture. L 2......... For a still picture. Film...... For watching a film.
Video Input Screen Setting This projector has the picture screen resize function, which enables you to customize the image size. 1 Press the MENU button to display the On-Screen Menu. Use the Point ▲▼ buttons to select Screen and then press the Point ► button or the SELECT button. the Point ▲▼ buttons to select the 2 Use desired item and then press the SELECT button. Normal Provide the image to fit the screen size while maintaining the aspect ratio of the input signal.
Video Input Keystone This function is used to adjust keystone distortion of the projected image. Use the Point ▲▼ buttons to choose the item you want to adjust. Keystone To correct keystone distortion, press the SELECT button. Keystone appears on the screen. Use the Point ▲▼ buttons to correct keystone distortion (p. 23). Store To store or reset the keystone correction, press the Point ► button. Store........... Keep the keystone correction even when the AC power cord is unplugged. Reset...........
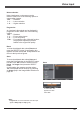
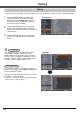
Setting Setting This projector has a Setting menu that allows you to set up the other various functions described below. 1 Press the MENU button to display the On-Screen Menu. Press the Point ▲▼ buttons to select Setting and press the Point ► button or the SELECT button to access the submenu items. 2 Use the Point ▲▼ buttons to select the desired item and then press the Point ► button or the SELECT button to access the selected item.
Setting Auto setup This function enables Input search, Auto PC adj. and Auto Keystone adjustment by pressing the AUTO SETUP button on the top control or the AUTO SET button on the remote control. Settings for those functions can be altered as follows: Input search This function detects the input signal automatically. When a signal is found, the search will stop. Use the Point ▲▼ buttons to select one of the following options. Off........ Input search does not work. On 1.....
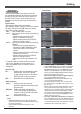
Setting Background Select the background screen for when no input signal is detected. Press the Point ▲▼ buttons to switch between each option. Blue........Project a blue background. User........Project an image captured in the Logo setting. Black......Project a black background. Display This function decides whether to display On-Screen Displays. On......................... Show all the On-Screen displays. Use this function when you want to project images after the lamp becomes bright enough.
Setting Capture This function enables you to capture an image being projected to use it for a starting-up display or interval of presentations. Capture Select Capture and press the SELECT button. A confirmation box appears and select Yes to capture the projected image. After capturing the projected image, go to the Logo select function and set it to User. Then the captured image will be displayed the next time you turn on the projector or when you press the NO SHOW button (p. 26).
Setting Enter a Logo PIN code Use the Point ▲▼ buttons to enter a number. Press the Point ◄► buttons to fix the number and move the red frame pointer to the next box. The number changes to . If you fixed an incorrect number, use the Point ◄► buttons to move the pointer to the number you want to correct, and then enter the correct number. Repeat this step to complete entering a four-digit number. After entering the four-digit number, move the pointer to Set.
Setting HDMI setup This function is only used for HDMI input source. HDMI setup Image Select Normal or Enhanced to match the video range setting of your HDMI Digital RGB equipment. Sound HDMI: When using the HDMI cable, select HDMI. Both video and audio are transferred and you need not to connect any additional cables for audio. Computer 2: When using the DVI-HDMI cable, select Computer 2 and connect the audio cable to COMPUTER IN 2 termimal.
Setting Picture in Picture This function is used to project two images simultaneously by placing a separate small sub screen within or next to the main screen. Use the Point ▲▼ buttons to select Picture in Picture and then press the SELECT button or the Point ► button to access the submenu. Only the sound from the source of Main picture is valid, while the source of Sub picture cannot output the sound.
Setting Power management For reducing power consumption as well as maintaining the lamp life, the Power management function turns off the projection lamp when the projector is not operated for a certain period. Select one of the following options: Ready............ When the lamp has been fully cooled down, the POWER indicator changes to green blinking. In this condition, the projection lamp will be turned on if the input signal is reconnected or any button on the top control or remote control is pressed.
Setting Standby mode This function is available when operating the projector via network. Network... Supply the power to the network function even after turning off the projector by pressing the ON/ STAND-BY button on the remote control. You can turn on/off the projector via network, modify network environment, and receive an e-mail about projector status while the projector is powered off. Eco.......... Select Eco when you do not use the projector via network.
Setting Closed caption Closed Caption is a function that displays the audio portion of a TV program as text on the screen. You can turn on the feature and switch the channels. If the input signal contains closed captions, you can turn on the feature and switch the channels. Press the Point ▲▼ buttons to select Off, CC1, CC2, CC3 or CC4. If the Closed caption is not clear, you can change the text from Color to White.
Setting Lamp control Lamp control This function allows you to change brightness of the screen. Lamo control Auto..... Brightness according to the input signal. The lamp power output is Normal.. maximum. The lamp power output is 70% of the Eco 1.... Normal mode. The lamp power output is 53% of the Eco 2.... Normal mode. Lamp life control Select the lamp operation when the total lighting time of a lamp exceeds the recommended total hours of use. Mode 1........
Setting Security (Key lock and PIN code lock) This function allows you to use the Key lock and PIN code lock function to set the security for the projector operation. Key lock This function locks the top control and remote control buttons to prevent operation by unauthorized persons. Select Key lock and then press the SELECT button and select the desired item by pressing the Point ▲▼ buttons. Key lock . ............ Unlocked. . ........... .Lock the operation of the top control.
Setting Enter a PIN code Use the Point ▲▼ buttons to enter a number. Press the Point ◄ ► buttons to fix the number and move the red frame pointer to the next box. The number changes to . If you fixed an incorrect number, use the Point ◄ ► buttons to move the pointer to the number you want to correct, and then enter the correct number. Repeat this step to complete entering a four-digit number. After entering the four-digit number, move the pointer to Set.
Setting Fan control Choose the running speed of cooling fans from the following options according to the ground elevation under which you use the projector. Off................ Normal speed. Set this function to Off when using the projector in non- high altitude environment. On 1............. Faster than Off mode. Select this mode when using the projector in high altitudes (about 1,200 meters or more above the sea level) where the fans have less cooling effect. On 2............. Faster than On 1 mode.
Setting Total power savings This function displays the saved amount of power and the exhausted CO2 of the projector. Total power savings Total power savings......Show the total accumulated power savings of the projector and display the total amount of CO2 exhausted from the projector. Reset.........Reset the figures of the total power savings and the exhausted CO2. Warning log This function records anomalous operations while the projector is in operation and use it when diagnosing faults.
Information Input Source Information Display The Information Menu is used for checking the status of the image signal being projected and the operation of the projector. Direct Operation The information menu changes each time you press the INFO. button on the remote controller as follows. page 1/2 page 2/2 hide page 1/2 • • • • While the information menu is displayed, press the Point ◄ ► buttons to display the previous or next page. Remote control INFO.
Maintenance and Cleaning WARNING indicator The WARNING indicator shows the state of the function which protects the projector. Check the state of the WARNING indicator and the POWER indicator to take proper maintenance. The projector is shut down and the WARNING indicator is blinking red. When the temperature inside the projector reaches a certain level, the projector will be automatically shut down to protect the inside of the projector.
Maintenance and Cleaning Replacing the Filters Filter prevents dust from accumulating on the optical elements inside the projector. Should the filter become clogged with dust particles, it will reduce cooling fans’ effectiveness and may result in internal heat buildup and adversely affect the life of the projector. If a “Filter warning” icon appears on the screen, replace the filters immediately. Replace the filters by following the steps below.
Maintenance and Cleaning Attaching the Lens Cap When moving this projector or while not using it over an extended period of time, attach the lens cap. Attach the lens cap according to the following procedures. the string through the hole on the 1 Thread lens cap and then tie a knot in the string to secure it in place. 2 To pass the other end of the string into the hole on the bottom of the projector and pull at it. Cleaning the Projection Lens Unplug the AC power cord before cleaning.
Maintenance and Cleaning Lamp Replacement When the projection lamp of the projector reaches its end of life, the Lamp replacement icon appears on the screen and LAMP REPLACE indicator lights yellow. Replace the lamp with a new one promptly. The timing when the LAMP REPLACE indicator should light is depending on the lamp mode. Top Control LAMP REPLACE indicator Lamp replacement icon Note: • The Lamp replacement icon will not appear when the Display function is set to Off (p.46), during Freeze (p.
Maintenance and Cleaning ORDER REPLACEMENT LAMP Replacement lamp can be ordered through your dealer. When ordering a projection lamp, give the following information to the dealer. ● Model No. of your projector : LC-WB200A ● Replacement Lamp Type No.: POA-LMP148 (Service Parts No. 610 352 7949) CAUTION LAMP HANDLING PRECAUTIONS This projector uses a high-pressure lamp which must be handled carefully and properly. Improper handling may result in accidents, injury, or create a fire hazard.
Appendix Indicators and Projector Condition Check the indicators for projector condition. Indicators POWER LAMP WARNING REPLACE red/ red green yellow Projector Condition The projector is off. (The AC power cord is unplugged.) The projector is in stand-by mode. Press the ON/STAND-BY button to turn on the projector. The projector is operating normally. The projector is preparing for stand-by or the projection lamp is being cooled down.
Appendix Technical Specifications Mechanical Information Projector Type Dimensions (W x H x D) Multi-media Projector 13.78" x 3.44" x 10.02" (350.0 mm X 87.5 mm X 254.4 mm ) (Not including protrusions) Net Weight 7.51 lbs (3.4 kg) Feet Adjustment 0˚ to 12˚ Panel Resolution LCD Panel System 0.59" TFT Active Matrix type, 3 panels Panel Resolution 1,280 x 800 dots Number of Pixels 3,072,000 (1,280 x 800 x 3 panels) Signal Compatibility Color System PAL, SECAM, NTSC, NTSC4.
Appendix Dimensions Unit: mm(inch) Screw Holes for Ceiling Mount Screw: M4 Depth: 12.0(0.47) 216.5 (8.52) 208.0 (8.19) 86.0 (3.38) 57.9 (2.28) 73.6 (2.90) 93.2 (3.67) 133.1 (5.24) 115.3 (4.54) 185.2 (7.29) 142.0 (5.59) 45.1 (1.78) 42.1 (1.66) 47.0 (1.85) 60.0 (2.36) 74.1 (2.92) 81.1 (3.19) 209.0 (8.23) 42.0 (1.65) 40.4 (1.59) 78.0 (3.07) 57.4 (2.26) 240.0 (9.45) 39.1 (1.54) 52.3 (2.06) 276.9 (10.90) 76.9 (3.03) 212.4 (8.36) 121.5 (4.78) 254.4 (10.02) 46.2 (1.28) 67.9 (2.67) 64.0 (2.