
Owner's Manual


Instructions for Installation
of
Safety
Bracket
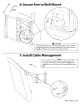
Step
1:
Tighten Main
Support
Nut
Identify Safety Bracket as shown below. Extend
TV
away from wall and tilt it down. Using Safety Bracket as a wrench,
tighten Main Support Nut
by
turning clockwise. Threaded Shaft should be visible above the
Nut
as shown in Detailed View
of
Diagram
1.
Do
not over-tighten. Adjust Main Support
Nut
until one edge is parallel with the
TV.
Caution:
Turning
counterclockwise
will
loosen
Main
Support
Nut
and
may
cause
TV
to
fall,
resulting
in
property
damage
or
personal
injury.
If
you
have
any
doubts
or
questions
in
regards
to
this
installation,
please
call
Sanus
or
a
qualified
installation
professional.
Diagram 1
Safety
Bracket
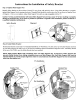
Step 2: Install Safety Bracket
Slide Safety Bracket around and over Threaded Shaft Block
of
Wall Mount. The hole in the top
of
Safety Bracket must line
up with Main Support
Nut
and fit over it. See the Pre Installation and Post Installation Diagrams below.
Add
Safety Sticker
to the arm
of
the
VMSA
once the Safety Bracket has been installed.
NOTE: Safety
Bracket
MUST
slide
completely
down
over
Main
Support
Nut.
If
alignment
of
Main
Support
Nut
prevents
Safety
Bracket
from
sliding
completely
down
over
Main
Support
Nut,
then
Main
Support
Nut
must
be
adjusted
slightly
to
provide
proper
alignment.
Under
no
circumstances
should
Main
Support
Nut
ever
be
loosened
more
than
one-quarter
turn.
Pre
Installation
Detailed View