USER GUIDE SanDisk Connect™ Wireless Stick for iPhone, iPad Color may vary Model: SDWS4 951 SanDisk Drive, Milpitas, CA 95035 ©2015 SanDisk Corporation.
IntroducGon GeIng Started • ConnecGng to iPhone/iPad • Charging Wireless SGck • LED Indicator ApplicaGon • Overview • File Management • Internet ConnecGvity • Camera Roll Backup • Photos • Videos • Music • Documents • Sharing & Social Network • Cast to TV (Google Chromecast, Amazon Fire TV, Apple TV) • Open Files in Other ApplicaGons • Contact Management • WebDAV Personalize your Drive • Wi-Fi Security • Power Saving • Wi-Fi ConnecGon Name • ReformaIng Wireless SGck • About the Device • Firmware Update T
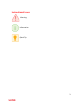
Instructional Icons Warning Information Quick Tip 3
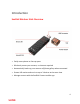
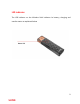
Introduction SanDisk Wireless Stick Overview • Easily move photos to free up space • Wirelessly access your content, no Internet required • Automatically backs up your camera roll/photo gallery when connected • Stream HD movies and music to up to 3 devices at the same time • Manage content with the SanDisk Connect mobile app 4
Works With • USB 2.0 connection interface or higher • Wi-Fi 802.11 b/g/n 2.4Ghz capable device • iPhone/iPad/iPod Touch: iOS version 8.0 or higher • Other Wi-Fi® enabled devices: a web browser, WebDAV client • PC or Mac: Windows® 10, Windows® 8, Windows 7, Windows Vista®, or Mac OS 10.
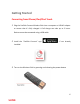
Getting Started Connecting from iPhone/iPad/iPod Touch 1 Plug the SanDisk Connect Wireless Stick into a computer or USB-AC adaptor to ensure that it’s fully charged. A full charge can take up to 2 hours. Device cannot be connected using a USB cable. 2 Install the “SanDisk Connect” app , if not already installed.
4 Connect to Wireless Stick Wi-Fi network “SanDisk Connect ######” a. ###### will be a unique identifier for your specific unit. b. Connect to the Wireless Stick Wi-Fi network through the device settings i. Click on the Settings icon ii. Click on Wi-Fi iii. Select “SanDisk Connect ######” iv. When connected a check mark will appear next to the device/network name 5 Launch the “SanDisk Connect” mobile app.
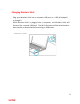
Charging Wireless Stick Plug your Wireless Stick into a computer USB port or a USB AC adaptor* to charge it. While Wireless Stick is plugged into a computer, the Wireless Stick will function like a normal USB drive. The Wi-Fi functions will be limited and no data transfer is allowed while functioning in USB mode.
LED Indicator The LED indicator on the Wireless Stick indicates its battery, charging and transfer status as explained below 9
Wireless Stick Status LED Status Device on White blinking Wi-Fi data Transfer White rapid blinking Battery charging Amber solid Low battery warning Red blinking Firmware update Color cycling 10
Application Application overview SanDisk Connect app is the companion to your Wireless Stick. Its major functions: 1. Add photos/videos from the camera roll to the Wireless Stick with the ‘+’ button. 2. Access other functions such as Auto-backup, “My Downloads”, settings and transfer contacts through the menu icon in the top left corner.
File Management Use your Wireless Stick to transfer and manage files between your devices. SanDisk Connect mobile app is required to transfer files to/from iPhone, iPad, & iPod Touch. Transfer photos and videos (camera roll) from your device to the Wireless Stick 1 Use the SanDisk Connect mobile app to access your Wireless Stick. 2 Select the add file button “+”. 3 When prompted to “select files”, choose the photos and videos you want to transfer from your device to the Wireless Stick.
Transfer files from Wireless Stick to your device 1 Use the SanDisk Connect mobile app to access your Wireless Stick. 2 Press “Select” button to choose the files from the Wireless Stick. 3 Press at the bottom of the screen. 4 Choose “Save to My Downloads” or, if you’re copying iOS-supported photos and videos only, choose “Save Images/Videos” to save them to the Camera Roll. A list of supported video, music, and photo formats is listed in the respective Video, Music, and Photo sections of this manual.
2 Drag and drop music, videos, photos, and documents between your computer and the Wireless Stick. Transfer files between Mac computer and Wireless Stick To transfer content between your Wireless Stick and Mac computer: 1 Plug your Wireless Stick into your Mac computer’s USB port. 2 Drag and drop music, videos, photos, and documents between your MAC and your Wireless Stick. The default device name will appear as “NO NAME”. You can rename the device for easier identification.
Transfer files between Wireless Stick and a device using a web browser You can transfer files between Wireless Stick and any device with a web browser. This could be useful when a mobile app is not available for a specific platform or it is not possible to install the mobile app on shared devices. For computers this will allow multiple devices to connect wirelessly via a browser instead of a direct USB connection. Not all features available in the mobile app are available via the web browser.
2 Enter www.sandisk.com/myconnect in your web browser 3 You can now browse & download files within the browser Some browsers will automatically try to connect via HTTPS. If you see an HTTPS error, please connect via HTTP. Delete files with the App 1 Use the SanDisk Connect mobile app to access your Wireless Stick. 2 Press “Select” and choose the files you’d like to delete from the Wireless Stick. 3 Press at the bottom of the screen.
You can swipe left on a file icon in list view and choose “delete” to easily remove individual files. Search within the App 1 Use the SanDisk Connect mobile app to access your Wireless Stick. 2 In the file view, pull down the screen to reveal the “Search ‘File Name’ input field. 3 You will see a search box appear at the top. Enter the file name you would like to find. 4 You’ll see search results appear for any matching files.
Internet Connectivity We understand how important it is for you to stay connected to Internet. Wireless Stick provides two options for your mobile device (phone/tablet) that will allow you to maintain an Internet connection while simultaneously connecting to the Wireless Stick: Mobile Internet (LTE/4G) or a local Wi-Fi network. Using mobile Internet By default, the Wireless Stick will connect to the Internet via mobile Internet (LTE/4G).
1 Use the SanDisk Connect mobile app to access your Wireless Stick. 2 In the app, choose Menu àInternet Connection à Connect the drive to a Wi-Fi network 3 Choose your preferred network and hit OK. 4 The LED on the Wireless Stick will double blink to indicate the device is connected to another Wi-Fi network. It is recommended that you reset your Wireless Stick when the application informs you to do so. For some networks, it is recommended to close and restart your mobile application.
Camera Roll Backup You can back up your camera roll to the Wireless Stick by setting up auto-sync or manually syncing as needed. Automatic Backup Set-up once and transfer your camera roll to the Wireless Stick automatically each time the device is connected. To set-up: 1 Use the SanDisk Connect mobile app to access your Wireless Stick. 2 On the app, go to Menu àCamera Roll Backup.
Manual Backup Backup your camera roll with the Wireless Stick as needed using the manual Backup Now option. To backup: 1 Use the SanDisk Connect mobile app to access your Wireless Stick. 2 Go to Menu àCamera Roll Backup. 3 To change the destination of the backed up photos and videos, select the “Destination” option and select your desired location. The default destination is “Camera Roll Backup” 4 Select “Backup Now”.
Photos Supported file formats BMP, TIF, TIFF, JPG, PNG, XBM, ICO, TGA View 1 Use the SanDisk Connect mobile app to access your Wireless Stick. 2 The contents of the Wireless Stick will appear. Browse to the folder containing your photos. 3 Tap the photo you’d like to view. 4 You can view other photos in the same folder by swiping left or right. Slideshow 1 Use the SanDisk Connect mobile app to access your Wireless Stick. 2 Browse to the folder containing your photos.
5 Slideshow settings can be changed through the settings option on the same screen. There are options for the transition type and the time duration for each photo. You can also transfer files directly from the Camera Roll to your Wireless Stick without having to open the SanDisk Connect app. The SanDisk Connect app does need to be installed.
Select the file(s), up to 10 at a time in the Camera Roll. Then click the Share icon on the bottom left. A list of applications will appear which you can send the selected media to. Click on the Connect Drive icon. A file tree will appear which allows the files to be placed in the proper folder.
Playback 1 Use the SanDisk Connect mobile app to access your Wireless Stick. 2 The contents of the Wireless Stick will appear. Browse to the folder containing your videos. 3 Tap the video you want to play. 4 You can play other videos in the same folder by swiping left or right. Some DRM-protected content cannot be streamed. Check with the content provider for playback restrictions. Up to three users can stream videos from the Wireless Stick at one time.
2 The contents of the Wireless Stick will appear. Browse to the folder containing your music. 3 Tap the song you want to play. 4 You can play the other songs in the same folder by swiping left or right. Playback supports music purchased from iTunes. Some DRM-protected content is not supported. Check with the content provider for playback restrictions. Multiple clients can stream music at the same time. Users can stream the same or different music files at the same time.
Documents Supported file formats DOC, DOCX, XLS, XLSX, PPT, PPTX, PDF Viewing 1. Use the SanDisk Connect mobile app to access your Wireless Stick. 2. The contents of the drive will appear. Browse to the folder containing your documents. 3. Tap the document you want to view.
The SanDisk Connect mobile app supports viewing of documents only. You may be able to use the iOS “Open In” function to open these file types in other apps for additional functionality. The file may need to be saved to your device in order to open in another application. Sharing & Social Network You can share files from your Wireless Stick in many ways including Facebook, Twitter and others from within the app. How to share 1 Use the SanDisk Connect mobile app to access your Wireless Stick.
Cast to TV Display the content on your Wireless Stick on larger displays such as your TV or computer monitor via Google Chromecast, Amazon Fire TV, and Apple TV. How to share media on Apple TV 1 Ensure the Wireless Stick, Apple TV, and your phone/tablet are all on the same Wi-Fi network. See Internet Connectivity for more details on connecting your Wireless Stick to an existing Wi-Fi network. 2 On your phone/tablet, swipe up from the bottom to display the iOS status menu. Click on AirPlay.
3 Go back to the Connect mobile app and select your photo or video to share. Your media should now appear on your Apple TV. The phone/tablet will have the following message letting you know the media is being shared.
How to share media on Amazon Fire TV or Google Chromecast 1 Ensure the Wireless Stick, Amazon Fire TV or Google Chromecast, and your phone/tablet are all on the same Wi-Fi network. See Internet Connectivity for more details on connecting your Wireless Stick to an existing Wi-Fi network. 2 Open the Connect mobile app. You should see a message that an Amazon Fire TV was detected. You will not see a message for Google Chromecast.
3 In the Connect mobile app, you will see a Devices Available message and button when you select a media file. Click on that message. A list of devices will appear. Select the device you would like to receive your cast.
4 If the content is a video, it will fling to the Amazon Fire TV or Google Chromecast. You will see a message similar to the below. If the content is a photo, the photo will be visible on both the phone/tablet and Amazon Fire TV or Google Chromecast. Swipe right and left on the phone/tablet to switch photos.
Open Files in Other Applications You can open files in other applications. How to share 1. Use the SanDisk Connect mobile app to access your Wireless Stick. 2. From the folder view, left swipe the file to display the menu button. Click on menu button. 3. Click on “Open in…” 4. Select the application you would like to open the file with. The file will download to your device and open in the selected application. Not all applications support the Apple “Open in…” function.
Contact Management Create a backup contact file and restore it when needed. This is particularly valuable when migrating your contacts to a new iPhone. Backup 1 Use the SanDisk Connect mobile app to access your Wireless Stick. 2 Go to Menu à Settings à Contacts àBackup 3 Select the contacts to back up. 4 Select “Backup”. Restore 1 Use the SanDisk Connect mobile app to access your Wireless Stick. 2 Go to Menu à Settings à Contacts àRestore 3 Choose the backup file you’d like to restore. 4 Select “Restore”.
WebDAV Web Distributed Authoring and Versioning (WebDAV) is an extension of Hypertext Transfer Protocol (HTTP) that allows clients to perform remote Web content authoring operations such as file management. The Wireless Stick supports WebDAV as a file transfer protocol. Since WebDAV is an open protocol, many WebDAV client (iOS, Android, Windows, Mac, etc) will work. You will need to be on the same Wi-Fi network as the Wireless Stick. See the previous sections on how to connect to your Wireless Stick.
Open any WebDAV client such as WebDAV NAV. Enter the Wireless Stick IP address as the Server URL. No authentication is required. Once connection is established all the files from the Wireless Stick as visible and available for download. Some WebDAV client functions will not be compatible with the Wireless Stick.
Personalize your Wireless Stick Wi-Fi Security You can secure the Wi-Fi connection enabled by your drive with a password and restrict the access. 1 Use the SanDisk Connect mobile app to access your Wireless Stick. 2 Go to Menu à Settings à Set Password to Drive 3 Enable “Security” by sliding the controller to the right 4 Choose and confirm the password of your choice. Any future Wi-Fi connection request will require this password.
Wi-Fi Connection Name You can choose a name for your drive to make it easier to identify the Wireless Stick 1 Use the SanDisk Connect mobile app to access your Wireless Stick. 2 Go to Menu à Settings à Change Drive Name 3 In the text box, name the drive and hit OK. Reformatting Wireless Stick 1 Connect the drive to a PC/Mac computer through the USB connector. 2 Format the drive as a regular USB flash drive. The 64GB and higher capacity drive can be formatted as exFAT.
About the Device 1 Use the SanDisk Connect mobile app to access your Wireless Stick. 2 Go to Menu à Settings à About 3 Under the About section, you can see a. Current app version b. Wireless Stick firmware version c. MAC Address of the Wireless Stick d. SanDisk Privacy Statement e. Legal terms and licensing conditions Firmware Update SanDisk continuously improves our user experience with bug fixes and enhancements. The SanDisk Connect mobile app may notify you that a new firmware is available.
Troubleshooting & Support Hardware Reset To reset settings to factory default values: while the Wireless Stick is off, press and hold the power button down for about 15 seconds until the LED flashes red and green (will turn white again). The device name, password, power save time, and Internet Connectivity settings will all be reset to default values. This reset will not change the firmware version. The content on the device will remain the same. In-app Support Go to Menu àHelp.
Technical Specifications Form Factor: USB flash drive Memory/Storage: embedded flash memory, not user removable (available capacities: 16 GB, 32 GB, 64 GB, 128 GB, and 200 GB1) Battery Type: Built-in, non-replaceable rechargeable lithium polymer battery Operating Duration: Up to 4.5 hours of continuous usage2 Battery Charging: Over USB 2.
Operating relative humidity: 5% to 95% non-condensing Maximum operating altitude: 10,000 feet (3,048m) Maximum File Size: <4GB (16 GB, 32 GB versions), limited only by capacity (64 GB, 128 GB versions) Dimensions: 3.03” x 0.75” x 0.43” (77mm x 19mm x 11mm) Weight: 21.76g (0.77oz) Regulatory Statement FCC Compliance Statement: This device complies with Part 15 of the FCC Rules.
• Reorient or relocate the receiving antenna. • Increase the separation between the equipment and receiver. • Connect the equipment to a different outlet so that the equipment and receiver are on different branch circuits. • Consult the dealer or an experienced radio/TV technician for help. Important: Changes or modifications to this product not authorized by SanDisk could void the electromagnetic compatibility (EMC) and wireless compliance and negate your authority to operate the product.
Le présent appareil est conforme aux CNR d'Industrie Canada applicables aux appareils radio exempts de licence. L'exploitation est autorisée aux deux conditions suivantes : (1) l'appareil ne doit pas produire de brouillage, et (2) l'utilisateur de l'appareil doit accepter tout brouillage radioélectrique subi, même si le brouillage est susceptible d'en compromettre le fonctionnement.
Brazil Este equipamento opera em caráter secundário, isto é, não tem direito a proteção contra interferência rejudicial, mesmo de estações do mesmo tipo, e não pode causar interferência a sistemas operando em caráter primário Hong Kong Indonesia 41671/SDPPI/2015 5190 47
Israel 51050156 אישור תאמה .
Malaysia Saudi Arabia Complies with the CITC Technical Specification CITC Certification Number TA 03112015-03112016-11858 Thailand Vietnam 49
Safety and Care All wireless devices are susceptible to interference, which might affect the performance of a Wireless Stick. Do not switch on a Wireless Stick in restricted areas or areas where wireless devices are prohibited. When instructed to do so, switch off the Wireless Stick in restricted areas such as those near medical equipment, fuel/chemicals, or blasting areas, or when instructed to in aircraft. The Wireless Stick contains a lithium polymer battery that has been fully tested for safety.
The Wireless Stick is not water resistant. Do not store a Wireless Stick in extreme temperatures. High temperatures can shorten the life of the device by damaging the battery or cause warping or melting of the plastic enclosure. Cold temperatures can also shorten the life of the Wireless Stick by damaging the battery, causing plastic enclouse to crack, or causing moisture to condense on or inside the device. Keep the Wireless Stick dry. Water or other liquids can damage it.
Cleaning Before cleaning a Wireless Stick, disconnect it from any USB port and turn off device. If the outside of the Wireless Stick is soiled, use a cloth that has been slightly dampened with water to clean the outside. Do not allow water to enter the Wireless Stick around the power button or USB connector.
Maintenance and Storage The Wireless Stick contains a lithium polymer battery that needs proper care for best usage. Note that while the lithium polymer battery does not have any memory effect, proper case is required for the best usage Standard Maintenance For proper maintenance of the battery, it is best to periodically let the Wireless Stick discharge. We do not recommend keeping the Wireless Stick plugged in.
When the Wireless Stick has reached the end of its useful life, return it to a recycling station in your community to prevent uncontrolled waste disposal and dispose of the battery properly. SanDisk is a trademark of SanDisk Corporation, registered in the United States and other countries. SanDisk Connect is a trademark of SanDisk Corporation. Apple, the Apple logo, iPhone, iPad, iPod Touch and Mac are trademarks of Apple Inc., registered in the U.S. and other countries.