SanDisk Connect™ Wireless Flash Drive USER MANUAL (For Use with Android™ Mobile Devices)
SanDisk is a trademark of SanDisk Corporation, registered in the United States and other countries. SanDisk Connect is a trademark of SanDisk Corporation. microSDHC is a trademark of SD-3C, LLC. Android is a trademark of Google Inc. Wi-Fi is a registered trademark of the Wi-Fi Alliance. All other trademarks are the property of their respective owners. ©2013 SanDisk Corporation. All rights reserved.
Contents 1. Introduction . . . . . . . . . . . . . . . . . . . . . . . . . . . . . . . . . . . . . . . 1 Wireless Flash Drive Overview . . . . . . . . . . . . . . . . . . . . . . . . . . . . . . 1 Features . . . . . . . . . . . . . . . . . . . . . . . . . . . . . . . . . . . . . . . . . . . . . . . 1 System Requirements . . . . . . . . . . . . . . . . . . . . . . . . . . . . . . . . . . . . .1 Supported File Formats . . . . . . . . . . . . . . . . . . . . . . . . . . . . . . . . . . .
Viewing Photos . . . . . . . . . . . . . . . . . . . . . . . . . . . . . . . . . . . . . . . . .17 Streaming Videos . . . . . . . . . . . . . . . . . . . . . . . . . . . . . . . . . . . . . . . .18 Playing Music . . . . . . . . . . . . . . . . . . . . . . . . . . . . . . . . . . . . . . . . . . .20 Playing Music in the Background While Outside the App . . . . . . 20 Moving Files . . . . . . . . . . . . . . . . . . . . . . . . . . . . . . . . . . . . . . . . . . . .21 Downloading Files . . . . . . . . . . .
Getting Support . . . . . . . . . . . . . . . . . . . . . . . . . . . . . . . . . . . . . . 49 Quick Start Guide . . . . . . . . . . . . . . . . . . . . . . . . . . . . . . . . . 49 About . . . . . . . . . . . . . . . . . . . . . . . . . . . . . . . . . . . . . . . . . . . 50 5. Product and Safety Information . . . . . . . . . . . . . . . . . . . . . . . 51 Product Specifications . . . . . . . . . . . . . . . . . . . . . . . . . . . . . . . . . . . .51 Regulatory Information . . . . . . . . . . . . . . . .
1. Introduction 1. Wireless Flash Drive Overview Introduction Wireless Flash Drive Overview The SanDisk Connect™ Wireless Flash Drive stores, shares, and streams digital content wirelessly across multiple mobile devices. Features • Share files with others. The Wireless Drive creates its own wireless network. Up to eight mobile devices can be wirelessly connected and access files on the Drive at the same time. • Stay connected to the Internet while accessing content from the Wireless Drive.
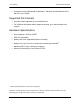
1. Introduction • Supported File Formats Computers running Windows® 8, Windows 7, Windows Vista®, Windows XP or Mac OS 10.6 or higher Supported File Formats • Any file formats supported by your mobile device • For additional information about supported formats, go to www.sandisk.com/ support Hardware Specifications 1 • Drive Capacity: 16 GB or 32 GB1 • USB: 2.
2. Getting Started 2. Charging the Wireless Drive Getting Started Charging the Wireless Drive Although the Wireless Drive is shipped with a charged battery, we urge you to fully charge the Drive before you begin to use it. (This can take up to two hours.) • Plug your Wireless Drive into a computer USB port or a USB AC adaptor to charge it: Note: Although the Wireless Drive cannot be used wirelessly while it’s plugged into a computer USB port, it can be used as a normal flash drive.
2.
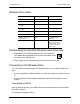
2. Getting Started Connecting to the Wireless Drive 1. Tap the Wireless Flash Drive app icon on your mobile device to open the Wireless Drive start screen: Wi-Fi detected Your mobile device searches for your Wireless Drive Wi-Fi network. The Wi-Fi icon indicates that your Wireless Drive Wi-Fi has been detected. 2. When your Drive name appears below Wireless Flash Drives, tap it to connect to the Drive.
2. Getting Started Connecting to the Wireless Drive An Internet Connection window opens: The connection window provides information about how to remain connected to the Internet while using your Drive by setting up a Preferred Network. After you’ve read and understood the information provided here, you can choose not to see this message again. You can connect directly to your Drive without using this screen.
2. Getting Started Connecting to the Wireless Drive You see the Wireless Drive main screen: Note: For information about enabling Internet access while using your Drive, see Chapter 4, Managing Your Drive. Accessing the Drive without an App You can connect to the Wireless Drive Wi-Fi network on your mobile device, PC, or Mac without downloading the Wireless Flash Drive app by using a web browser to access the Drive. 1. In your mobile device Wi-Fi settings, connect to the Wireless Drive Wi-Fi network.
2. Getting Started Loading Content on the Wireless Drive 2. Launch an Internet browser and go to www.sandisk.com/wfd to connect to the Wireless Drive: Loading Content on the Wireless Drive You can load content in two ways: • Plug your Wireless Drive into your computer, then drag and drop content onto it. • Transfer content via Wi-Fi from a mobile device to your Wireless Drive.
2. Getting Started Loading Content on the Wireless Drive From a PC You can transfer content between your Wireless Drive and your PC using a USB connection. 1. Plug your Wireless Drive into your computer USB port. 2. In the AutoPlay window, click Open folder to view files: 3. Drag and drop music, videos, photos, and documents from your computer into the Wireless Drive window.
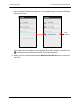
2. Getting Started Loading Content on the Wireless Drive To upload files, photos, or videos from the Phone Gallery, 1. On the Wireless Drive start screen, tap Downloads or Phone Gallery to navigate to the files you want to upload: 2. On the screen displaying the files to be uploaded, tap the Upload icon and select the desired files (the selected files are outlined in blue).
2. Getting Started Loading Content on the Wireless Drive 3. An Upload Complete window confirms a successful upload and informs you that the uploaded files can be found in the Uploaded from Android folder on your Drive: Note: For more detailed information on using photo, music, and video files, see Chapter 3, Working with Files.
3. Working with Files 3. Wireless Drive Application Overview Working with Files Wireless Drive Application Overview The Wireless Drive app start screen provides access to files stored on both your Wireless Flash Drive and your mobile device. It also contains a Help link.
3. Working with Files Wireless Drive Application Overview Wireless Drive Main Screen Location Bar Download icon Files stored on Drive App menu Note: The folders shown in these images illustrate just one of the ways you can choose to organize and display the photo, video, music, and document files stored on your Wireless Drive.
3.
3.
3. Working with Files Toggling between List View and Grid View 1. On the Wireless Drive start screen, tap the location of the desired content: 2. Navigate to the desired file and tap it to open it in the Wireless Drive app. Toggling between List View and Grid View You can view the files and folders on any Wireless Drive app screen in either list view or grid view.
3. Working with Files • Viewing Photos Tap the mobile device Menu button to display the Wireless Drive app menu and toggle between a list view and a grid view of your content: Viewing Photos You can use the Wireless Drive app to view photos stored on the Drive or in the Downloads or Gallery folders on your mobile device. 1. Navigate to the photos you want to view.
3. Working with Files Streaming Videos 2. Tap a photo to display a full-screen image: 3. Tap the photo to display the photo controls: Streaming Videos You can use the Wireless Drive app to stream videos stored on the Drive or in the Downloads or Gallery folders on your mobile device.
3. Working with Files Streaming Videos 1. Navigate to the video you want to stream, tap on it, and select a video player with which to stream it: 2.
3. Working with Files Playing Music If you tap Picture-in-Picture, the video continues to stream in a small window when you leave the video Play screen and move around in the Wireless Drive app or exit the app and use your mobile device. 3. Tap the video window to return to the video Play screen and stop the video or watch it on the full screen. Playing Music You can use the Wireless Drive app to play music stored on your Wireless Drive or in the Downloads or Gallery folders on your mobile device. 1.
3. Working with Files Moving Files 3. You can return to the music Play screen and change or stop the music playing in the background in either of two ways: • Tap the Wireless Flash Drive icon on your mobile device Apps screen. — OR — • Pull down the Android notification drawer and tap the Wireless Flash entry under Ongoing: You’re returned to the music Play screen in the Wireless Drive app. Moving Files Files can be moved in three ways: • Download files from your Wireless Drive to a mobile device.
3. Working with Files Moving Files 1.
3. Working with Files Moving Files Uploading Files When you upload files from a mobile device to your Wireless Drive, you can choose an existing destination (folder or album) to upload to or you can create a new folder on the Drive and upload files into it. You can upload files stored on your mobile device in two ways: • Access the contents of your Downloads folder or mobile device Gallery from the Wireless Drive start screen. • Go directly to content stored in other locations on your mobile device.
3. Working with Files Moving Files 2. Enter a name for the new folder and tap Create: The new folder is displayed on the screen from which you created it. Uploading Files from the Phone Gallery or Downloads Folder 1.
3. Working with Files Moving Files 2. On the screen displaying the files to be uploaded, tap your mobile device Menu button to display the Upload icon , tap the icon, and select the files for upload (the selected files are outlined in blue): 3. Again tap the mobile device Menu button, then tap the Upload icon, which is now green : 4.
3. Working with Files Moving Files the uploaded files can be found in the Uploaded from Android folder on your Drive: Uploading Files from Other Locations on the Mobile Device 1. On your mobile device, navigate to the file you want to upload. 2.
3. Working with Files Moving Files Sharing Files In addition to handing someone your Wireless Drive to plug into a computer USB port, you can share files stored on your Drive in two ways: • Allow others Wi-Fi access to your Wireless Drive so they can use their mobile devices to connect to the files on your Drive. • Send files to others via email, social media, messaging, or Bluetooth. The methods available vary depending upon the features provided on your mobile device.
3. Working with Files Deleting Files 1. Browse to the file you want to share, long press on the file to display the file options, and tap Share: 2. Select a method to share your file and provide the required information. (The options available on your mobile device vary.) Deleting Files You can delete individual files or you can delete an entire folder at one time.
3. Working with Files Deleting Files Deleting a File 1. Open the screen containing the file you want to delete, long press on the file to display the file options, and tap Delete file: 2.
3. Working with Files Deleting Files Deleting a Folder 1. Long press on a folder and tap Delete folder: 2.
3. Working with Files Unsupported File Formats Unsupported File Formats The Wireless Drive app can open all file formats that are supported by your mobile device.
4. Managing the Wireless Drive 4. Updating the Firmware Managing the Wireless Drive Updating the Firmware New Firmware is made available just like any other application update. 1. Install the Firmware upgrade: 2. Tap Open to launch the Wireless Flash Drive app.
4. Managing the Wireless Drive Updating the Firmware A popup message prompts you to update the Firmware on the Drive: 3. Tap OK. When the new Firmware has been installed, instructions on how to complete the update are displayed: 4. Turn off the Drive and connect it to a USB charger or a computer. Both the blue and the amber LEDs blinking rapidly.
4. Managing the Wireless Drive Updating the App 5. Wait for several seconds after the rapid flashing stops, then eject the Drive from the charger or computer. 6. Turn the Wireless Drive back on and launch the Wireless Flash Drive app. Updating the App You update the Wireless Flash Drive app the same way you update any other app on your mobile device: 1. Tap your mobile device applications store icon. 2. Go to Menu > My Apps and scroll down to the Wireless Flash Drive app under Installed. 3.
4. Managing the Wireless Drive • Managing Wireless Drive Settings Tap the mobile device Menu button to display the Settings option: Saving Settings Changes When you leave the Settings screen after changing a setting, a Settings changed window confirms that you want to save your change and a Save settings window advises you to restart your Wireless Drive in order for the new setting to take effect.
4. Managing the Wireless Drive Managing Wireless Drive Settings 1. In the Settings changed window, tap Save to confirm your changes: 2. In the Save settings window, tap OK to acknowledge that you must restart your Wireless Drive to complete the setting change: 3. Turn your Wireless Drive off and then back on to complete the change.
4. Managing the Wireless Drive Managing Wireless Drive Settings Changing the Wireless Drive Network Name Your Wireless Drive Wi-Fi network comes uniquely identified as SanDisk Flashxxxxxx (for example, SanDisk Flash ABCDEF).You can change the network name to make it easier to identify your Drive. 1. On the Settings screen, tap Network to open the Network screen.
4. Managing the Wireless Drive Managing Wireless Drive Settings 2. Tap the area under the Wireless Drive name to open the Name change window, enter a new name for the Drive, and tap OK: 3. In the Settings changed window, tap Save to save your changes. 4. In the Save settings window, tap OK to acknowledge that you must restart your Drive. 5. Turn your Wireless Drive off and then back on to complete the network name change. 6.
4. Managing the Wireless Drive Managing Wireless Drive Settings 1. On the Settings screen, tap Network to open the Network screen: 2. Tap the area under Wireless Drive Password to open the Wireless Drive Password window, enter a password, and tap OK: 3. In the Settings changed window, tap Save to save your changes. 4. In the Save settings window, tap OK to acknowledge that you must restart your Drive.
4. Managing the Wireless Drive Managing Wireless Drive Settings 5. Turn your Wireless Drive off and then back on to complete the password change. Note: Creating a Wi-Fi password allows you to limit access to your Drive when you connect directly to it. But the Wi-Fi password does not limit access when your Drive is connected to an Internet Wi-Fi network, where anyone who has installed the Wireless Flash Drive app can access your Drive.
4. Managing the Wireless Drive Managing Wireless Drive Settings 1. On the Settings screen, tap Power Save Timer to open the Power Save Timer window: 2. Select the desired amount of time. As soon as you make your selection, the Power Save Timer window closes and the Settings screen displays the new selection.
4. Managing the Wireless Drive Managing Wireless Drive Settings 1. On the Settings screen, tap Internet Connection to open the Internet Connection screen: 2. Turn on Enable Internet Connection and select the desired network from the list of Preferred Networks, then exit the Flash Drive app: 3. On your mobile device, go to Settings > Wi-Fi and connect to the Preferred Network you selected in the app.
4. Managing the Wireless Drive Managing Wireless Drive Settings Your Wireless Drive start screen indicates that your mobile device is connected to the Internet: Internet Connection icon You're now connected to both the Wireless Drive and the Internet. Whenever your mobile device connects to this Internet network and you launch the Wireless Drive app, the mobile device will automatically find the Drive.
4. Managing the Wireless Drive Managing Wireless Drive Settings 1. On the Settings screen, tap Internet Connection: 2.
4. Managing the Wireless Drive Managing Wireless Drive Settings A window confirms that your Wi-Fi network is now a Preferred Network: 3. On your mobile device, go to Settings > Wi-Fi and select the Preferred Network. 4. Turn the Wireless Flash Drive off, then back on to complete the Internet connection.
4. Managing the Wireless Drive Managing Wireless Drive Settings Setting the Downloads Directory The default Downloads directory on the Wireless Drive comes is the Download folder located on your mobile device: You can change the location at which you want to download files from the Wireless Drive. 1.
4. Managing the Wireless Drive Managing Wireless Drive Settings 2. Navigate to any existing folder on the mobile device until you reach a new destination for your downloads, then tap Select: From now on, your downloaded files will be stored in the new directory. Resetting Messages and Warnings In several Message and Warning pop-up windows in the Wireless Drive app, you’re offered the option of electing not to see those messages again.
4. Managing the Wireless Drive Managing Wireless Drive Settings 1.
4.
4.
5. Product and Safety Information 5. Product Specifications Product and Safety Information Product Specifications Dimensions 78mm x 27mm x14mm (3.1'' x 1'' x 0.5'') Weight 27gr (0.95 oz) Memory Card Class 10 SanDisk Ultra microSDHC™ up to 32GB 1GB=1,000,000,000 bytes. Actual user storage less. Battery Type Operating Duration Battery Charging Built-in, non-replaceable rechargeable lithium polymer battery 1 Up to 4 hours of continuous usage Using a USB 2.
5. Product and Safety Information Regulatory Information Note: This equipment has been tested and found to comply with the limits of a Class B digital device, pursuant to Part 15 of the FCC Rules. These limits are designed to provide reasonable protection against harmful interference in a residential installation. This equipment generates uses and can radiate radio frequency energy and if not installed and used in accordance with the instructions, may cause harmful interference to radio communications.
5. Product and Safety Information Safety and Care Recycling SanDisk Connect Wireless Flash Drive: Do not dispose of either the SanDisk Connect Wireless Flash Drive with your household waste. In some countries or regions, collection systems are set up to handle electrical and electronic waste items. Contact your regional authorities for more details. If collection systems are not available, please return unwanted accessories to any SanDisk Approved Service Center in your region.
5. Product and Safety Information Cleaning the plastic enclosure. Cold temperatures can also shorten the life of the Drive by damaging the battery, causing the plastic enclosure to crack, or causing moisture to condense on or inside the device. Keep the Wireless Flash Drive dry. Water or other liquids can damage it. In addition, high humidity can cause condensation to form. If a Wireless Flash Drive gets wet, turn it off, place it in a low-humidity environment, and allow it to completely dry.
5. Product and Safety Information Maintenance and Storage Long Term Storage If the Wireless Flash Drive will not be used, it is best to keep the battery around 50% charged. To charge the battery to approximately 50%, fully discharge the Wireless Flash Drive until it turns itself off, then let it charge for 1 hour. Store the Wireless Flash Drive at a temperature between 20° C and 45° C (4° F and 113° F) at a relative humidity of 65% ± 20%. Recycling Please recycle all the Wireless Flash Drive packaging.
Index moving 21 sharing 27 Firmware upgrading 32 A accessing files through the Wireless Drive app 15 accessing the Drive without an app 7 allowing access to your Wireless Drive 27 application overview 12 B battery life 2 battery type 2 C changing settings 35 changing the Wireless Drive network name 37 charging the Wireless Drive 3 cleaning 54 connecting via Wi-Fi 4 force restart 40 forgot password 40 G getting started 3 H hardware specifications 2 I Internet using the Wireless Drive while connected 41 L
Picture-in-Picture 20 U playing music 20 unresponsive Drive 40 playing music in the background while outside the app 20 unsupported file formats 31 updating the app 34 power save timer 40 upgrading the Firmware 32 product and safety information 51 uploading files 23 product specifications 51 create new folder 23 R from other locations on the mobile device 26 reboot Drive 40 from the Gallery or the Downloads folder 24 regulatory information 51 using the Wireless Drive while charging 3 reset
use while charging 3 connecting the Wireless Drive to the Internet 41 Wireless Drive app menu 14 creating/changing a password 38 Wireless Drive Application overview 12 power save timer 40 Wireless Drive file menu 15 resetting messages and warnings 47 Wireless Drive LEDs 4 saving settings changes 35 Wireless Drive overview 1 selecting a Downloads directory 46 Wireless Drive Quick Start Guide 49 support 49 Wireless Drive settings 34 Wireless Drive Wi-Fi network detected 5 about Wireless Drive
SanDisk is a trademark of SanDisk Corporation, registered in the United States and other countries. SanDisk Connect is a trademark of SanDisk Corporation. Apple, the Apple logo, iPhone, iPad, and iPod touch are trademarks of Apple Inc., registered in the U.S. and other countries. App Store is a service mark of Apple Inc. The microSDHC mark is a trademark of SD-3C, LLC. Wi-Fi is a registered trademarks of the Wi-Fi Alliance. All other trademarks are the property of their respective owners.
Contents 1. Introduction . . . . . . . . . . . . . . . . . . . . . . . . . . . . . . . . . . . . . . . 1 Wireless Flash Drive Overview . . . . . . . . . . . . . . . . . . . . . . . . . . . . . .1 Features . . . . . . . . . . . . . . . . . . . . . . . . . . . . . . . . . . . . . . . . . . . . . . . .1 System Requirements . . . . . . . . . . . . . . . . . . . . . . . . . . . . . . . . . . . . .2 Supported File Formats . . . . . . . . . . . . . . . . . . . . . . . . . . . . . . . . . . .
Uploading Files . . . . . . . . . . . . . . . . . . . . . . . . . . . . . . . . . . . . . . 23 Displaying the Upload Options . . . . . . . . . . . . . . . . . . . . . . . 23 Uploading Photos and Videos . . . . . . . . . . . . . . . . . . . . . . . . 24 Uploading Files from Your iPhone, iPad, or iPod touch . . . . 25 Creating a New Folder . . . . . . . . . . . . . . . . . . . . . . . . . . . . . 26 Sharing Your Files . . . . . . . . . . . . . . . . . . . . . . . . . . . . . . . . . . . .
Long Term Storage . . . . . . . . . . . . . . . . . . . . . . . . . . . . . . . . . . . .47 Recycling . . . . . . . . . . . . . . . . . . . . . . . . . . . . . . . . . . . . . . . . . . .47 Index . . . . . . . . . . . . . . . . . . . . . . . . . . . . . . . . . . . . . . . . . . .
1. Introduction 1. Wireless Flash Drive Overview Introduction Wireless Flash Drive Overview The SanDisk Connect™ Wireless Flash Drive stores, shares, and streams digital content wirelessly across multiple mobile devices. Features • Share files with others. The Wireless Drive creates its own wireless network. Up to eight mobile devices can be wirelessly connected and access files on the Drive at the same time. • Stay connected to the Internet while accessing content from the Wireless Drive.
1. Introduction System Requirements System Requirements • Mobile devices running iOS version 5.0 or higher or other Wi-Fi-enabled devices with a web browser • Computers running Windows® 8, Windows 7, Windows Vista®, Windows XP or Mac OS 10.6 or higher Supported File Formats • Any file formats supported by your mobile device • For additional information about supported formats, go to www.sandisk.com/ support Hardware Specifications 1 • Drive Capacity: 16 GB or 32 GB1 • USB: 2.
2. Getting Started 2. Charging the Wireless Drive Getting Started Charging the Wireless Drive Although the Wireless Drive is shipped with a charged battery, we urge you to fully charge the Drive before you begin to use it. (This can take up to two hours.) • Plug your Wireless Drive into a computer USB port or a USB AC adaptor to charge it: Note: Although the Wireless Drive cannot be used wirelessly while it’s plugged into a computer USB port, it can be used as a normal flash drive.
2.
2. Getting Started Connecting to the Wireless Drive Connecting via Wi-Fi 1. In your mobile device Wi-Fi settings, select the Wireless Drive network from the list of available Wi-Fi networks. It appears as SanDisk Flash xxxxxx (in the example below, SanDisk Flash ABCDEF): 2.
2. Getting Started Loading Content on the Wireless Drive 1. In your mobile device Wi-Fi settings, connect to the Wireless Drive Wi-Fi network. It appears in the list of available networks as SanDisk Flashxxxxxx (for example, SanDisk Flash123456). 2. Launch an Internet browser and go to www.sandisk.com/wfd to connect to the Wireless Drive: Loading Content on the Wireless Drive You can load content in two ways: • Plug your Wireless Drive into your computer, then drag and drop content onto it.
2. Getting Started • Loading Content on the Wireless Drive Transfer content via Wi-Fi from a mobile device to your Wireless Drive. From a PC You can transfer content between your Wireless Drive and your computer using a USB connection. 1. Plug your Wireless Drive into your computer USB port. 2. In the AutoPlay window, click Open folder to view files: 3. Drag and drop music, videos, photos, and documents from your computer into the Wireless Drive window.
2. Getting Started Loading Content on the Wireless Drive or you can create folders and add content to them; for example, the Music, Photos, Videos, and Documents folders in the window below: You can also drag content from the Wireless Drive window onto your computer to move files between your mobile devices and your computer. From a Mobile Device 1. In your mobile device Wi-Fi settings, connect to the Wireless Drive Wi-Fi network. 2.
2. Getting Started 3. Tap the Upload icon Loading Content on the Wireless Drive to display the Upload options, then tap Upload Photos and Videos to display the content available for upload from this mobile device: 4.
2. Getting Started Loading Content on the Wireless Drive 5. You can use the filter controls to display only photos or only videos for easier file selection: Tap to display only photos Tap to display only videos 6. Tap on thumbnails to select them for upload. (You can tap Select All to select all photos at once.
2. Getting Started Loading Content on the Wireless Drive You see the progress of the upload and receive confirmation when it’s complete: The files are uploaded to the location displayed in the Navigation Bar. Note: For more detailed information on using photo, music, and video files, see Chapter 3, Working with Content.
3. Working with Files 3. Wireless Drive Application Overview Working with Files Wireless Drive Application Overview The Wireless Drive application connects you to content on both your Drive and your mobile device. You can view, share, and manage videos, music, photos, and documents. Accessing Files through the Wireless Drive App The Wireless Drive app start screen provides access to files stored on both your Wireless Flash Drive and your mobile device.
3.
3. Working with Files Viewing Photos Viewing Photos 1.
3. Working with Files Viewing Photos 2. Navigate to the photo you want to view: a. In the Navigation Bar, tap Photos. b. Find the photo you want to view. c. Tap the photo thumbnail in the Navigation Bar to open the photo. d. Tap the photo to display the photo controls. Delete photo View previous photo Download photo View Send next photo photo Full screen Note: The Photos folder used here is simply an example of one way to organize pictures on your Drive.
3. Working with Files Streaming Videos Streaming Videos 1.
3. Working with Files Streaming Videos 2. Navigate to the video you want to stream: a. In the Navigation Bar, tap Videos. b. Find the video you want to stream. c. Tap the video thumbnail in the Navigation Bar to open the video. d. Tap the Play icon to stream the video; tap the video itself to display the Video controls.
3. Working with Files Using the Wireless Flash Drive with iTunes Using the Wireless Flash Drive with iTunes You can use the Wireless Flash Drive app to play music, movies, and TV shows you’ve purchased on iTunes. To play iTunes content, 1. Make sure your mobile device is synced with iTunes: • On your mobile device, launch the iTunes app and navigate to More > Purchased > Music/Movies/TV Shows. If you see your content, your mobile device is synced with iTunes.
3. Working with Files Playing Music 2. Navigate to the music you want to stream: a. In the Navigation Bar, tap Music. b. Find the song you want to play. c. Tap the song thumbnail in the Navigation Bar to open the song. d. Tap the Play icon on the music screen to play the song and display the Song controls.
3. Working with Files Moving Files Controlling Music from Outside the Music Play Screen You can use the Wireless Drive app to play music loaded on either your Wireless Drive or in the Saved on iPad folder on your mobile device. You can play the music in the background while you use other Wireless Drive app features or exit the app to use your mobile device. You always have access to the currently playing song whether you’re still inside the Wireless Drive app or outside it on your mobile device. 1.
3. Working with Files Moving Files uploaded.You can use existing albums or folders as upload destinations, or you can create a new folder during the upload process. Downloading Files You can download files from your Wireless Drive to a mobile device by selecting them in the Navigation Bar or you can download a single file while you’re viewing it. To download files from the Navigation Bar, 1.
3. Working with Files Moving Files 2. A Downloading files window tells you where your downloaded content will be located. Depending on whether you want to see this message each time you download content, tap the appropriate option to continue with the download: 3.
3. Working with Files • On the photo View screen, tap the Download icon Moving Files , then select an option in the Downloading files window: Uploading Files When you upload content from a mobile device to your Wireless Drive, you can choose an existing destination (folder or album) to upload to or you can create a new folder on the Drive and upload content into it.
3. Working with Files • Moving Files In the Navigation Bar, open the destination on the Wireless Drive at which you want to upload content from a mobile device. Then tap the Upload icon display the Upload options: to Upload Options: • Upload Photos and Videos: Select the album on your mobile device containing the files to be uploaded. • Upload Files from iPad (or Upload Files from iPhone or Upload Files from iPod touch): Select files to upload.
3. Working with Files Moving Files 3. In the Upload options, tap Upload Photos and Videos, then tap the album containing the files to be uploaded: 4. Select the files for upload and tap Upload: The files are uploaded to the chosen location on the Wireless Drive. Uploading Files from Your iPhone, iPad, or iPod touch To upload files from your mobile device to your Wireless Drive, 1. In the Navigation Bar, select the destination folder for the uploaded files. 2.
3. Working with Files Moving Files uploaded. The files available for upload from your mobile device are now displayed in the Navigation Bar: 3. Select the files to be uploaded, then tap Upload: An upload window keeps you apprised of the progress of the upload. When the upload is complete, the Navigation Bar again displays the destination folder you selected for the upload; it now contains the uploaded files. Creating a New Folder To create a new folder and then upload files into it, 1.
3. Working with Files Moving Files 2. In the Upload options, tap Create New Folder, use the keyboard to enter a name for the folder, and tap Create: The new folder (currently empty) is displayed in the Navigation Bar as your destination folder. 3.
3. Working with Files Moving Files • Allow others Wi-Fi access to your Wireless Drive so they can use their mobile devices to connect to the content on your Drive. • Send content to others via email, social media, messaging, or Bluetooth. The methods available vary depending upon the features provided on your mobile device.
3. Working with Files Deleting Files and Folders 1. Open the photo you want to share, tap it to display the Photo options, and tap the Send icon : 2. Select a method to share your photo and provide the required information. (The options available on your mobile device vary.) Deleting Files and Folders To delete a file you’re viewing, 1. Open the file you want to delete.
3. Working with Files 2. Tap the Delete icon Deleting Files and Folders , then tap Delete File: To delete a file or a folder in the Navigation Bar, 1. Swipe to the right on the item in the Navigation Bar: 2. Tap the Delete button.
3. Working with Files Unsupported File Formats Unsupported File Formats The Wireless Drive app can open all file formats that are supported by your mobile device.
4. Managing the Wireless Drive 4. Updating the Firmware Managing the Wireless Drive Updating the Firmware You are notified in the Wireless Flash Drive app when a Firmware update is available and asked if you want to install it. If you tap Yes, the app automatically uploads and installs the update. 1. Tap the App Store icon: 2. Install the update. 3. Connect your mobile device to the Wireless Flash Drive Wi-Fi network and launch the app.
4. Managing the Wireless Drive Updating the App The new Firmware is copied to the Drive: 5. Follow the on-screen instructions to turn off the Drive and connect it to a USB charger or a computer: Both the blue and the amber LEDs blink rapidly. 6. Wait for several seconds after the rapid flashing stops before ejecting the Drive from the charger or computer. 7.
4. Managing the Wireless Drive Updating the App 1. Tap the App Store icon: 2. In the App Store, tap the Wireless Flash Drive app icon: 3. Follow the on-screen instructions to reconnect to the Wireless Drive Wi-Fi network after the app update.
4. Managing the Wireless Drive Managing Wireless Drive Settings Managing Wireless Drive Settings The Wireless Drive Settings screen provides access to all the functions you can perform in the Wireless Flash Drive app and information about the Drive and the app. The Settings screen is accessed by tapping the Settings icon : Changing the Wireless Drive Network Name Your Wireless Drive Wi-Fi network comes uniquely identified as SanDisk Flash xxxxxx (in the example, SanDisk Flash FBAODA).
4. Managing the Wireless Drive Managing Wireless Drive Settings 2. On the Network Name screen, enter a new name for the network and tap Save: 3. Follow the instructions in the pop-up window to go to Settings > Wi-Fi on your mobile device, remove the old Wi-Fi network, and reconnect to the Wireless Drive by selecting it under its new Wi-Fi network name: 4. Turn your Wireless Drive off and then back on to complete the network name change.
4. Managing the Wireless Drive Managing Wireless Drive Settings Creating/Changing a Password The default Wi-Fi security setting is no password. We recommend that you set a WiFi password so that your Drive contents can’t be accessed by other people within range (up to 160 feet) of the Wi-Fi network created by the Wireless Drive. 1. On the Settings screen, tap Password to open the Password screen: 2.
4. Managing the Wireless Drive Managing Wireless Drive Settings Note: Creating a Wi-Fi password allows you to limit access to your Drive when you connect directly to it. But the Wi-Fi password does not limit access when your Drive is connected to an Internet Wi-Fi network, where anyone who has installed the Wireless Flash Drive app can access your Drive.
4. Managing the Wireless Drive Managing Wireless Drive Settings 2. Turn on Enable Internet Connection and select the desired network from the list of available networks: The network you select is added to your Preferred Networks: From now on, whenever you launch the Wireless Drive app within range of the Preferred Network, it will automatically find your Wireless Drive so you can surf the Internet while you access the content on the Drive. 3.
4. Managing the Wireless Drive Managing Wireless Drive Settings Setting the Power Save Timer You can set your Wireless Drive to power down after it’s been idle for a specified amount of time. 1. On the Settings screen, tap Power Save Timer to open the timer: 2. Use your fingertip to move the timer to the desired amount of time, then tap Done to save your setting and close the timer.
4.
4.
5. Product and Safety Information 5. Product Specifications Product and Safety Information Product Specifications Dimensions 78mm x 27mm x14mm (3.1'' x 1'' x 0.5'') Weight 27gr (0.95 oz) Memory Card SanDisk Ultra microSDHC™ up to 32GB 1GB=1,000,000,000 bytes. Actual user storage less. Battery Type Operating Duration Battery Charging Built-in, non-replaceable rechargeable lithium polymer battery 1 Up to 4 hours of continuous usage Over USB 2.
5. Product and Safety Information Regulatory Information Note: This equipment has been tested and found to comply with the limits of a Class B digital device, pursuant to Part 15 of the FCC Rules. These limits are designed to provide reasonable protection against harmful interference in a residential installation. This equipment generates uses and can radiate radio frequency energy and if not installed and used in accordance with the instructions, may cause harmful interference to radio communications.
5. Product and Safety Information Safety and Care Recycling SanDisk Connect Wireless Flash Drive: Do not dispose of either the SanDisk Connect Wireless Flash Drive with your household waste. In some countries or regions, collection systems are set up to handle electrical and electronic waste items. Contact your regional authorities for more details. If collection systems are not available, please return unwanted accessories to any SanDisk Approved Service Center in your region.
5. Product and Safety Information Cleaning the plastic enclosure. Cold temperatures can also shorten the life of the Drive by damaging the battery, causing the plastic enclosure to crack, or causing moisture to condense on or inside the device. Keep the Wireless Flash Drive dry. Water or other liquids can damage it. In addition, high humidity can cause condensation to form. If a Wireless Flash Drive gets wet, turn it off, place it in a low-humidity environment, and allow it to completely dry.
5. Product and Safety Information Maintenance and Storage Long Term Storage If the Wireless Flash Drive will not be used, it is best to keep the battery around 50% charged. To charge the battery to approximately 50%, fully discharge the Wireless Flash Drive until it turns itself off, then let it charge for 1 hour. Store the Wireless Flash Drive at a temperature between 20° C and 45° C (4° F and 113° F) at a relative humidity of 65% ± 20%. Recycling Please recycle all the Wireless Flash Drive packaging.
Index sharing 27 filter controls 10 Firmware A upgrading 32 accessing files through the Wireless Drive app 12 force restart 38 accessing the Drive without the app 5 forgot password 38 allowing access to your Wireless Drive 28 application overview 12 G getting started 3 B getting support 40 battery life 2 getting Wireless Drive information 40 battery type 2 C H hardware specifications 2 changing the Wireless Drive network name 35 charging the Wireless Drive 3 cleaning 46 compressing videos du
playing iTunes content 18 upload options playing music 18 creating a new folder 26 Power Save Timer 40 uploading files from your mobile device 25 Preferred Networks 39 uploading photos and videos 24 product and safety information 43 uploading files 23 product specifications 43 upload options 23 R uploading files from your mobile device 25 reboot Drive 38 uploading photos and videos 24 regulatory information 43 using Internet Connection 38 reset Drive 38 using the Wireless Drive while char
Wireless Drive settings 35 working with files 12 SanDisk Connect™ Wireless Flash Drive User Manual for iPhone, iPad, or iPod touch 50