Sound for Generations ROBERTS WM-202 DAB/FM WiFi Internet Radio with MP3/WMA Media Streaming with Enhanced User Interface Please read this manual before use
Contents Your radio ......................................................................................... 2-8 WM-202 Internet Radio and Media Player features ......................... 2 Before you can use this product ....................................................... 3 About this instruction manual ........................................................... 4 Controls and connections .............................................................. 5-6 Battery operation ..............................
Your radio WM-202 Internet Radio and Media Player features The Roberts WM-202 provides the following features in an attractive compact unit:● Listen to local, regional, national and international broadcasts using FM, DAB and Internet radio ● Large clock display with time and date when in Stand-by. ● Listen to over 1000 radio stations from around the country, and over 10,000 from around the world via the internet without using your PC.
Before you can use this product Before you can use your Internet radio, you must have the following: ● A broadband Internet connection (not required for DAB, FM or Media player functions). ● A wireless access point (WiFi) or a wired Ethernet connection connected to your broadband Internet Service Provider, preferably via a router. In many cases the broadband modem, router and wireless access point will be a single combined unit supplied by your Internet Service Provider or bought from a computer store.
Your radio About this instruction manual This instruction manual is split into sections for each of the different operating modes of your Roberts WM-202 radio. There are four main sections - Internet Radio, Media Player (streaming files from a stored library), DAB radio and FM radio. Each section is clearly identified by the shaded heading in the top right hand corner of each pair of pages.
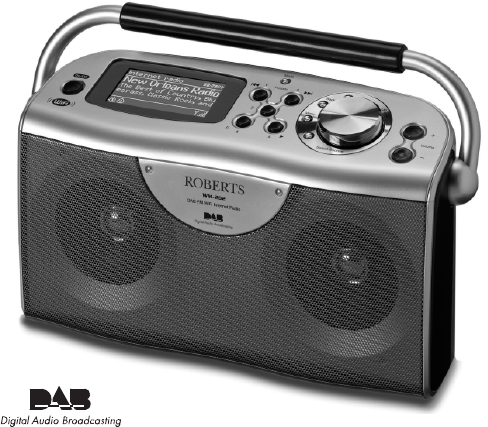
Controls and connections 3 4 5 6 7 8 9 10 11 (Top) 2 12 1 13 16 5 15 14 1. On / Off button 7. Preset 2 / Fast forward button 13. Volume Down button 2. LCD display 8. Menu button 14. Info button 3. Telescopic aerial 9. Back button 15. Preset 5 / Play button 4. Preset button 3 10. Forward button 5. Preset 1 / Rewind button 11. Tuning / Select / Snooze control 6. Mode button 12. Volume Up button 16.
Your radio Controls and connections (Rear) Aux In 22 17 18 19 20 21 17. Battery compartment 20. Auxiliary input socket 18. Ethernet socket (RJ-45) 21. Headphone socket 19. USB socket 22.
Battery operation 1. Remove the battery cover on the rear of the unit by pushing the battery door in slightly and then downwards in the direction of the arrows in the diagram. 2. Insert six LR20 (D size) alkaline batteries into the battery compartment. Take care to ensure all batteries are inserted with the correct polarity as shown inside the battery compartment. Replace the battery cover. 3.
Your radio Navigation controls This page describes the basic means of controlling your WM-202 radio. Instructions for each of the operational modes are given in the later sections of this book. 1 1. Pressing the On/Off button brings your radio out of Stand-by mode if running from the mains or switches it on if using batteries.
Connecting your radio to your computer network 1. Place your radio on a flat surface and plug the cable from the mains adaptor into the DC input socket located on the rear of your radio (marked 'DC in') ensuring that the plug is pushed fully into the socket. Aux In 2. If you wish to use a wired network connection, plug the Ethernet cable into the RJ-45 socket at the back of the radio. 3. Plug the mains adaptor into a wall socket and switch on the socket.
Configuration If your network allows automatic configuration the radio will acquire a network address, and will then enter the main Internet Radio menu (paragraph 13 overleaf). There are two indicator lights incorporated into the RJ-45 connector. If you have problems with your wired connection, they may help you to identify the possible cause of the problem.
Connecting to your computer network - cont. 8. If your network is not found, it is possible that it is configured such that the SSID is not broadcast (sometimes referred to as hidden). If this is the case then the name will not be visible in the list (there may be a blank entry). You will then need to use the Tuning/Select control to point to the '[Manual config]' option, and then you should press the control to enter manual configuration.
Configuration WEP keys are 10 or 26 characters long (using 0 - 9, and A - F). Some wireless routers can also use pass-phrases for WEP but these do not conform to a defined standard and are not supported. WPA keys are usually set up using a pass-phrase of between 8 and 63 characters. Your Internet radio can accept pass-phrases for WPA keys. 12. To enter the WEP or WPA key, characters are selected and entered using the Tuning/Select control.
Connecting to your computer network - cont. If you have followed the steps on the preceding pages successfully, your radio will have connected to your router, and then made a connection to the Internet and set its clock. If this is the case, then you can try listening to radio stations via the Internet as described on page 17 onwards.
Entering the network details manually Configuration If you do not wish to use DHCP for automatic configuration, or if your network is configured with a hidden SSID, then you will need to enter some network settings manually. (Note - a hidden SSID may prevent casual observers from detecting your network, but it is not recommended as a means of network security.) 1. From the radio’s Network settings menu, select 'Manual settings'. You must then choose whether to connect using 'Wired' or 'Wireless' connections.
Entering the network details manually - cont. 5. In most installations the DNS settings (DNS = Domain Name Server) will be set to the same IP address as your router. In this case the secondary DNS may be left at zero. To enter the DNS address, rotate the Tuning/Select control to set the value for each group of digits and then press the control to enter the value and to move on to the next group. Repeat this until all eight groups of digits have been entered.
Entering the network details manually - cont. Configuration The three controls on the right-hand side of the screen have special functions. You can quickly access these by pressing the Info button and then use the Tuning/Select control as needed: select ' select ' select ' ' to erase a character or key previously entered (press Info again to continue) ' when the encryption key is complete ' to cancel and go back to the SSID settings screen Once the key is entered the radio should connect to your network.
Internet Radio mode Internet Radio - the basics Before you can use your radio to listen to broadcasts via the internet, it is necessary to have already connected your radio to your computer network using either the wireless (WiFi) connection or the wired Ethernet connection (RJ-45 socket) on the back of the radio. Please see page 9 for details. There are literally many thousands of broadcasts available via the internet.
Internet Radio Operating your radio - Internet Radio Selecting a radio station by location 1. Press the On/Off button to switch the radio on. Then press the Mode button to select Internet Radio mode. 2. Press the Menu button to enter the main Internet Radio menu. Rotate the Tuning/Select control until "Station list" is highlighted on the display. Press the Tuning/Select control to select. 1 1 3. Rotate the Tuning/Select control until 'Stations' is highlighted on the display.
8. Rotate the Tuning/Select control to highlight your chosen radio station and then press the control to confirm. The display will show 'Connecting...' while the radio connects to the new station. The radio should then start playing. Adjust the volume as needed. 9. If the station has on-demand content, that is, it gives the option of listening to programmes which have already been broadcast or to Podcasts, there will be an additional screen showing the radio station name as well as a 'Podcasts' option.
Internet Radio Selecting a radio station by genre 1. Press the Menu button to enter the main Internet Radio menu. Rotate the Tuning/Select control until "Station list" is highlighted on the display. Press the Tuning/Select control to select. 1 2. Rotate the Tuning/Select control until 'Stations' is highlighted on the display. Press the Tuning/Select control to select. 3. Rotate the Tuning/Select control until 'Genre' is highlighted on the display. Press the Tuning/Select control. 4.
Searching for a radio station by name There may be occasions when you know the name of a radio station but you do not know the location or genre. This facility allows you to search for the station using a part (or parts) of the radio station name. 1 1. Press the Menu button to enter the main Internet Radio menu. Rotate the Tuning/Select control until 'Station list' is highlighted on the display and then press the control to select. 2.
Internet Radio Selecting a new or popular station As described in the section Introducing Internet Radio on page 17, your radio connects to an internet database of radio stations. This may highlight stations which are newly added to the list of those available or stations which are particularly popular with listeners around the world. Your radio allows you to easily choose stations from these two categories, using menus very similar to those used when finding stations by location and genre. 1 1.
Selecting a podcast / BBC Listen Again Some radio stations allow you to listen to programmes that have already been broadcast. The BBC's Listen Again service is an example of this. In addition, radio broadcasters and individuals may make programmes which are intended normally to be downloaded into a computer or copied onto a portable media player. These are commonly known as Podcasts.
Internet Radio Presetting stations - Internet Radio With so many Internet radio stations available, it is desirable to have a means of rapidly selecting the stations that you listen to most frequently. Your radio has five memory presets which can easily be set to store the details of any Internet radio station. The radio station presets are retained in memory even when the radio is switched off. Please see also 'Last Listened' on page 25 and 'Configuring My Favourite Stations' on page 28.
Last Listened It is often helpful to be able to go back to a station that you have recently listened to. Your radio has a 'Last Listened' feature which provides you with quick access to the ten most recently listened to radio stations or podcasts. As each new radio station is listened to the oldest item is deleted from the list. The Last Listened list is stored when the radio is without power. 1 1. With the radio switched on and in Internet Radio mode, press the Menu button.
Internet Radio c. Reliability Displays the reliability of the data stream from the station currently being received. d. Format Displays the bit rate and format of the station being received. e. Playback buffer Displays status when connecting to and playing a radio station. This indicates the reliability of the data stream to your radio. If there are no bars shown to the right of the dividing line then the data stream reliability is poor and you may find that there are many breaks in the audio. f.
Customising your radio In addition to storing your favourite radio stations in the radio presets, your radio allows you to create customised lists of stations which can appear in two special menus on the radio called 'My Favourites' and 'My Added Stations'. Your radio uses a database which is accessed via the Internet in order to find out which radio stations are available and how it should connect to them. You are able to add your personal selections to this database.
Internet Radio Customising your radio - cont. Configuring My Favourite Stations Configuring My Added Stations 1. Using the web site at http://www.wifiradio-frontier.com, it is possible to search among the many radio stations that are available by location, genre, or language. You may also choose from new or popular stations. 1. If you wish to listen to a radio station which is not currently held in the database at http://www.wifiradio-frontier.com, it is possible to add the details yourself.
Selecting favourite stations - Internet Radio 1. Press the Menu button to enter the main menu. 2. Rotate the Select/Tuning control until 'Station list' is highlighted on the display. Press and release the Select/Tuning control to enter the menu. 1 3. Rotate the Select/Tuning control until 'My Favourites' is highlighted on the display. Press and release the Select/Tuning control and your favourite stations list will appear on the display (set up as described on page 28). 2-4 4.
Internet Radio Selecting your added stations - Internet Radio 1. Press the Menu button to enter the main Internet Radio menu. Rotate the Tuning/Select control until 'Station list' is highlighted on the display. Press the Tuning/Select control to select. 1 2. Rotate the Tuning/Select control until 'My Added Stations' is highlighted on the display. Press the Tuning/Select control to select. 3.
Media Player Using Windows Shares The Media Player allows you to play audio files which are stored on a computer on your network. Supported file formats are MP3 and WMA. Note that the playback of DRM protected content and WMA Lossless files is not supported. This section describes setting up your Windows PC to allow the radio to access your audio files via Windows Shares. If you wish to use UPnP, please turn to page 34. Your radio supports two file access methods.
Media Player Locate the shared audio files using the radio 1. Press the On/Off button to switch the radio on. Then press the Mode button to select Music Player mode. 1 2. Press the Menu button to enter the main Music Player menu. 3. Rotate the Tuning/Select control until 'Shared folders' is selected on the display. Press the control to select. 1 4. The radio will then display a list of Workgroups or Domains that it has identified on your computer network.
Locate the shared audio files - cont. 7. If your computer has connected successfully to the shared folder, please skip to 'Media Selection' on page 38. 8 8. To specify a user name and password for access to shared folders, press the Menu button. Using the Tuning/Select control scroll down to 'PC settings'. Use the Tuning/Select control to select 'PC settings. You then have the ability to separately specify the user name and password. 9.
Accessing your audio files via a UPnP server Media Player The recommended way to access your media files is via a UPnP server application. This method offers normally simpler set up and superior file searching compared to the Shared Folders method. If your computer is running Windows (XP or Vista), then Windows Media Player version 11 includes a UPnP server which will make your files available to your radio. There are other UPnP server solutions available for Windows users who may wish to use an alternative.
Set up UPnP access on a Windows PC - cont. You will now need to connect your Internet radio to Windows Media Player 11 and configure it to allow access to your media library. 3. Press the On/Off button to switch the radio on. Then press the Mode button as needed until the 'Music Player' mode display is shown.. Press the Menu button to enter the main Music Player menu. 3 3 4. Rotate the Tuning/Select control until 'Shared media' is highlighted and press the control to select.
Media Player Locating and playing media files using UPnP Once the UPnP server has been configured to share media files with your Internet radio, you may select the files that you wish to play as follows:1 1. Press the On/Off button to switch on the radio. Press the Mode button as needed until the 'Music Player' mode display is shown. 2. Press the Menu button to enter the main Music Player menu. 3. Rotate the Tuning/Select control until 'Shared media' is highlighted on the display. 4.
Note: Do not worry if not all of your media appear in the menus immediately. Windows Media Player needs to look inside each file to identify the artist, album and track information from 'tags' embedded in each file. Additionally, Windows Media Player may take time to access the Internet to obtain additional information such as 'album art' which it can display when you examine your music library on your PC.
Media Player Media selection Whether you access your files using Shared folders or using UPnP, the file selection mechanisms are very similar. When searching via UPnP you will have a selection of search criteria as determined by the UPnP server software on your computer. This allows you to search by a given information type (Album, Artist, etc.) and then to narrow the search to an album or to a particular track within an album.
Listening to a particular track 1. If you wish to play only a particular track from an album or folder, first choose the album or folder as described on the preceding pages. 2. Rotate the Tuning/Select control until the required track is highlighted. 1-3 3. Press and release the Tuning/Select control. The track will begin playing. The radio will then play subsequent tracks from the same album or folder. Controlling playback 1. Press the Pause button to pause playback of the current track. 2.
Media Player Display modes - Media Player Your radio has a range of display options when in Media Player mode. Note that the availability of information depends on the specific media files and also upon the UPnP server capability (if used). 1. Press the Info button to cycle through the different options. a. Artist Displays the artist information for the current track. b. Album Displays the album information for the current track. c.
Operating your radio - DAB 1. Carefully extend the telescopic aerial. 2 2. Press the On/Off button to switch on the radio. If the radio has been used before the last used mode will be selected. 3. Press the Mode button as needed so that DAB mode is selected on the display. 4. If this is the first time that DAB mode is used a quick scan of the UK Band III DAB channels will be carried out. The display will show "Scanning". If the radio has been used before the last used station will be selected. 5.
DAB Radio Selecting a station - DAB 1. The display normally shows the name of the currently tuned radio station. 2. Rotate the Tuning /Select control to access the radio station list and to scroll through the available stations. 2,3 3. Press the Tuning/Select control to select the highlighted station. The display may show 'Connecting...' while the radio re-tunes. 4. Use the Volume buttons to set the sound level as needed.
Display modes - DAB Your radio has a range of display options when in DAB mode:1. Press the Info button to cycle through the different options. 1 a. Text Displays text messages such as the artist or track name, phone in number, traffic alerts, etc. b. Program Type Displays the type of station being listened to such as Pop, Classic, News etc. c. Multiplex Name / Frequency Displays the name of the DAB multiplex and frequency to which the current station belongs. d.
DAB Radio e. Bit rate and audio type Displays the digital bit rate and audio type for the station being listened to f. Displays the current date.
Finding new stations - DAB Should you wish to use your radio for DAB reception in a new location, or if no stations were detected during the initial scan, you can follow this procedure to allow your radio to find out which DAB radio stations are available. 1 1. Ensure that the telescopic antenna is extended, and then press the Mode button as needed to select DAB mode. 2. Once in DAB mode press the Menu button. 2 3. Rotate the Tuning/Select control until 'Local scan' is highlighted on the display. 4.
DAB Radio Manual Tuning - DAB Manual tuning allows you to tune directly to the various DAB Band III channels. At the time of writing, all UK DAB stations are located in the range 11B to 12D. 1 1. When in DAB mode press Menu button so that the display shows the DAB menu list. 2. Rotate the Tuning/Select control until 'Manual tune' is highlighted. 3. Press the Tuning/Select button to enter manual tune mode. 2-5 4. Rotate the Tuning/Select control to choose the required DAB channel. 5.
Dynamic Range Control settings - DAB Dynamic Range Control (also known as DRC) can make quieter sounds easier to hear when your radio is used in a noisy environment by reducing the dynamic range of the audio signal. 1 1. Press the On/Off button to switch on your radio. 2. Press the Mode button as needed to select DAB mode. 2 3. Press the Menu button to enter the DAB menu list. 4. Rotate the Tuning/Select control until 'DRC' is highlighted on the display. 3 5.
DAB Radio Station order setup - DAB Your radio has 3 station order settings from which you can choose. The station order settings are, alphanumeric, ensemble and valid. 1 Note: The default station order on your radio is alphanumeric. 1. Press the On/Off button to switch on your radio. 2 2. Press the Mode button as needed to select DAB mode. 3. Press the Menu button to enter the DAB menu list. 4. Rotate the Tuning/Select control until 'Station order' is highlighted.
Operating your radio - FM 1. Carefully extend the telescopic aerial and press the On/Off button to switch on your radio. 1 2. Press the Mode button as needed to select the FM mode display. 3. Rotate the Tuning/Select control in a clockwise direction. The displayed frequency will increase. Press the Tuning/Select control to carry out an auto-tune. Your radio will scan up the FM band from the currently displayed frequency and will stop scanning when it finds a station of sufficient strength. 2 4.
FM Radio Manual tuning - FM 1. Carefully extend the telescopic aerial and press the On/Off button to switch on your radio. 1 2. Press the Mode button as needed to select the FM mode display. 3. Rotate the Tuning/Select to control the frequency that the radio will tune to. The frequency will change in steps of 50kHz. 2 When the end of the waveband is reached the radio will recommence tuning from the opposite end of the waveband. 4. Use the Volume buttons to adjust the sound level as needed. 5.
Display modes - FM Your radio has a range of display options when in FM mode:1. Press the Info button to cycle through the different options. a. Text Displays text messages such as the artist or track name, phone in number, traffic alerts, etc. b. Program Type Displays the type of station being listened to such as Pop, Classic, News etc. c. Frequency Displays the frequency of the FM signal. d. Date Displays the current date.
FM Radio Scan setting - FM When using the FM mode your radio can be set to either scan local stations or to scan all stations including distant radio stations. 1. Press the Mode button as needed to select the FM mode display. 1 2. Press the Menu button to enter the FM menu list. 3. Rotate the Tuning/Select control until 'Scan setting' is highlighted. Press the Tuning/Select control to enter the scan adjustment mode. 2 The current setting is indicated with an asterisk. 4.
Stereo / Mono switching - FM If the FM radio station being listened to has a weak signal, some hiss may be audible. It is possible to reduce this hiss by forcing the radio to play the station in mono rather than stereo. 1 1. Press the Mode button as needed to select the FM mode display and tune to the required FM station as previously described. 2. Press the Menu button to enter the FM menu list. 2 3. Rotate the Tuning/Select control until 'Audio setting' is highlighted on the display.
FM Radio Presetting stations - DAB and FM radio There are 5 memory presets each for DAB, FM and Internet radio. They are used in the same way for each operating mode. 1. Press the On/Off button to switch on your radio. 1 2. Tune to the required radio station as previously described. 3. To store the station as a preset, press and hold the required Preset button (1 - 5) until the display shows 'Preset stored'. The station will be stored under the chosen preset button.
Automatically updating the clock Your radio will normally update the clock automatically when connected to the internet. If you enter a time setting manually, the radio will calculate a local time offset so that whenever it synchronises using the internet, the correct local time is stored in the radio. In the event of a power failure, your radio will connect to the internet and then set the clock automatically based on this information.
Clock and Alarms Setting the clock format The clock display used in stand-by mode and on the playing mode screens can be set to 12 or 24 hour format. The selected format is then also used when setting the alarms. 1 1. With your radio switched on, press the Menu button to access the menu for the current mode. 2. Rotate the Tuning/Select control until 'System settings' is highlighted on the display. Press the control to enter the system settings menu. 4.
Manually setting the clock The WM-202 Internet radio will normally set its clock automatically to UK time after a connection to the Internet has been established. Should you need to set the time manually, change the time zone, or manually switch from winter to summer time (GMT to BST - also known outside the UK as daylight savings time), then please follow this procedure. 1 1. Press the On/Off button to switch on your radio. 2.
Clock and Alarms 8. Rotate the Tuning/Select control to select the correct year. Press the control to enter the selection. The hour digits will then flash. 9. Rotate the Tuning/Select control to select the correct hour. Press the control to enter the selection. The minute digits will then flash. 8-14 10. Rotate the Tuning/Select control to select the correct minutes. Press the control to enter the selection. The display will then return to the previous menu.
Setting the alarm clock Your radio has two separate alarms which can be set to wake you to either the radio or a buzzer alarm. In the event of a power interruption your radio has built in memory that will retain your alarm settings. 1 Ensure that the time is set correctly before setting the alarms. IMPORTANT: Your radio must be powered from the mains supply in order for the clock to run so that the alarms will operate. You cannot use the alarms if the radio is only running from batteries. 1.
Clock and Alarms 7. Rotate the Tuning/Select control to highlight the Frequency option for the alarm then press the control if you wish to change it. The alarms options are as follows: Daily - the alarm will sound everyday Once - the alarm will sound once Weekdays - the alarm will sound on weekdays only 7-10 Weekends - the alarm will sound only at weekends Rotate the Tuning/Select control to choose the required alarm frequency option. Press the control to confirm the selection. 8.
11. Rotate the Tuning/Select control until the 'Volume:' option is highlighted on the display and press the control if you wish to change it. The radio uses the saved volume setting for each alarm when it sounds. Rotate the control to set the required volume and then press the control to confirm the setting. 11-12 12. In order to store the alarm settings rotate the Tuning/Select control until 'Save' is highlighted. Press the control to store the alarm settings.
Clock and Alarms Disabling alarms 1. To disable a single alarm enter the alarm setup menu (see page 59) and rotate the Tuning/Select control until the desired alarm is highlighted on the display. Press the Tuning/Select control. 2. Rotate the Tuning/Select control until the 'Enable:' option is highlighted on the display. 1-4 3. Press and release the Tuning/Select control to change the status so that the display shows 'Enable: Off'. 4.
Sleep timer Your radio can be set to turn off after a preset time has elapsed. The sleep timer setting can be adjusted between 15 and 120 minutes in 15 minute increments. 1 1. Press the On/Off button to switch on your radio. 2. Access the menu for the current mode by pressing the Menu button. Rotate the Tuning/Select control until 'Main menu' is highlighted on the display. Press the control to enter the main menu. 2 3.
Display and Audio Brightness control The brightness of the display can be adjusted for when the radio is in Stand-by and for when it is in use. If you use the unit in the bedroom, you may prefer a lower stand-by brightness level than the standard setting. There are three brightness levels and an off setting. 1,4 1. Press the On/Off button to switch on your radio. Access the menu for the current mode by pressing the Menu button. 2.
Contrast / viewing angle control The contrast of the display can be adjusted. The adjustment also changes the angle from which the display can best be seen. 1 1. Access the menu for the current mode by pressing the Menu button. Rotate the Tuning/Select control until 'System settings' is highlighted on the display. Press the control to enter the system settings menu. 2. Rotate the Tuning/Select control until 'Contrast' is highlighted on the display and press the control. 1-3 3.
Display and Audio Headphone socket A 3.5mm Headphone Socket located on the rear of your radio is provided for use with headphones. Inserting a plug automatically mutes the internal loudspeaker. Please be aware that the sensitivity of headphones can vary widely. We therefore recommend setting volume to a low level before connecting headphones to the radio. Aux In IMPORTANT: Excessive sound pressure from earphones and headphones can cause hearing loss. Auxiliary input socket A 3.
Factory reset If you wish to completely reset your radio to its initial state this may be performed by following this procedure. By performing a factory reset, all user entered settings will be erased. 1 1. Access the main menu by pressing the Menu button until the 'Main menu' option is shown, then select this with the Tuning/Select control. 2. Rotate the Tuning/Select control until 'System settings' is selected on the display. Press the control to enter the system settings menu. 3.
Software update Information From time to time, new software features for your radio may be developed. Your radio has therefore been designed to allow its internal software to be updated using your Internet connection. You should not attempt to update your radio unless it is recommended to you by Roberts Customer Services. Updating the software may remove all network settings, radio station presets and alarm settings from your radio.
Network profiles Troubleshooting Each time that you connect your radio to a WiFi network, the radio will store the details of that connection (SSID, security key, DHCP/IP address settings) as a profile. Up to four such profiles are stored in the radio so that if your radio is frequently used in multiple locations there is no need to enter the network settings when returning to a location previously visited.
Information You can view the radio’s MAC address using the menu items ‘Main Menu' -> 'System settings' -> 'Network' -> 'View settings' -> 'MAC address'. Note that the WM-202 radio has both wired and wireless MAC addresses. These are identical except for the first two digits. A wireless MAC address will typically be of the form 00:13:E0:xx:xx:xx If your radio can connect to the network successfully, but is unable to play particular internet radio stations, it may be due to one these causes: 1.
Software version display The software version display is provided for reference and customer support purposes and cannot be changed. 1,3 1. Access the menu for the current mode by pressing the Menu button. Rotate the Tuning/Select control until 'System settings' is highlighted on the display. Press the control to enter the system settings menu. 2. Rotate the Tuning/Select control until 'Info' is highlighted on the display. Press the control to display the software version and radio ID. 3.
Information Cautions • The radio shall not be exposed to dripping or splashing and no objects filled with liquids, such as vases, shall be placed on the radio. • It is recommended to operate the product such that there is a minimum distance (10cm recommended) to adjacent objects in order to ensure good ventilation. • The ventilation of the product should not be restricted by covering it with items such as newspapers, tablecloths, curtains etc.
Software license information This product is protected by certain intellectual property rights of Microsoft. Use or distribution of such technology outside of this product is prohibited without a license from Microsoft. In addition, end users shall: a.
Information Guarantee This instrument is guaranteed for twelve months from the date of delivery to the original owner against failure due to faulty workmanship or component breakdown, subject to the procedure stated below. Should any component or part fail during this guarantee period it will be repaired or replaced free of charge. The guarantee does not cover: 1. Damage resulting from incorrect use. 2. Consequential damage. 3. Receivers with removed or defaced serial numbers. N.B.
ROBERTS RADIO TECHNICAL SERVICES 97-99 Worton Road Isleworth Middlesex TW7 6EG Technical Helpline :- 020 8758 0338 (Mon-Fri during office hours) Web site: http://www.robertsradio.co.