Wine Cellar Installation manual RW51TS338SR/AA
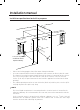
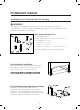
Installation manual Installation specifications for built-in purposes 24 (61 ” min. .0 c m) x. (170 67” ma cm) . 24” min ) m c .0 1 6 ( 0cm) (87.0 cm) 34 1/4” min. x. (12 47” ma 2” 5 .1 F P 6” FP 1 1/2” (3.8 cm) diameter * If electrical outlet in adjacent cabinetry • Gloves and safety goggles should be worn during installation. • It is not recommended to install the appliance into a corner or directly beside a wall.
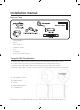
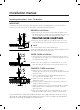
Installation manual Required Tools • • Safety goggles Gloves • Tape measure • Carpenter square • • Level Flashlight • Electric drill with hole bit Fixing the TOP Fixing Bracket 1. Remove the 2 pieces of decorative plastic nail (a) from the top of wine cooler; 2. use two screws (c) to fix the top fixing bracket (d) on top of wine cooler; 3. build in wine cooler into cabinet (b) and align the glass door with cabinet; 4.
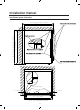
Installation manual Installation guide of bracket 24" min.(610mm) Depth of furniture Two screws to fix on furniture 23 13/16" (605mm) 34 1/16" (865mm) 34 1/4" min. (870mm) Height of furniture Top fixing bracket Glass door build-in installation Two screws to fix on product Side fixing bracket installation Side fixing bracket 1/ 8" (2.5mm) Top fixing bracket 23 13 / 16 " (605mm) 24" min. (610mm) Width of furniture) 4 1/ 8" (2.
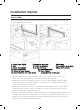
Installation manual Installing the Anti-Tip Bracket for Free Standing WARNING This appliance may tip when shelves are extended, causing damage or injury. If this appliance is used in a FREE STANDING application, the anti-tip bracket must be installed following these instructions! Anti-tip bracket parts List: A : Anti-tip bracket (1pc) B : Anti-tip bracket (1pc) size (6mm x 30mm)(1/4" X 1.
Installation manual Installing Instructions - Anti - Tip Bracket IMPORTANT: Determine the final location of the appliance before attempting to install the bracket. You will need to choose one of the three installation methods below. DRYWALL installation: 1. After you have chosen the installation location, Place the bracket on the floor with Loc b against the wall, use Screw (E) (2pcs) to secure the bracket to the wall. Ensure at least one screw is secured into a stud. 2.
Installation manual Reverse Door Do not cover racks with aluminum foil or any other mate- rial that will prevent adequate air circulation within the cabinet. 1. Lower hinge (Right) 2. crews for door axis 3. Door axis 4. Door . crews for actuator . Door switch press plate . Upper hinge(Right) 8. crews for hinge 9.Decorative screws 10. Upper hinge(Left) 11. Lower hinge(Left) 12. crews for door stopper 13. Door stopper 14. crew holes for door limit device 1 . crew holes for Actuator 1.
Contact SAMSUNG WORLD WIDE If you have any questions or comments relating to Samsung products, please contact the SAMSUNG Customer Care Center. Country U.S.A Contact Center 1-800-SAMSUNG (726-7864) 1-844-SAM-PAYS (726-7297) Web Site www.samsung.
Enfriador de vino Manual de instalación RW51TS338SR/AA
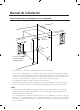
Manual de instalación Especificaciones de instalación para fines integrados 24 (61 ” min. .0 c m) x. (170 67” ma cm) . 24” min ) m c .0 1 6 ( 0cm) (87.0 cm) 34 1/4” min. x. (12 47” ma 2” 5 .1 F P 6” FP 1 1/2” (3.8 cm) diameter * If electrical outlet in adjacent cabinetry • Utilice guantes y anteojos de seguridad durante la instalación. • No se recomienda instalar el electrodoméstico en un rincón no directamente junto a una pared.
Manual de instalación HERRAMIENTAS NECESARIAS Cinta métrica Escuadra de carpintero Anteojos de seguridad Linterna Taladro con mecha Guantes • • Anteojos de seguridad Guantes • Cinta métrica • Escuadra de carpintero • • Nivel Linterna • Taladro con mecha Nivel CÓMO AJUSTAR EL SOPORTE DE FIJACIÓN SUPERIOR 1. Retire las 2 partes de los tornillos plásticos decorativos (a) de la parte superior de la cava de vinos; 2.
Manual de instalación Guía de instalación del soporte 24" min.(610mm) Profundidad del mueble 23 13/16" (605mm) Dos tornillos para ajustar al mueble 34 1/16" (865mm) 34 1/4" min. (870mm) Altura del mueble Soporte de fijación superior Instalación empotrada de puerta de vidrio Dos tornillos para ajustar al producto Instalación del soporte de fijación lateral soporte de fijación lateral 1/ 8" (2.5mm) Soporte de fijación superior 23 13 / 16 " (605mm) 24" min.
Manual de instalación Instalación del soporte antivuelco para uso independiente ADVERTENCIA Este electrodoméstico puede volcarse cuando se extienden sus estantes y provocar daños o lesiones. Si se lo utiliza en forma INDEPENDIENTE, ¡debe instalarse el soporte antivuelco de acuerdo con las siguientes instrucciones! Lista de piezas del soporte antivuelco: A : Soporte antivuelco (1) B : Perno hexagonal (1) tamaño (6mm x 30mm)(1/4" X 1.
Manual de instalación Installing Instructions - Anti - Tip Bracket IMPORTANTE: Determine la ubicación final del electrodoméstico antes de intentar instalar el soporte. Deberá seleccionar uno de los tres métodos de instalación que se detallan a continuación. INSTALACIÓN EN PARED DE YESO: 1. Una vez que haya seleccionado el lugar de instalación, coloque el soporte con la Ub. b contra la pared, utilice en tornillo (E) (2) para ajustar el soporte a la pared.
Manual de instalación CÓMO INVERTIR LA PUERTA La dirección de la puerta puede cambiarse de izquierda a derecha. Sin requerimientos especiales, todas las puertas abren de lado izquierdo. Si fuera necesario que abra del lado derecho, siga estas instrucciones: 1. Bisagra inferior (Derecha) 4. Puerta 2. Tornillos del eje de la puerta . Placa de presión del interruptor de la puerta 9. Tornillos decorativos 12. Tornillos del tope de la puerta 3. Eje de la puerta . Tornillos del actuador .
Contacte a SAMSUNG WORLD WIDE Si tiene preguntas o comentarios relacionados con los productos Samsung, póngase en contacto con el Servicio de Atención al Cliente de SAMSUNG. País U.S.A Centro de contacto 1-800-SAMSUNG (726-7864) 1-844-SAM-PAYS (726-7297) Sitio web www.samsung.