
Installation guide
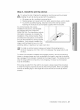


Step
4.
Install
the
anti-tip
device
To
reduce
the
risk
of
tipping,
the
appliance
must
be
secured
by
properly
warnina
INStalling
the
anti-tio
device
packed
with
the
appliance.
®
All
ranges
can
tip,
resulting
in
personal
injury.
®
Tipping
ranges
can
cause
burns
from
spills,
personal
injury,
and/or
death.
®
To
prevent
accidental
tipping,
install
and
check
the
anti-tip
bracket
following
the
instructions
and
template
supplied
with
the
bracket.
An
anti-tip
bracket
and
screws,
installation
instructions,
and
template
are
shioped
with
every
range
(PN
DG94-00670A).
The
instructions include
information
necessary
to
complete
the
installation
of
the
anti-tip
bracket.
Read
and
follow
the
instructions
on
the
sheet
and
use
the
template
for
anti-tip
bracket
installation.
lf
not
properly
installed,
the
range
could
be
tipped
by
you
or
a
child
standing,
sitting,
or
leaning
on
an
open
oven
door.
SNOLLONUISN|
NOLLV
IVLSNI
(PD)
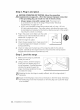
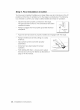
To
install
an anti-tio
bracket,
release
and
extend
the
leveling
leg
to
a
minimum
clearance
of
21/32
in
(146.5
mm)
between
the
range
bottom
and
the
floor.
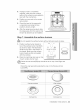
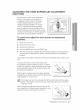
To
check
if
the
bracket
is
installed
and
engaged
properly,
rernove
the
warming
drawer
or
storage
drawer
and
look
underneath
the
range
to
see
that
the
leveling
leg
is
engaged
in
the
bracket.
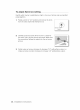
Carefully
tio
the
range
forward.
The
bracket
should
stop
the
range
within
4
inches
(10.2
cm)
of
tipping.
If
it
does
not,
the
bracket
must
be
reinstalled.
If
the
range
is
pulled
from
the
wall
for
any
reason,
always
repeat
this
procedure
to
verify
the
range
is
properly
secured
by
the
anti-tio
bracket.
Never
completely
remove
the
leveling
legs
or
the
range
will
not
be
secured
to
the
anti-tio
device
properly.
installation
instructions
37