
User Manual
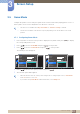


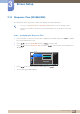

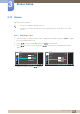
Table Of Contents
- Table Of Contents
- Before Using the Product
- Preparations
- 1.1 Checking the Components
- 1.2 Parts
- 1.2.1 Frontal Buttons (SE200 Series)
- 1.2.2 Frontal Buttons (S**E450B*, S**E650B*)
- 1.2.3 Frontal Buttons (S**E450M*)
- 1.2.4 Frontal Buttons (S**E450D*)
- 1.2.5 Reverse Side (SE200 Series)
- 1.2.6 Reverse Side (S**E450B*, S**E650B*)
- 1.2.7 Reverse Side (S**E450M*)
- 1.2.8 Reverse Side ( S**E450D*)
- 1.2.9 Right Side View (S**E450D*)
- 1.3 Installation
- 1.3.1 Attaching the Stand (SE200 Series)
- 1.3.2 Attaching the Stand (SE450, SE650 Series)
- 1.3.3 Removing the Stand (SE200 Series)
- 1.3.4 Adjusting the Product Tilt (SE200 Series)
- 1.3.5 Adjusting the Product Tilt and Height (SE450, SE650 Series)
- 1.3.6 Rotating the Monitor (SE450, SE650 Series)
- 1.3.7 Installing a Wall-mount Kit or Desktop Stand
- 1.3.8 Anti-theft Lock
- Connecting and Using a Source Device
- Screen Setup
- 3.1 Brightness
- 3.2 Contrast
- 3.3 Sharpness
- 3.4 Eye Saver Mode
- 3.5 Game Mode
- 3.6 SAMSUNG MAGIC Bright
- 3.7 SAMSUNG MAGIC Angle (Except S19E200NY / S22E200NY / S24E650BW)
- 3.8 SAMSUNG MAGIC Upscale
- 3.9 Image Size (Except S19E200BR / S19E450BR / S19E450MR)
- 3.10 Response Time (S24E650BW)
- 3.11 H-Position & V-Position
- 3.12 Coarse
- 3.13 Fine
- Configuring Tint
- Resizing or Relocating the Screen
- Setup and Reset
- 6.1 Reset All
- 6.2 Smart Eco Saving
- 6.3 Off Timer (S19E200NW / S19E200NY / S22E200N / S22E200NY)
- 6.4 Off Timer Plus (Except S19E200NW / S19E200NY / S22E200N / S22E200NY)
- 6.5 PC/AV Mode (Except S19E200NW / S19E200NY / S22E200N / S22E200NY)
- 6.6 Key Repeat Time
- 6.7 Source Detection (Except S19E200NW / S19E200NY / S22E200N / S22E200NY)
- INFORMATION Menu and Others
- Installing the Software
- Troubleshooting Guide
- Specifications
- 10.1 General (S19E200NY / S19E200NW)
- 10.2 General (S19E200BW / S19E200BR)
- 10.3 General (S22E200NY)
- 10.4 General (S22E200B / S22E200N / S22E200BW)
- 10.5 General (S23E200B / S24E200BL)
- 10.6 General (S19E450BW / S19E450MW / S19E450BR / S19E450MR)
- 10.7 General (S22E450B / S22E450M / S22E450D)
- 10.8 General (S22E450BW / S22E450MW / S22E450DW)
- 10.9 General (S23E450B)
- 10.10 General (S24E450BL / S24E450DL)
- 10.11 General (S24E450B / S24E450M / S24E450D)
- 10.12 General (S24E650BW)
- 10.13 General (S27E450B / S27E450D)
- 10.14 PowerSaver
- 10.15 Standard Signal Mode Table
- Appendix
- Index

63
Screen Setup
3
3 Screen Setup
3.7 SAMSUNG MAGIC Angle (Except S19E200NY /
S22E200NY / S24E650BW)
Angle allows you to configure the settings to obtain the optimum picture quality according to your
viewing angle.
This menu is not available when Bright is in Cinema or Dynamic Contrast mode.
This menu is not available when Game Mode or Eye Saver Mode is enabled.
The functions available on the monitor may vary depending on the model. Refer to the actual
product.
You can customize the angle to suit your preferences.
3.7.1 Configuring SAMSUNG MAGIC Angle
1 Press any button on the front of the product to display the Key Guide. Next, press [ ] to display
the corresponding menu screen.
2 Press [ ] to move to PICTURE and press [ ] on the product.
3 Press [ ] to move to Angle and press [ ] on the product.
The following screen will appear.
Off : Select this option to view directly in front of the product.
Lean Back Mode 1 : Select this option to view from a place slightly lower than the product.
Lean Back Mode 2 : Select this option to view from a place lower than Lean Back Mode 1.
Standing Mode : Select this option to view from a place higher than the product.
Side Mode : Select this option to view from either side of the product.
Group View: Select this option for more than one viewer to view from places , , and .
SAMSUNG
MAGIC
SAMSUNG
MAGIC
MENU
SAMSUNG
MAGIC
100
75
60
50
50
2200
0
100
75
60
Custom
Off
Off
Wide
AUTO
off
Lean Back Mode 1
Lean Back Mode 2
Standing Mode
Side Mode
Brightness
Contrast
Sharpness
Eye Saver Mode
Game Mode
SAMSUNG
MAGIC
Bright
SAMSUNG
MAGIC
Angle
Select an angle that
best suits your
viewing position.
PICTURE
AUTO
AUTO
4
2
3
1
1
5 5
①
②
③
④
⑤
①
④
⑤