
User Manual
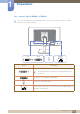
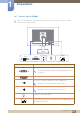


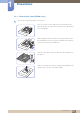

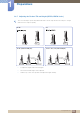
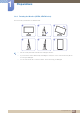
Table Of Contents
- Table Of Contents
- Before Using the Product
- Preparations
- 1.1 Checking the Components
- 1.2 Parts
- 1.2.1 Frontal Buttons (SE200 Series)
- 1.2.2 Frontal Buttons (S**E450B*, S**E650B*)
- 1.2.3 Frontal Buttons (S**E450M*)
- 1.2.4 Frontal Buttons (S**E450D*)
- 1.2.5 Reverse Side (SE200 Series)
- 1.2.6 Reverse Side (S**E450B*, S**E650B*)
- 1.2.7 Reverse Side (S**E450M*)
- 1.2.8 Reverse Side ( S**E450D*)
- 1.2.9 Right Side View (S**E450D*)
- 1.3 Installation
- 1.3.1 Attaching the Stand (SE200 Series)
- 1.3.2 Attaching the Stand (SE450, SE650 Series)
- 1.3.3 Removing the Stand (SE200 Series)
- 1.3.4 Adjusting the Product Tilt (SE200 Series)
- 1.3.5 Adjusting the Product Tilt and Height (SE450, SE650 Series)
- 1.3.6 Rotating the Monitor (SE450, SE650 Series)
- 1.3.7 Installing a Wall-mount Kit or Desktop Stand
- 1.3.8 Anti-theft Lock
- Connecting and Using a Source Device
- Screen Setup
- 3.1 Brightness
- 3.2 Contrast
- 3.3 Sharpness
- 3.4 Eye Saver Mode
- 3.5 Game Mode
- 3.6 SAMSUNG MAGIC Bright
- 3.7 SAMSUNG MAGIC Angle (Except S19E200NY / S22E200NY / S24E650BW)
- 3.8 SAMSUNG MAGIC Upscale
- 3.9 Image Size (Except S19E200BR / S19E450BR / S19E450MR)
- 3.10 Response Time (S24E650BW)
- 3.11 H-Position & V-Position
- 3.12 Coarse
- 3.13 Fine
- Configuring Tint
- Resizing or Relocating the Screen
- Setup and Reset
- 6.1 Reset All
- 6.2 Smart Eco Saving
- 6.3 Off Timer (S19E200NW / S19E200NY / S22E200N / S22E200NY)
- 6.4 Off Timer Plus (Except S19E200NW / S19E200NY / S22E200N / S22E200NY)
- 6.5 PC/AV Mode (Except S19E200NW / S19E200NY / S22E200N / S22E200NY)
- 6.6 Key Repeat Time
- 6.7 Source Detection (Except S19E200NW / S19E200NY / S22E200N / S22E200NY)
- INFORMATION Menu and Others
- Installing the Software
- Troubleshooting Guide
- Specifications
- 10.1 General (S19E200NY / S19E200NW)
- 10.2 General (S19E200BW / S19E200BR)
- 10.3 General (S22E200NY)
- 10.4 General (S22E200B / S22E200N / S22E200BW)
- 10.5 General (S23E200B / S24E200BL)
- 10.6 General (S19E450BW / S19E450MW / S19E450BR / S19E450MR)
- 10.7 General (S22E450B / S22E450M / S22E450D)
- 10.8 General (S22E450BW / S22E450MW / S22E450DW)
- 10.9 General (S23E450B)
- 10.10 General (S24E450BL / S24E450DL)
- 10.11 General (S24E450B / S24E450M / S24E450D)
- 10.12 General (S24E650BW)
- 10.13 General (S27E450B / S27E450D)
- 10.14 PowerSaver
- 10.15 Standard Signal Mode Table
- Appendix
- Index

37
Preparations
1
1 Preparations
1.3.3 Removing the Stand (SE200 Series)
The exterior may differ depending on the product.
Place a soft cloth over the table to protect the product and
place the product onto the cloth so that the front of the product
faces downwards.
While holding the stand neck with one hand, pound the other
fisted hand down onto the top of the stand base in the direction
of the arrow to detach the stand base.
Turn the connecting screw at the bottom of the stand base to
separate it.
Remove the stand neck from the stand base by pulling it in the
direction of the arrow as shown in the figure.