
Tus neeg siv phau ntawv

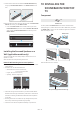
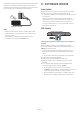
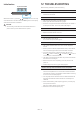

Table Of Contents
- ENG
- Checking the Components
- Product Overview
- Using the Soundbar Remote Control
- Inserting Batteries before using the Remote Control (AAA batteries X 2)
- How to Use the Remote Control
- Active Voice Amplifier (AVA)
- Using the Hidden Buttons (Buttons with more than one function)
- Output specifications for the different sound effect modes
- Adjusting the Soundbar volume with a TV remote control
- Connecting the Soundbar
- Connecting to a TV
- Connecting an External Device
- Connecting a Mobile Device
- Connecting via Apple Airplay 2
- Installing the Wall Mount
- Installing the Soundbar in front of TV
- Software Update
- Troubleshooting
- License
- Open Source License Notice
- Important Notes About Service
- Specifications and Guide
- FRC
- Vérification des composants
- Présentation du produit
- Utilisation de la télécommande du Soundbar
- Insertion des piles avant d’utiliser la télécommande (2 piles AAA)
- Comment utiliser la télécommande
- Active Voice Amplifier (AVA)
- Utilisation des boutons masqués (boutons ayant plusieurs fonctions)
- Spécifications de sortie pour les différents modes d’effets sonores
- Réglage du volume du Soundbar avec la télécommande du téléviseur
- Connexion du Soundbar
- Connexion à un téléviseur
- Connexion d’un appareil externe
- Connexion d’un appareil mobile
- Connexion par Apple AirPlay 2
- Installation du support mural
- Installation du Soundbar devant le téléviseur
- Mise à jour du logiciel
- Dépannage
- Licence
- Avis concernant les licences libres
- Remarque Importante Concernant le Service
- Spécifications et guide

ENG - 33
7. Install the Soundbar with the attached Bracket-Wall Mounts by
hanging the Bracket-Wall Mounts on the Holder-Screws on the
wall.
8. Slide the Soundbar down as shown below so that the Bracket-Wall
Mounts rest securely on the Holder-Screws.
• Insert the Holder-Screws into the wide (bottom) part of the
Bracket-Wall Mounts, and then slide the Bracket-Wall Mounts
down so that the Bracket-Wall Mounts rest securely on the
Holder-Screws.
Installing the Surround Speakers on a
Wall (applicable models only)
You can purchase wall mounts separately to install the surround
speakers on a wall.
Wall mounts aren’t sold by Samsung Electronics.
Notes for Wall Mounting the Surround Speakers
• Surround Speaker wall mounts must be able to support more than
17.6 lbs (8.0 kg).
• Hole size : 1/4 - 20 UNC threaded insert
‒ Standard Screw : 6.35 mm (0.25 Inch) ø,
1.2 7mm (0.05 Inch) Pitch
‒ Length : 18 mm (0.70 Inch) long
‒ Quantity : Left 1 EA / Right 1 EA
L R
• Check the strength of the wall before you install the Wall Mount
Brackets. If the strength is insufcient, make sure to reinforce the
wall before installing the Wall Mount Brackets and the speakers
on the wall.
• Samsung Electronics is not liable for any damage to the product
due to the product being installed inappropriately.
• Take care not to install the speakers sideways or upside down.
10 INSTALLING THE
SOUNDBAR IN FRONT OF
TV
Component
x 4
Rubber-Foot
To install, attach the Rubber-Feet to the bottom of the Soundbar
before placing it in position above the TV stand. Make sure you attach
the Rubber-Feet so they do not lie outside the edges of the TV stand.
Refer to the gure below.
Rubber-Foot
Place the Soundbar on a TV stand.
Microphones (applicable models only)