FULL MANUAL HW-Q930B / HW-Q800B / HW-Q700B Imagine the possibilities Thank you for purchasing this Samsung product. To receive more complete service, please register your product at www.samsung.
SAFETY INFORMATION CAUTION (for Canada) SAFETY WARNINGS This device contains licence-exempt transmitter(s)/receiver(s) that comply with Innovation, Science and Economic Development Canada’s licence-exempt RSS(s). Operation is subject to the following two conditions: (1) This device may not cause interference. (2) This device must accept any interference, including interference that may cause undesired operation of the device.
PRECAUTIONS Important Safety Instructions Read these operating instructions carefully before using the unit. Follow all the safety instructions listed below. Keep these operating instructions handy for future reference. 1. Read these instructions. 2. Keep these Instructions. 3. Heed all warnings. 4. Follow all instructions. 5. Do not use this apparatus near water. 6. Clean only with dry cloth. 7. Do not block any ventilation openings. Install in accordance with the manufacturer’s instructions. 8.
CONTENTS 01 Checking the Components 6 02 Product Overview 7 Top Panel of the Soundbar. . . . . . . . . . . . . . . . . . . . . . . . . . . . . . . . . . . . . . . . . . . . . . . . . . . . . . . . . . . . . . . . . . . . . . . . . . . . . . . . . . . . . . . . . . . . . . . . . . . . . .7 Bottom Panel of the Soundbar . . . . . . . . . . . . . . . . . . . . . . . . . . . . . . . . . . . . . . . . . . . . . . . . . . . . . . . . . . . . . . . . . . . . . . . . . . . . . . . . . . . . . . . . . . . . . .
10 Installing the Soundbar in front of TV 33 Component . . . . . . . . . . . . . . . . . . . . . . . . . . . . . . . . . . . . . . . . . . . . . . . . . . . . . . . . . . . . . . . . . . . . . . . . . . . . . . . . . . . . . . . . . . . . . . . . . . . . . . . . . . . . . . . . . 33 11 Software Update 34 Auto Update. . . . . . . . . . . . . . . . . . . . . . . . . . . . . . . . . . . . . . . . . . . . . . . . . . . . . . . . . . . . . . . . . . . . . . . . . . . . . . . . . . . . . . . . . . . . . .
01 CHECKING THE COMPONENTS SOUNDBAR Soundbar Main Unit x2 Surround Speaker (optional) (Left / Right) Soundbar Remote Control / Batteries Subwoofer x 4 or 2 Power Cord (Subwoofer, Surround Speaker, Soundbar) (optional) x2 HDMI Cable x2 (M4 x L10) Wall Mount Guide Holder-Screw x4 x2 Bracket-Wall Mount Screw Rubber-Foot • For more information about the power supply and power consumption, refer to the label attached to the product.
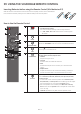
02 PRODUCT OVERVIEW Top Panel of the Soundbar 1 3 1 2 3 2 4 4 HW-Q930B / HW-Q800B HW-Q700B 1 (Multi Function) Button (Q930B / Q800B models) • In standby mode, press the (Multi Function) button to turn on the Soundbar. • Press the (Multi Function) button to change the input source. 1 (Power) Button (Q700B model) Turns the power on and off. 2 (Volume) Button Adjusts the volume. 3 (Mic On/Off) Button (Q930B / Q800B models) Press the button to turn the microphone on or off.
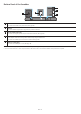
Bottom Panel of the Soundbar SERVICE 1 DIGITAL AUDIO IN (OPTICAL) 3 HDMI 4 HDMI TO TV (eARC/ARC) 5 2 SERVICE DIGITAL AUDIO IN (OPTICAL) HDMI IN 1 HDMI HDMI IN 2 HDMI TO TV (eARC/ARC) 1 POWER Connect the Soundbar’s AC power cable. (See page 14) 2 SERVICE Connect a USB storage device to upgrade the product’s software. 3 DIGITAL AUDIO IN (OPTICAL) Connect to the digital (optical) output of an external device.
03 USING THE SOUNDBAR REMOTE CONTROL Inserting Batteries before using the Remote Control (AAA batteries X 2) Slide the back cover in the direction of the arrow until it is completely removed. Insert 2 AAA batteries (1.5V) oriented so that their polarity is correct. Slide the battery cover back into position. How to Use the Remote Control 1 1 Power 2 3 2 Press to select a source connected to the Soundbar. Source 8 9 Turns the Soundbar on and off.
7 Sound Control By pressing the button, you can set the audio function such as Spacefit sound, AVA, Voice enhance mode, Night mode, Sync, Surround speaker mode, Virtual. The desired item can be adjusted using the Up/Down buttons. • The Spacefit sound and AVA functions are not supported by Q700B model. • Voice enhance mode enhances spoken dialog in movies and TV to make it easier to hear.
Active Voice Amplifier (AVA) • Analyzes external noise in real time while soundbar is playing, so that voice audio can always be heard clearly. • No data is saved during the analysis. • This function is not supported by Q700B model.
Output Effect Input With Subwoofer Only With Subwoofer & Surround Speaker 2.0 ch 2.1 ch 2.1 ch 5.1 ch 5.1 ch 5.1 ch / 7.1 ch (DTS) 7.1 ch 5.1 ch 7.1 ch Dolby Atmos®, DTS:X 5.1.2 ch 7.1.4 ch 2.0 ch 5.1.2 ch 7.1.4 ch 5.1 ch 5.1.2 ch 7.1.4 ch 7.1 ch 5.1.2 ch 7.1.4 ch Dolby Atmos®, DTS:X 5.1.2 ch 7.1.4 ch 2.0 ch 5.1.2 ch 7.1.4 ch 5.1 ch 5.1.2 ch 7.1.4 ch 7.1 ch 5.1.2 ch 7.1.4 ch Dolby Atmos®, DTS:X 5.1.2 ch 7.1.4 ch 2.0 ch 5.1.2 ch 7.1.4 ch 5.1 ch 5.1.
Adjusting the Soundbar volume with a TV remote control Adjust the Soundbar volume using the TV’s remote control. • This function can be used with IR remote controls only. Bluetooth remote controls (remote controls that require pairing) are not supported. • Set the TV speaker to External Speaker to use this function. • Manufacturers supporting this function: Samsung, VIZIO, LG, Sony, Sharp, PHILIPS, PANASONIC, TOSHIBA, Hisense, RCA 1. Turn Off the Soundbar. 2.
04 CONNECTING THE SOUNDBAR Connecting the power and units Use the Power cord to connect the Subwoofer, Surround Speakers, and Soundbar to an electrical outlet in the following order: • For more information about the required electrical power and power consumption, refer to the label attached to the product. (Label: Rear of the Soundbar Main Unit) 1. Connect the Power cord to the Subwoofer. Power Cord Rear of Subwoofer 2. Connect the power cord to the Left and Right Surround Speakers.
Recommended Speaker Layout CAUTION • Wireless receiving antennas are built into the wireless subwoofer and surround speakers. Keep the units away from water and moisture. • For optimal listening performance, make sure that the areas around the wireless subwoofer and surround speakers locations are clear of any obstructions.
Manually connecting the Subwoofer or Surround Speakers Before performing the manual connection procedure below: • Check whether the power cables for the Soundbar and subwoofer or Surround Speakers are connected properly. • Make sure that the Soundbar is turned off. 1. Turn off the Soundbar main. 2. Press and hold ID SET on the rear of the subwoofer and surround speakers for at least 5 seconds. • The red indicator at the rear of each speaker turns off and the blue indicator blinks.
LED Indicator Lights on the Rear of Subwoofer and Surround Speakers LED Subwoofer Status On Description Resolution Successfully connected (normal operation) - Recovering the connection Check if the power cable attached to the main Soundbar unit is connected properly or wait about 5 minutes. If blinking persists, try manually connecting the subwoofer and Surround Speakers. See page 16.
05 CONNECTING TO A TV Connecting the TV that supports HDMI ARC (Audio Return Channel) CAUTION • When both the HDMI cable and optical cable are connected, the HDMI signal is received first. • To connect the HDMI cable between the TV and Soundbar, be sure to connect the terminals marked ARC. Otherwise, the TV sound may not be output. • The recommended cable is High Speed HDMI Cable with Ethernet. Connect to the HDMI TO TV (eARC/ARC) port of the Soundbar main unit.
Connecting using an Optical Cable Pre-connection Checklist • When both the HDMI cable and optical cable are connected, the HDMI signal is received first. • When you use an optical cable and the terminals have covers, be sure to remove the covers. Bottom of the Soundbar Optical Cable (not supplied) DIGITAL AUDIO IN (OPTICAL) OPTICAL OUT Top of the Soundbar Top of the Soundbar D.IN D.IN 1.
Connecting via Bluetooth When a Samsung TV is connected using Bluetooth, you can hear stereo sound without the hassle of cabling. • Only one Samsung TV can be connected at a time. • Samsung TV that supports Bluetooth can be connected. Check the specifications of your TV. Top of the Soundbar 5 Sec BT PAIRING PAIR OR Top of the Soundbar 5 Sec BT PAIRING The initial connection 1. Press the (OR) PAIR button on the Soundbar remote control to enter the “BT PAIRING” mode.
What is the difference between BT READY and BT PAIRING? • BT READY : In this mode, you can reconnect any Samsung TV or mobile device that was connected before. • BT PAIRING : In this mode, you can connect a new device to the Soundbar. (Press the PAIR button on the Soundbar remote control or press and hold the (Mic On/Off) / (Source) button on the top of the Soundbar for more than 5 seconds while the Soundbar is in “BT” mode.) Notes on Bluetooth connection • • • • Locate a new device within 3.
Connecting via Wi-Fi Pre-connection Checklist • Wi-Fi connection is available only on Samsung TV. • Check whether the wireless router (Wi-Fi) is turned on and the TV is connected to the router. • The TV and Soundbar must be connected to the same wireless network (Wi-Fi). • If your wireless router (Wi-Fi) uses a DFS channel, you will not be able to establish a Wi-Fi connection between the TV and Soundbar. Contact your Internet service provider for details.
Using the Q-Symphony Function For Q-Symphony, the Soundbar syncs with a Samsung TV to output sound through two devices for optimum surround effect. When the Soundbar is connected, the menu, “TV+Soundbar” appears under the Sound Output menu of the TV. Select the corresponding menu. TV menu HDMI Cable OR Optical Cable (not supplied) D.
Using the Spacefit sound Provides optimized sound quality by analyzing the listening spaces. Method 1. Connecting via Soundbar To enable this function, turn on the Spacefit sound mode with the remote control of the Soundbar. ( Up ) → “Spacefit sound On”) ( (Sound Control) → “Spacefit sound Off” → • This is available in all Sound modes. Method 2. Connecting via TV To enable this function, turn on the Adaptive Sound+ mode on your Samsung TV menu.
06 CONNECTING AN EXTERNAL DEVICE Method 1. Connecting using an HDMI Cable (Capable of Dolby Atmos / DTS:X decoding and playback) Pre-connection Checklist • If the Audio Output options include Secondary Audio, make sure Secondary Audio is set to Off. • Make sure that the content supports Dolby Atmos® / DTS:X. Top of the Soundbar Top of the Soundbar HDMI HDMI External Device HDMI HDMI OUT HDMI Cable HDMI IN (ARC) HDMI Cable HDMI TO TV (eARC/ARC) Bottom of the Soundbar 1. 2.
Method 2. Connecting using an Optical Cable Top of the Soundbar D.IN Top of the Soundbar BD / DVD player / Settop box / Game console D.IN DIGITAL AUDIO IN (OPTICAL) OPTICAL OUT Optical Cable (not supplied) Bottom of the Soundbar 1. Use an optical cable (not supplied) to connect the DIGITAL AUDIO IN (OPTICAL) on the Soundbar main and the OPTICAL OUT port on the external device. 2. Turn on the Soundbar and external device. 3. To select “D.
07 CONNECTING A MOBILE DEVICE Method 1. Connecting via Bluetooth When a mobile device is connected using Bluetooth, you can hear stereo sound without the hassle of cabling. • When you connect a paired Bluetooth device with the Soundbar off, the Soundbar automatically turns on. Top of the Soundbar 5 Sec Mobile device BT PAIRING PAIR OR Top of the Soundbar 5 Sec BT PAIRING The initial connection • When connecting to a new Bluetooth device, make sure the device is within 3.
Notes on Bluetooth connection • • • • Locate a new device within 3.28 ft (1 m) to connect via Bluetooth communication. If asked for a PIN code when connecting a Bluetooth device, enter <0000>. The Soundbar automatically turns off after 18 minutes in the Ready state. The Soundbar may not perform Bluetooth search or connection correctly under the following circumstances: ‒ If there is a strong electrical field around the Soundbar. ‒ If several Bluetooth devices are simultaneously paired with the Soundbar.
Method 2. Connecting via Wi-Fi (Wireless Network) To connect a Soundbar to a mobile device via a wireless network (Wi-Fi), the SmartThings app is required. The initial connection 1. Install and launch the SmartThings app from your mobile device (smartphone or tablet). 2. On the app, follow the screen instructions to add the Soundbar. • The automatic pop-up (the second screenshot below) may not show on some devices. If the pop-up window does not appear, press “ ” on the Home screen.
Using the Tap Sound Tap the Soundbar with your mobile device to play the sound of content on the mobile device through the Soundbar. • This function may not be supported, depending on the mobile device. • This function is only compatible with Samsung mobile devices with Android 8.1 or later. SmartThings App Top of the Soundbar Mobile device 1. Turn on the Tap Sound function on your mobile device. • For details on how to turn on the function, refer to “Setting the Tap Sound function” below. 2.
08 CONNECTING VIA APPLE AIRPLAY 2 • This feature may not be available in some countries. • This Samsung Soundbar supports AirPlay 2 and requires iOS 11.4 or later. With AirPlay 2, you can stream music, podcasts, and other audio from your Apple devices to the Samsung Soundbar. • Make sure the Soundbar is powered on and connected to the same Wi-Fi network as your Apple device. from an AirPlay-supported app or Control Center on your iPhone, iPad, or Mac.
09 INSTALLING THE WALL MOUNT 2. Align the Wall Mount Guide’s Center Line with the center of your TV (if you are mounting the Soundbar below your TV), and then fix the Wall Mount Guide to the wall using tape. • If you are not mounting below a TV, place the Center Line in the center of the installation area. Installation Precautions • Install on a vertical wall only. • Do not install in a place with high temperature or humidity. • Verify whether the wall is strong enough to support the product’s weight.
10 INSTALLING THE SOUNDBAR IN FRONT OF TV 7. Install the Soundbar with the attached Bracket-Wall Mounts by hanging the Bracket-Wall Mounts on the Holder-Screws on the wall. Component x4 8. Slide the Soundbar down as shown below so that the Bracket-Wall Mounts rest securely on the Holder-Screws. • Insert the Holder-Screws into the wide (bottom) part of the Bracket-Wall Mounts, and then slide the Bracket-Wall Mounts down so that the Bracket-Wall Mounts rest securely on the Holder-Screws.
As illustrated in the image, align the center of the Soundbar with the center of the TV, carefully place the Soundbar onto the TV stand. At this time, place the microphones (applicable models only) at the front of the stand not to interfere with voice recognition. TV 11 SOFTWARE UPDATE Auto Update When the Soundbar is connected to the Internet, software updates automatically occur even when the Soundbar is turned off. • To use the Auto Update function, the Soundbar must be connected to the Internet.
12 TROUBLESHOOTING Initialization Top of the Soundbar Before seeking assistance, check the following. Soundbar does not turn on. • Check whether the power cord of the Soundbar is correctly inserted into the outlet. INIT Soundbar works erratically. With the Soundbar on, press the (Volume) buttons on the body at the same time for at least 5 seconds. “INIT” appears on the display and then the Soundbar is initialized. CAUTION • All the settings of the Soundbar are initialized.
In case there is sound jitter, delays, or noise from the Subwoofer and Surround Speaker Sound drops out when connected via Bluetooth. • If there are any objects between the Soundbar and Subwoofer speaker, this could cause a problem. Please reposition these to a place without such an object. • There may be sound jitter or delays when the Subwoofer and Surround Speaker are far from the Soundbar. Please place them near the Soundbar.
13 LICENSE 14 OPEN SOURCE LICENSE NOTICE To send inquiries and requests for questions regarding open sources, contact Samsung Open Source (http://opensource.samsung.com) Dolby, Dolby Atmos, and the double-D symbol are registered trademarks of Dolby Laboratories Licensing Corporation. Manufactured under license from Dolby Laboratories. Confidential unpublished works. Copyright © 2012-2021 Dolby Laboratories. All rights reserved.
16 SPECIFICATIONS AND GUIDE Specifications Soundbar Main Unit Model Name HW-Q930B Weight 11.9 lbs (5.4 kg) 43.7 x 2.38 x 4.7 inches (1110.7 x 60.4 x 120.0 mm) Dimensions (W x H x D) Operating Temperature Range +41°F to +95°F (+5°C to +35°C) Operating Humidity Range 10 % ~ 75 % AMPLIFIER Rated Output power Supported play formats (30 W x 3) + (20 W x 6) + (10 W x 3) Dolby 5.1ch / Dolby Digital Plus / Dolby TRUE HD / Dolby ATMOS / DTS 5.
Subwoofer Subwoofer Name PS-WB96B Weight 21.6 lbs (9.8 kg) 8.3 x 15.9 x 15.9 inches (210.0 x 403.0 x 403.0 mm) Dimensions (W x H x D) AMPLIFIER Rated Output power 160 W Subwoofer Name PS-WB75B Weight 13 lbs (5.9 kg) 8.1 x 13.9 x 11.9 inches (205.0 x 353.0 x 302.0 mm) Dimensions (W x H x D) AMPLIFIER Rated Output power 160 W Surround Speaker (applicable models only) Wireless Surround Speaker SET Name PS-RB96B (LEFT/RIGHT) Weight 6.8 lbs (3.1 kg) 5.1 x 7.9 x 5.5 inches (129.5 x 201.3 x 140.
LIMITED WARRANTY TO ORIGINAL PURCHASER Samsung Electronics Canada Inc.(SECA), warrants that this product is free from defective material and workmanship. SECA further warrants that if this product falls to operate properly within the specified warranty period and the failure is due to improper workmanship or defective materials, SECA will repair or replace the product at its option. All warranty repairs must be performed by a SECA Authorized Service Center.
© 2022 Samsung Electronics Co., Ltd. All rights reserved. Contact SAMSUNG WORLD WIDE If you have any questions or comments relating to Samsung products, please contact the SAMSUNG customer care Center. HEADQUARTERS Samsung Electronics Canada Inc. 2050 Derry Road West, Mississauga, Ontario L5N 0B9 Canada TEL: 1-800-SAMSUNG (1-800-726-7864) www.samsung.com/ca/support Country Samsung Service Center Web Site CANADA 1-800-SAMSUNG(726-7864) 1-844-SAM-PAYS (726-7297) www.samsung.
MANUEL COMPLET HW-Q930B / HW-Q800B / HW-Q700B Imaginez les possibilités Nous vous remercions d’avoir fait l’acquisition de ce produit Samsung. Pour bénéficier d’un service plus complet, veuillez inscrire votre produit sur le site www.samsung.
INFORMATIONS RELATIVES À LA SÉCURITÉ ATTENTION (Pour le Canada) AVERTISSEMENTS L’émetteur/récepteur exempt de licence contenu dans le présent appareil est conforme aux CNR d’Innovation, Sciences et Développement économique Canada applicables aux appareils radio exempts de licence.
Consignes de sécurité importantes Lisez attentivement ces consignes avant d’utiliser l’appareil. Veillez à respecter toutes les consignes répertoriées ci-après. Conservez ces instructions à portée de main pour vous y référer ultérieurement. 1. Lisez attentivement ces consignes. 2. Conservez-les précieusement. 3. Tenez compte de tous les avertissements mentionnés. 4. Respectez toutes les instructions sans exception. 5. N’utilisez pas cet appareil à proximité de l’eau. 6. Nettoyez-le à l’aide d’un tissu sec.
CONTENU 01 Vérification des composants 6 02 Présentation du produit 7 Panneau supérieur du Soundbar. . . . . . . . . . . . . . . . . . . . . . . . . . . . . . . . . . . . . . . . . . . . . . . . . . . . . . . . . . . . . . . . . . . . . . . . . . . . . . . . . . . . . . . . . . . . . . . . . . . . . . . . . . . . . . . . . . . 7 Panneau inférieur du Soundbar. . . . . . . . . . . . . . . . . . . . . . . . . . . . . . . . . . . . . . . . . . . . . . . . . . . . . . . . . . . . . . . . . . . . . . . . .
10 Installation du Soundbar devant le téléviseur 33 Composant . . . . . . . . . . . . . . . . . . . . . . . . . . . . . . . . . . . . . . . . . . . . . . . . . . . . . . . . . . . . . . . . . . . . . . . . . . . . . . . . . . . . . . . . . . . . . . . . . . . . . . . . . . . . . . . . . . . . . . . . . . . . . . . . . . . . . 33 11 Mise à jour du logiciel 34 Mise à jour automatique . . . . . . . . . . . . . . . . . . . . . . . . . . . . . . . . . . . . . . . . . . . . . . . . . . . . . . . . . . . .
01 VÉRIFICATION DES COMPOSANTS SOUNDBAR Unité principale du Soundbar x2 Haut-parleur ambiophonique (en option) (gauche/droite) Télécommande du Soundbar / Piles Caisson de basses x 4 ou 2 Cordon d’alimentation (caisson de basses, haut-parleur ambiophonique, Soundbar) (en option) Câble HDMI x2 x2 (M4 x L10) Guide de montage mural Vis de fixation x4 x2 Support de montage mural Vis Pied en caoutchouc • Pour plus d’informations sur l’alimentation et la consommation électriques, reportez-vous à l’
02 PRÉSENTATION DU PRODUIT Panneau supérieur du Soundbar 1 3 1 2 3 2 4 4 HW-Q930B / HW-Q800B HW-Q700B 1 Bouton (Multifonction) (modèles Q930B/Q800B) • En mode veille, appuyez sur le bouton (Multifonction) pour allumer le Soundbar. • Appuyez sur le bouton (Multifonction) pour changer la source d’entrée. 1 Bouton (Alimentation) (modèle Q700B model) Permet de mettre l'appareil sous ou hors tension. 2 (Volume) Bouton Permet de régler le volume.
Panneau inférieur du Soundbar SERVICE 1 DIGITAL AUDIO IN (OPTICAL) 3 HDMI 4 HDMI TO TV (eARC/ARC) 5 2 SERVICE DIGITAL AUDIO IN (OPTICAL) HDMI IN 1 HDMI HDMI IN 2 HDMI TO TV (eARC/ARC) 1 POWER Branchez le cordon d’alimentation CA du Soundbar. (Voir la page 14) 2 SERVICE Connectez un dispositif de stockage USB pour mettre à niveau le logiciel du produit. 3 DIGITAL AUDIO IN (OPTICAL) Permet de connecter la sortie numérique (optique) d’un appareil externe.
03 UTILISATION DE LA TÉLÉCOMMANDE DU SOUNDBAR Insertion des piles avant d’utiliser la télécommande (2 piles AAA) Faites glisser le couvercle arrière dans le sens de la flèche jusqu’à ce qu’il soit complètement retiré. Insérez 2 piles AAA (1,5 V) orientées de sorte que leur polarité soit correcte. Refaites glisser le couvercle des piles à sa position initiale. Comment utiliser la télécommande 1 1 Alimentation 2 3 2 Appuyez sur ce bouton pour sélectionner une source connectée au Soundbar.
7 Commande du son En appuyant sur le bouton, vous pouvez régler la fonction audio, comme Spacefit Sound, AVA, Voice enhance mode, Night mode, Sync, Surround speaker mode ou Virtual. L’élément souhaité peut être ajusté à l’aide des boutons Haut/Bas. • Les fonctions Spacefit sound et AVA ne sont pas prises en charge par le modèle Q700B. • Voice enhance mode améliore les dialogues dans les films et à la télévision et permet de mieux les entendre.
Active Voice Amplifier (AVA) • Analyse le bruit externe en temps réel pendant que le Soundbar est actif, de sorte que la voix puisse toujours être entendue clairement. • Aucune donnée n’est enregistrée pendant l’analyse. • Cette fonctionnalité n’est pas prise en charge par le modèle Q700B.
Sortie Effet Standard Surround Game Adaptive sound Entrée Avec le caisson de basses uniquement Avec caisson de basse et haut-parleur ambiophonique 2.0 canaux 2.1 canaux 2.1 canaux 5.1 canaux 5.1 canaux 5.1 canaux / 7.1 canaux (DTS) 7.1 canaux 5.1 canaux 7.1 canaux Dolby Atmos®, DTS:X 5.1.2 canaux 7.1.4 canaux 2.0 canaux 5.1.2 canaux 7.1.4 canaux 5.1 canaux 5.1.2 canaux 7.1.4 canaux 7.1 canaux 5.1.2 canaux 7.1.4 canaux Dolby Atmos®, DTS:X 5.1.2 canaux 7.1.
Réglage du volume du Soundbar avec la télécommande du téléviseur Contrôlez le volume du Soundbar à l’aide de la télécommande du téléviseur. • Cette fonction ne peut être utilisée qu’avec des télécommandes infrarouges. Les télécommandes Bluetooth (télécommandes qui nécessitent un appairage) ne sont pas prises en charge. • Réglez le haut-parleur du téléviseur à Haut-parleur externe pour utiliser cette fonction.
04 CONNEXION DU SOUNDBAR Connexion de l’alimentation et des unités Utilisez le cordon d’alimentation pour brancher le caisson de basse, les haut-parleurs ambiophoniques et la Soundbar dans une prise électrique en respectant la séquence suivante : • Pour plus d’informations sur les exigences en matière d’alimentation électrique et de consommation d’énergie, reportez-vous à l’étiquette apposée sur le produit. (Étiquette : Arrière de l’unité principale du Soundbar 1.
Disposition recommandée pour les haut-parleurs MISE EN GARDE • Des antennes de réception sans fil sont intégrées dans le caisson de basse et les hautparleurs ambiophoniques sans fil. Protégez ces derniers de l’eau et de l’humidité. • Pour une écoute optimale, veillez à dégager l’espace autour du caisson de basse et des haut-parleurs ambiophoniques sans fil.
Connexion manuelle du caisson de basses ou des haut-parleurs ambiophoniques Avant d’effectuer la procédure de branchement manuel ci-dessous : • Vérifiez si les câbles d’alimentation de la Soundbar et du caisson de basse ou des haut-parleurs ambiophoniques sont bien branchés. • Assurez-vous que le Soundbar est éteint. 1. Éteignez le Soundbar. 2. Maintenez appuyé le bouton ID SET à l’arrière du caisson de basses et des haut-parleurs ambiophoniques pendant au moins 5 secondes.
Voyants à DEL à l’arrière du caisson de basses et des haut-parleurs ambiophoniques Voyant Caisson de basses État Allumé Description Résolution Connexion réussie (fonctionnement normal) - Récupération de la connexion Vérifiez si le câble d’alimentation raccordé à l’unité principale du Soundbar est correctement connecté ou attendez environ cinq minutes. Si le voyant à DEL continue à clignoter, essayez de connecter manuellement le caisson de basse et les hautparleurs ambiophoniques. Voir la page 16.
05 CONNEXION À UN TÉLÉVISEUR Connexion du téléviseur prenant en charge HDMI ARC (canal de retour audio) MISE EN GARDE • Lorsque le câble HDMI et le câble optique sont tous les deux connectés, le signal HDMI est reçu en premier. • Pour connecter le câble HDMI entre le téléviseur et le Soundbar, assurez-vous de connecter les bornes marquées ARC. Sinon, le son du téléviseur risque de ne pas être émis. • Le câble recommandé est un câble High Speed HDMI Cable with Ethernet.
Connexion à l’aide d’un câble optique Liste de contrôle de pré-connexion • Lorsque le câble HDMI et le câble optique sont tous les deux connectés, le signal HDMI est reçu en premier. • Lorsque vous utilisez un câble optique et que les bornes sont munies de caches, assurez-vous de retirer les caches. Câble optique (non fourni) Dessous du Soundbar DIGITAL AUDIO IN (OPTICAL) OPTICAL OUT Dessus du Soundbar Dessus du Soundbar D.IN D.IN 1.
Connexion par Bluetooth Lorsqu’un téléviseur Samsung est connecté via Bluetooth, vous pouvez entendre le son stéréo sans les tracas du câblage. • Un seul téléviseur Samsung peut être connecté à la fois. • Un téléviseur Samsung prenant en charge Bluetooth peut être connecté. Vérifiez les spécifications de votre téléviseur. Dessus du Soundbar 5 Sec BT PAIRING PAIR OU Dessus du Soundbar 5 Sec BT PAIRING La connexion initiale 1.
Quelle est la différence entre BT READY et BT PAIRING ? • BT READY : dans ce mode, vous pouvez reconnecter n’importe quel téléviseur ou appareil mobile Samsung connecté auparavant. • BT PAIRING : dans ce mode, vous pouvez connecter un nouvel appareil au Soundbar (Appuyez sur le bouton PAIR de la télécommande du Soundbar ou maintenez enfoncé le bouton (Marche/Arrêt microphone) / dessus du Soundbar et maintenez-le enfoncé pendant plus de 5 secondes pendant que le Soundbar est en mode « BT ».
Connexion en Wi-Fi Liste de contrôle de pré-connexion • La connexion Wi-Fi est disponible uniquement sur les téléviseurs Samsung. • Vérifiez que le routeur sans fil (Wi-Fi) est activé et que le téléviseur est connecté au routeur. • Le téléviseur et le Soundbar doivent être connectés au même réseau sans fil (Wi-Fi). • Si votre routeur sans fil (Wi-Fi) utilise un canal DFS, vous ne pourrez pas établir de connexion Wi-Fi entre le téléviseur et le Soundbar.
Utilisation de la fonction Q-Symphony Pour utiliser la fonction Q-Symphony, le Soundbar se synchronise avec un téléviseur Samsung afin d’émettre le son au moyen de deux appareils pour un effet ambiophonique optimal. Lorsque le Soundbar est connecté, le menu « TV+Soundbar » apparaît au-dessous du menu Sortie audio du téléviseur. Sélectionnez le menu correspondant. Menu du téléviseur Câble HDMI OU Câble optique (non fourni) D.
Utilisation du son Spacefit Offre une qualité sonore optimisée en analysant les espaces d’écoute. Méthode 1. Connexion par le Soundbar Pour activer cette fonction, activez le mode Spacefit sound à l’aide de la télécommande du Soundbar. ( Haut ) → « Spacefit sound On ») ( (Commande du son) → « Spacefit sound Off » → • Cette fonction est offerte par tous les modes audio. Méthode 2.
06 CONNEXION D’UN APPAREIL EXTERNE Méthode 1. Connexion à l’aide d’un câble HDMI (décodage et lecture Dolby Atmos / DTS:X possible) Liste de contrôle de pré-connexion • Si les options de sortie audio incluent une sortie audio secondaire, vérifiez qu’elle est désactivée. • Vérifiez que le contenu prend en charge Dolby Atmos® / DTS:X.
Méthode 2. Connexion à l’aide d’un câble optique Dessus du Soundbar D.IN Dessus du Soundbar Lecteur BD/DVD/Décodeur/ Console de jeu D.IN DIGITAL AUDIO IN (OPTICAL) OPTICAL OUT Câble optique (non fourni) Dessous du Soundbar 1. Utilisez un câble optique (non fourni) pour connecter le port DIGITAL AUDIO IN (OPTICAL) au Soundbar principal et le port OPTICAL OUT à l’appareil externe. 2. Allumez le Soundbar et l’appareil externe. 3. Pour sélectionner le mode « D.
07 CONNEXION D’UN APPAREIL MOBILE Méthode 1. Connexion par Bluetooth Lorsqu’un appareil mobile est connecté par Bluetooth, vous pouvez entendre le son stéréo sans les tracas du câblage. • Lorsque vous connectez un appareil Bluetooth associé alors que le Soundbar est éteint, le Soundbar s’allume automatiquement.
Remarques sur la connexion Bluetooth Placez un nouvel appareil à moins de 1 m (3,28 pi) pour vous connecter par Bluetooth. Si un code PIN vous est demandé lors de la connexion d’un appareil Bluetooth, entrez <0000>. Le Soundbar s’éteint automatiquement au bout de 18 minutes à l’état Prêt. Le Soundbar peut ne pas effectuer correctement la recherche ou la connexion Bluetooth dans les circonstances suivantes : ‒ S’il y a un fort champ électrique autour du Soundbar.
Méthode 2. Connexion par Wi-Fi (réseau sans fil) Pour connecter un Soundbar à un appareil mobile via un réseau sans fil (Wi-Fi), l’application SmartThings est requise. La connexion initiale 1. Installez et lancez l’application SmartThings sur votre appareil mobile (téléphone intelligent ou tablette). 2. Dans l’application, suivez les instructions à l’écran pour ajouter le Soundbar. • La fenêtre contextuelle automatique (deuxième illustration ci-dessous) peut ne pas s’afficher sur certains appareils.
Utilisation de la fonction Tap Sound Appuyez sur le Soundbar avec votre appareil mobile pour lire le son du contenu de l’appareil mobile via le Soundbar. • Cette fonction peut ne pas être prise en charge en fonction de l’appareil mobile. • Cette fonction n’est compatible qu’avec les appareils mobiles Samsung fonctionnant sous Android 8.1 ou une version ultérieure. Application SmartThings Dessus du Soundbar Appareil mobile 1. Activez la fonction Tap Sound sur votre appareil mobile.
08 CONNEXION PAR APPLE AIRPLAY 2 • Cette fonction pourrait ne pas être disponible dans certains pays. • Ce Soundbar Samsung prend en charge AirPlay 2 et nécessite iOS 11.4 ou version ultérieure. Avec AirPlay 2, vous pouvez diffuser en flux de la musique, des balados et d’autres sons à partir de votre appareil Apple sur le Soundbar Samsung. • Assurez-vous que le Soundbar est sous tension et qu’il est connecté au même réseau Wi-Fi que votre appareil Apple.
09 INSTALLATION DU SUPPORT MURAL 2. Alignez la ligne centrale du guide de montage mural du gabarit papier sur le centre de votre téléviseur (si vous montez le Soundbar sous ce dernier), puis fixez le guide de montage mural au mur avec du ruban adhésif. • Si vous ne faites pas l’installation sous un téléviseur, placez la ligne centrale au centre de la zone d’installation. Précautions d’installation • Effectuez l’installation sur un mur vertical uniquement.
10 INSTALLATION DU SOUNDBAR DEVANT LE TÉLÉVISEUR 7. Installez le Soundbar à l’aide des supports muraux en accrochant les supports muraux sur les vis de maintien sur le mur. Composant x4 8. Faites glisser le Soundbar vers le bas, comme illustré ci-dessous, de sorte que les supports muraux reposent fermement sur les vis de maintien.
Comme illustré sur l'image, alignez le centre du Soundbar avec le centre du téléviseur, puis placez soigneusement le Soundbar sur le support du téléviseur. À ce stade, placez les microphones (modèles applicables seulement) à l’avant du support pour ne pas nuire à la reconnaissance vocale.
12 DÉPANNAGE Initialisation Dessus du Soundbar Avant de communiquer avec l’assistance, effectuez les vérifications suivantes. Le Soundbar ne s’allume pas. • Vérifiez si le cordon d’alimentation du Soundbar est correctement inséré dans la prise. INIT Pendant que le Soundbar est allumé, appuyez sur les boutons (Volume) de l’unité pendant au moins 5 secondes. Le message « INIT » apparaît sur l'écran et le Soundbar s'initialise. MISE EN GARDE • Tous les paramètres du Soundbar sont initialisés.
En cas d’instabilité du son, de retards ou de bruit provenant du caisson de basses et du haut-parleur ambiophonique Le son se coupe lors d’une connexion par Bluetooth. • S’il y a des objets entre le Soundbar et le caisson de basses, cela peut causer un problème. Veuillez les déplacer à un autre endroit. • Le son pourrait être instable ou retardé lorsque le caisson de basses et le haut-parleur ambiophonique sont éloignés du Soundbar. Veuillez les rapprocher du Soundbar.
13 LICENCE Dolby, Dolby Atmos, and the double-D symbol are registered trademarks of Dolby Laboratories Licensing Corporation. Manufactured under license from Dolby Laboratories. Confidential unpublished works. Copyright © 2012-2021 Dolby Laboratories. All rights reserved. For DTS patents, see http://patents.dts.com. Manufactured under license from DTS, Inc. (for companies headquartered in the U.S./Japan/Taiwan) or under license from DTS Licensing Limited (for all other companies).
16 SPÉCIFICATIONS ET GUIDE Caractéristiques techniques Unité principale du Soundbar Nom du modèle HW-Q930B 11,9 lb (5,4 kg) Poids 43,7 x 2,38 x 4,7 inches (1110,7 x 60,4 x 120,0 mm) Dimensions (L × H × P) Plage de températures de fonctionnement +41 °F à +95 °F (+5 °C à +35 °C) Plage d’humidité de fonctionnement 10 % à 75 % AMPLIFICATEUR Puissance de sortie nominale Formats de lecture pris en charge (30 W x 3) + (20 W x 6) + (10 W x 3) Dolby 5.
Caisson de basses Nom du caisson de basses PS-WB96B 21,6 lb (9,8 kg) Poids 8,3 x 15,9 x 15,9 po (210,0 x 403,0 x 403,0 mm) Dimensions (L × H × P) AMPLIFICATEUR Puissance de sortie nominale 160 W Nom du caisson de basses PS-WB75B 13 lb (5,9 kg) Poids 8,1 x 13,9 x 11,9 po (205,0 x 353,0 x 302,0 mm) Dimensions (L × H × P) AMPLIFICATEUR Puissance de sortie nominale 160 W Haut-parleur ambiophonique (modèles applicables seulement) Nom de l’ensemble de haut-parleurs ambiophoniques sans fil PS-RB96B (G
GARANTIE LIMITÉE À L’ACHETEUR INITIAL Samsung Electronics Canada Inc. (SECA) garantit ce produit contre tout défaut de fabrication. SECA garantit aussi que si cet appareil ne fonctionne pas convenablement durant la période de garantie SECA se réservera le droit de réparer ou de remplacer l’appareil défectueux. Toutes les réparations sous garantie doivent être effectuées par un Centre de service autorisé SECA.
© 2022 Samsung Electronics Co., Ltd. Tous droits réservés. Comment contacter Samsung dans le monde Si vous avez des suggestions ou des questions concernant les produits Samsung, veuillez contacter le Service Consommateurs Samsung. SIÈGE SOCIAL Samsung Electronics Canada Inc. 2050 Derry Road West, Mississauga, Ontario L5N 0B9 Canada TEL: 1-800-SAMSUNG (1-800-726-7864) www.samsung.com/ca/support Pays Centre de service de Samsung Site Web CANADA 1-800-SAMSUNG(726-7864) 1-844-SAM-PAYS (726-7297) www.