
Owner's Manual
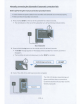
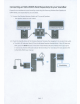
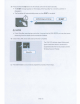
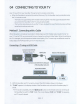

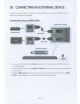

Table Of Contents
- User Manual
- Safety Information
- Precautions
- About This Manual
- Contents
- Checking the Components
- Product Overview
- Connecting the Soundbar
- Connecting to your TV
- Connecting an External Device
- Connecting a USB Storage Device
- Connecting a Mobile Device
- Using the Remote Control
- Installing the Wall Mount
- Placing the Soundbar on a TV stand
- Troubleshooting
- License
- Open Source License Notice
- Important Notes About Service
- Specifications and Guide
- Warranty
- Full Manual
- 01 Checking the Components
- 02 Product Overview
- 03 Connecting the Soundbar
- 04 Connecting to your TV
- 05 Connecting an External Device
- 06 Connecting a USB Storage Device
- 07 Connecting a Mobile Device
- 08 Using the Remote Control
- 09 Installing the Wall Mount
- 10 Placing the Soundbar on a TV stand
- 11 Software Update
- 12 Troubleshooting
- 13 License
- 14 Open Source License Notice
- 15 Important Notes About Service
- 16 Specifications and Guide
- Template

3.
Press
and
hold
the
Up
button
on
the remote control for at
least
5
seconds.
•
The
ID
SET
message
appears
on
the display of the
Sound
bar
for a
moment,
and
then
it
disappears.
•
The
Sound
bar
will automatically power
on
when
ID
SET
is
complete.
~
(
SAMSUNG
logo
is
on
the
top
]
it
CAUTION
• If your
Sound
bar
was
playing
music
when
it
connects
to the
SWA-8500S,
you
may
hear
some
stuttering from the woofer
as
the connection finalizes.
4.
Check
if
the
LI
NK
LED
is
solid
blue
(connection
complete).
[ BlueisOn J
The
LINK
LED
indicator
stops
blinking
and
glows a
solid
blue
when
a connection
is
established
between
the
Sound
bar
and
the
Wireless
Receiver
Module.
5.
If the
SWA-8500S
is
not
connected,
repeat the
procedure
from
Step
2.
ENG-8