HW-K950 User Manual For further information, refer to the Web Manual. Web manual : www.Samsung.com → Owners & Support → Manuals & Downloads → Product name search → HW-K950 * Design, specifications and App screen are subject to change without prior notice.
SAFETY INFORMATION c The following also applies to the Wireless Subwoofer (PS-KW1-1) and Surround Speakers (PS-KS2-1, PS-KS2-2). SAFETY WARNINGS TO REDUCE THE RISK OF ELECTRIC SHOCK, DO NOT REMOVE THE COVER (OR BACK). NO USER-SERVICEABLE PARTS ARE INSIDE. REFER SERVICING TO QUALIFIED SERVICE PERSONNEL. CAUTION RISK OF ELECTRIC SHOCK. DO NOT OPEN. This symbol indicates that high voltage is present inside. It is dangerous to make any kind of contact with any internal part of this product.
Important Safety Instructions Read these operating instructions carefully before using the unit. Follow all the safety instructions listed below. Keep these operating instructions handy for future reference. 1) Read these instructions. 2) Keep these Instructions. 3) Heed all warnings. 4) Follow all instructions. 5) Do not use this apparatus near water. 6) Clean only with dry cloth. 7) Do not block any ventilation openings. Install in accordance with the manufacturer's instructions.
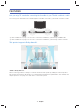
FEATURES Lets you enjoy TV sound after connecting the Soundbar to your TV with or without a cable. You can enjoy rich and realistic TV sound through the Soundbar connected to your TV with or without a cable. c Refer to Method 1 on page 7 to see how to connect the Soundbar to your TV using an HDMI Cable. c Refer to Method 2 on page 8 to see how to connect the Soundbar to your TV using a wireless network. This product supports Dolby Atmos®. * What is Dolby Atmos®? Atmos technology enhances existing 5.
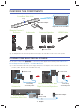
CHECKING THE COMPONENTS Soundbar Main Unit Top 3 AC/DC Adapter Right Side of the Soundbar Remote Control / Batteries Subwoofer HDMI Cable Surround Speaker SOURCE SOUND LEVEL EFFECT VOL Left WOOFER Right SOUNDBAR 1 Power Cord 2 Power Cord c To distinguish the left surround speaker from the right, check the label on the rear of each speaker.
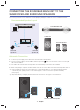
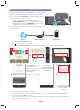
CONNECTING THE SOUNDBAR MAIN UNIT TO THE SUBWOOFER AND SURROUND SPEAKERS You can enjoy rich bass tones and better sound quality by linking the subwoofer to the Soundbar main unit. Recommended Speaker Layout TV Soundbar Main Unit S it Soundbar Main Unit Subwoofer Subwoofer 90° 90° Surround Speaker 110° 110° Surround Speaker L Surround Speaker R Left Right Automatic Connection 1. Connect a power supply to the subwoofer and surround sound speakers. 2.
Connecting the Subwoofer and Surround Speakers Manually if the Automatic Connection Fails c Before You Begin • Make sure that the Soundbar, the subwoofer, and the surround speakers are plugged in. • Make sure that the Soundbar is turned on. 1. Press and hold ID SET on the rear of the subwoofer and surround speakers for at least 5 seconds. The red indicator at the rear of each speaker turns off and the blue indicator blinks.
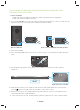
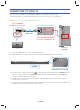
CONNECTING TO YOUR TV You can enjoy TV sound after connecting the Soundbar to your TV with or without a cable. c Important: Before you begin, put the batteries into the remote. See page 17 for instructions. Method 1. Connecting with a Cable Check the HDMI IN (TV-ARC) port on your TV. AUX IN HDMI OUT (TV-ARC) DIGITAL AUDIO IN (OPTICAL) HDMI IN (ARC) HDMI Cable HDMI OUT (TV-ARC) Check the HDMI OUT (TV-ARC) port on the Soundbar main unit. HDMI IN 1 HDMI IN 2 Bottom of Soundbar 1.
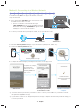
Method 2. Connecting to a Wireless Network Installing the Samsung Multiroom App and Connecting Wirelessly To install Samsung Multiroom app for the first time, follow the steps shown below. 1. Press and hold the SPK ADD button on the bottom of the Soundbar for more than 1 second. • There is a notification sound and the message “ADD SPEAKER” appears on the Soundbar’s main unit. Afterwards, the message “WIFI READY” appears when standby-for-connection mode activates.
Adding the Soundbar to an Existing Multiroom Audio System If the Samsung Multiroom app is already installed for use with another multiroom audio device, follow these steps to add the Soundbar. 1. Press and hold the SPK ADD button on the bottom of the Soundbar for more than 1 second. • There is a notification sound and the message “ADD SPEAKER” appears on the Soundbar’s main unit. Afterwards, the message “WIFI READY” appears when standby-for-connection mode activates.
Connecting the Soundbar to your Samsung Smart TV You can connect your TV to the Soundbar through a wireless network and enjoy the TV sound. c Important: Make sure that the TV and Soundbar are connected to the same network. (How to check your Samsung TV network : Home menu Network Network Status) Configuring Settings from your Samsung Smart TV c To play sound via the Soundbar, make sure that your TV model supports the Multiroom feature (Samsung Smart TVs released after 2014).
CONNECTION VIA BLUETOOTH You can connect a Bluetooth device to the Soundbar and enjoy music with stereo sound, all without wires! c It is not possible to connect multiple Bluetooth devices at the same time. Connect Bluetooth device 1. Press the select BT. button on the right side of the Soundbar or the SOURCE button on the remote control to 2. Select the Bluetooth menu on the Bluetooth device you want to connect. (Refer to the Bluetooth device's user manual.) 3.
CONNECTING DEVICES IN ORDER TO USE DOLBY ATMOS® This product supports Dolby Atmos®. c Important: Dolby Atmos® works only in HDMI mode. It is not compatible with other input sources. HDMI Cable Bottom of the Soundbar HDMI IN HDMI OUT (TV-ARC) Soundbar HDMI IN 1 Or HDMI Cable External Device HDMI IN 2 HDMI OUT 1. Connect an HDMI cable from the HDMI IN 1 or HDMI IN 2 jack on the back of the product to the HDMI OUT jack on your digital device.
CONNECTING AN EXTERNAL DEVICE HDMI Cable Bottom of the Soundbar HDMI IN HDMI OUT (TV-ARC) Soundbar HDMI IN 1 Or HDMI Cable External Device HDMI IN 2 HDMI OUT 1. Connect an HDMI cable from the HDMI IN 1 or HDMI IN 2 jack on the back of the product to the HDMI OUT jack on your digital device. Use the HDMI cable to connect the HDMI IN port on the TV to the HDMI OUT (TV-ARC) port on the bottom of the Soundbar. button on the right side of the Soundbar or the SOURCE button on the remote control to 2.
Wallmount Components INSTALLING THE WALL MOUNT You can use the wall mount bracket to mount this unit on a wall. Installation Precautions Bracket-Wall Mount (2 EA) • Install on a vertical wall only. • Do not install the Soundbar system in a location with high temperature and/or humidity. Install the system on a stable wall that can bear the weight of the Soundbar main unit. Holder-Screw (2 EA) • Check the strength of the wall.
2. Align the Paper Template's Center Line with the center of your TV (if you are mounting the Soundbar below your TV), and then fix the Wall Mount Guide to the wall using tape. 5. Push a screw (not supplied) through each Holder-Screw, and then screw each screw firmly into a support screw hole. c If you are not mounting below a TV, place the Center Line in the center of the installation area. C CENTER LINE C TYPE : 700mm 6.
7. Install the Soundbar with the attached BracketWall Mounts by hanging the Bracket-Wall Mounts on the Holder-Screws on the wall. INSTALLING THE SURROUND SPEAKERS ON A WALL You can purchase wall mounts separately to install the surround speakers on a wall. Considerations for Purchasing • Endurable load : Above 17.6 Ibs (8.0 Kg) • Hole size : 1/4 - 20 threaded insert 8. Slide the Soundbar down as shown below so that the Bracket-Wall Mounts rest securely on the Holder-Screws.
REMOTE CONTROL BUTTONS & FEATURES Inserting Batteries before using the Remote Control (AA batteries X 2) Slide the battery cover in the direction of the arrow until it is completely removed. Insert 2 AA batteries (1.5V) in the correct +/- polarity. Slide the battery cover back into position. SOURCE SOUND Controlling the Volume of Soundbar by using Your TV Remote Control LEVEL EFFECT 1. Press and hold the SOUND button for more than 5 seconds while the Soundbar is turned on. 2.
You can select from 6 sound modes: STANDARD, MUSIC, CLEAR VOICE, SPORTS, MOVIE, and NIGHT. EFFECT c NIGHT mode When changing a channel or music source, the volume difference between different music input sources is automatically adjusted to be suitable for listening. c DRC (Dynamic Range Control) Lets you apply dynamic range control to Dolby Digital tracks. Press and hold the EFFECT button for about 5 seconds in standby mode to toggle the DRC (Dynamic Range Control) function ON - DRC and OFF - DRC.
STL STR FTL SL LEVEL FTR FL C Surround Speaker L Soundbar Main Unit SR FR Surround Speaker R The ATMOS Soundbar has 5.1.4 channel sound. Use this button to adjust the volume of each of the speakers. Press this button, use the Left/Right buttons to select a speaker, and then use the Up/Down buttons to increase or decrease the level (volume).
TROUBLESHOOTING Before seeking assistance, check the following. The unit will not turn on. Is the power cord plugged into the outlet? È Connect the power plug to the outlet. For DTS patents, see http://patents.dts.com. Manufactured under license from DTS Licensing Limited. DTS, the Symbol, DTS in combination with the Symbol, and DTS Digital Surround are registered trademarks or trademarks of DTS, Inc. in the United States and/or other countries. © DTS, Inc. All Rights Reserved.
SPECIFICATIONS Weight Soundbar Main Unit 14.8 lbs (6.7 kg) Subwoofer (PS-KW1-1) 21.2 lbs (9.6 kg) Surround Speaker (PS-KS2-1 (L), PS-KS2-2 (R)) 4.4 lbs (2.0 kg) Soundbar Main Unit 47.6 x 3.2 x 5.2 inches (1210.2 x 81.7 x 131.4 mm) Subwoofer (PS-KW1-1) 8.0 x 15.7 x 16.3 inches (203.9 x 399.0 x 414.3 mm) Surround Speaker (PS-KS2-1 (L), PS-KS2-2 (R)) 4.7 x 8.3 x 5.6 inches (120.2 × 210.9 × 141.
LIMITED WARRANTY TO ORIGINAL PURCHASER This SAMSUNG brand product, as supplied and distributed by SAMSUNG and delivered new, in the original carton to the original consumer purchaser, is warranted by SAMSUNG against manufacturing defects in materials and workmanship for a limited warranty period of: One (1) Year Parts and Labor* (*90 Days Parts and Labor for Commercial Use) This limited warranty begins on the original date of purchase, and is valid only on products purchased and used in the United States.
The party responsible for product compliance: Samsung Electronics Co., LTD. America QA lab of Samsung 19 Chapin Rd. Building D, Pine Brook, New Jersey 07058 Questions or Comments? COUNTRY IN THE US CALL 1-800-SAMSUNG (726-7864) OR VISIT US ONLINE AT www.samsung.com/us/support WRITE Samsung Electronics America, Inc. 85 Challenger Road Ridgefield Park, NJ 07660 © 2016 Samsung Electronics Co., Ltd. All rights reserved.