
AV Receiver System User Manual


Table Of Contents
- Safety information
- Features
- Contents
- Description
- Connections
- CONNECTING A CD PLAYER
- CONNECTING AN iPod
- CONNECTING THE FM ANTENNA
- Basic functions of your AV Receiver
- BEFORE USING THE AV RECEIVER
- Basic functions of your AV Receiver
- Setup
- SETUP MENU TREE
- SETTING THE SPEAKER SIZE
- CONNECTION SETTING FOR SURROUND BACK
- SETTING THE SPEAKER LISTENING DISTANCE
- SETTING THE SPEAKER LEVEL
- SETTING THE TEST TONE
- SETTING DOLBY PRO LOGIC MODE
- SETTING DOLBY PRO LOGIC IIx
- SETTING TONE CONTROL
- SETTING NEO:6 MODE
- SETTING EX/ES MODE
- AV SYNC
- MP3 ENHANCER
- SMART VOLUME
- ASC (AUTO SOUND CALIBRATION) SETUP
- DRC SETUP
- DUAL MONO SETUP
- HDMI SETUP
- VARIABLE SET (Low Power Consumption SETUP)
- VIDEO CONV. (Video Conversion)
- ZONE2 SETUP
- 12-V TRIGGER
- Operation
- USING THE SURROUND MODES
- LISTENING TO THE RADIO
- USING AN iPod
- CONVENIENT FUNCTIONS
- SOFTWARE UPGRADE
- Miscellaneous
- OPERATING YOUR TV WITH THE REMOTE CONTROL
- OPERATING YOUR DVD OR BD PLAYER WITH THE REMOTE CONTROL
- Troubleshooting
- ASC Error List
- Appendix
- SPECIFICATIONS
18
Connections
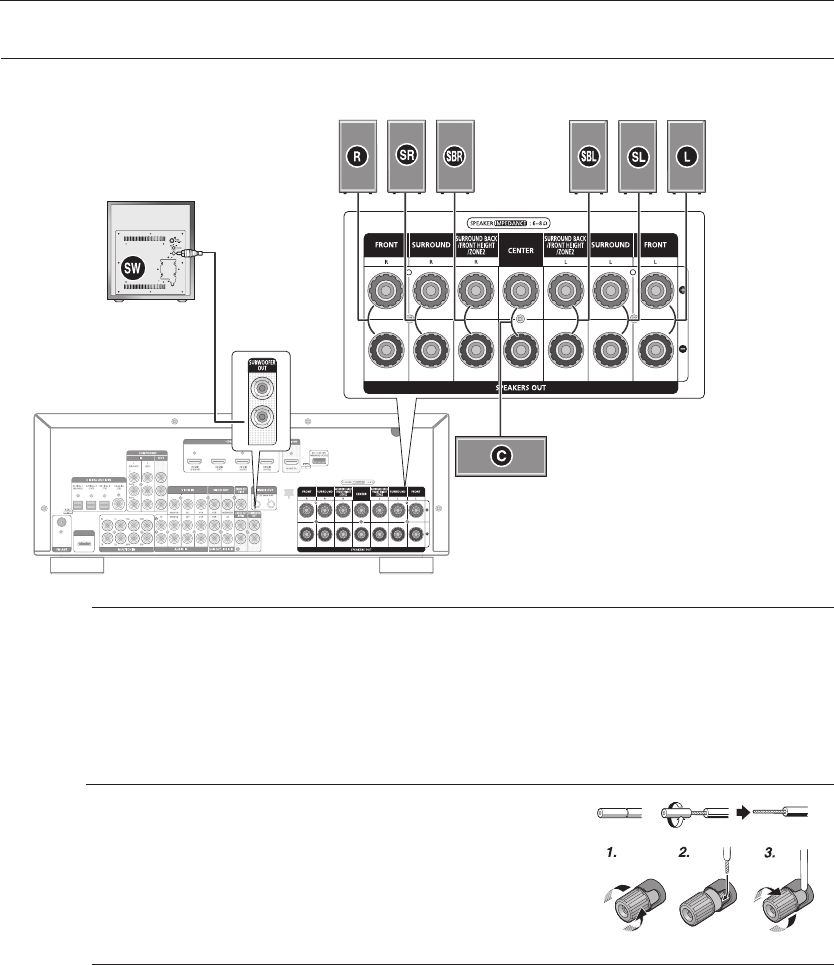
CONNECTING THE SPEAKERS
Connecting Speaker Wire
Loosen the knob by turning counterclockwise.
Insert the bare part of the wire into the hole in the side of each
terminal.
Tighten the knob by turning clockwise to secure the wire.
Keep the subwoofer speaker out of reach of children to prevent them from inserting their hands or objects
into the duct (hole).
Never touch speaker terminals while the power is on. Doing so could result in electric shock.
Make sure the polarities (+ and -) are correct.
1.
2.
3.
M
SURROUND (R)
SURROUND BACK (R)
FRONT (R)
CENTER
ACTIVE SUBWOOFER
FRONT (L)
SURROUND (L)
SURROUND BACK (L)
If you want to use two active subwoofer speakers, connect both subwoofer speakers into the SUBWOOFER OUT terminals
in the rear panel.
When using Dolby Pro Logic IIz, connect the Surround Back Speakers (FHL, FHR) to SURROUND BACK/FRONT HEIGHT
Jack.
M
- HW-C900-XAA_0831.indd 18 - HW-C900-XAA_0831.indd 18 2010-08-31 6:21:432010-08-31 6:21:43