INSTALL GUIDE HG43NJ690U HG50NJ690U HG55NJ690U HG65NJ690U HG75NJ690U Thank you for purchasing this Samsung product. To receive more complete service, please register your product at www.samsung.com Model Serial No.
Before Reading This Install Guide This TV B2B (Business to Business) model is designed for hotels or the other hospitality businesses, supports a variety of special functions, and lets you limit some user (guest) controls. Figures and illustrations in this Install Guide are provided for reference only and may differ from the actual product appearance. Product design and specifications may change without notice. Operational Modes This TV has two modes: Interactive and Standalone mode.
Warning! Important Safety Instructions Please read the Safety Instructions before using your TV. CAUTION Class II product: This symbol indicates that a safety connection to electrical earth (ground) is not required. RISK OF ELECTRIC SHOCK. DO NOT OPEN. CAUTION: TO REDUCE THE RISK OF ELECTRIC SHOCK, DO NOT REMOVE COVER (OR BACK). THERE ARE NO USER SERVICEABLE PARTS INSIDE. REFER ALL SERVICING TO QUALIFIED PERSONNEL. AC voltage: Rated voltage marked with this symbol is AC voltage.
•• Before connecting the AC power cord to the DC adaptor outlet, make sure that the voltage designation of the DC adaptor corresponds to the local electrical supply. •• Never insert anything metallic into the open parts of this apparatus. This may cause a danger of electric shock. •• To avoid electric shock, never touch the inside of this apparatus. Only a qualified technician should open this apparatus. •• Be sure to plug in the power cord until it is firmly seated.
Contents Before Reading This Install Guide ----------------------------------------------------------------------------- 2 Warning! Important Safety Instructions ----------------------------------------------------------------------------- 3 01 Package Content 02 TV Installation 03 04 Assembling the swivel (43″-65″) ----------------------------------------------------------------------------- 8 Installing the LED TV Stand ----------------------------------------------------------------------
08 Using a Multi Code Remocon 09 Setting the Soundbar Samsung Soundbar (AirTrack) and Hospitality TVs in 2018 ----------------------------------------------------------------------------- 50 10 Editing Channels Channel Bank Editor (Smoovie TV Only) ----------------------------------------------------------------------------- 51 Using Channel Editor ----------------------------------------------------------------------------- 52 11 Anti-theft Kensington Lock 12 Specifications and Other Informatio
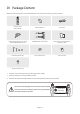
01 Package Content Make sure the following items are included with your TV. If any items are missing, contact your dealer. Remote Control (AA59-00817A) Batteries (AAA x 2) Power Cord Data Cable (depending on the model) (BN39-00865B, BN39-01011E) COMPONENT IN / AV IN Adapter Safety Guide / Quick Setup Guide / Regulatory Guide Hotel Mount Kit (43″-65″) Cable Guide (43″-65″) Cable Guide (75″) Wall Mount Adapter (x 4) •• The items’ colors and shapes may vary depending on the models.
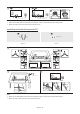
02 TV Installation Assembling the swivel (43″-65″) WARNING: If you configure the TV to swivel, you must attach it securely to the floor, a desk, a dresser top, etc. as described in the installation instructions. The LED TVs have swivel stands. You can configure these stands so that the TVs swivel 20 degrees left and right, 60 degrees left and right, or 90 degrees left and right using the BRACKET HOLDER SWIVEL. •• This function is not available on the HG75NJ690U model.
Installing the LED TV Stand Assembling the Stand and Components (43″-65″) When installing the stand, use the provided components and parts.
4 NOTE •• Make sure to distinguish between the front and back of each component when assembling them. •• Make sure that at least two persons lift and move the TV. Assembling the Stand and Components (75″) A B x 4 (M4 x L14) Stand x 1 Screws 1 2 3 x4 (M4 x L14) NOTE •• Make sure to distinguish between the front and back of each component when assembling them. •• Make sure that at least two persons lift and move the TV.
Assembling the Hotel Mount Kit (43˝-65˝) A B Short Bolt x 2 C Long Bolt x 2 A D Washer x 2 Nut x 2 or B C D [[ Affix the stand to a flat surface such as a dresser top, desk top, or entertainment center as shown. WARNING: To prevent injury, you must attach this TV securely to the floor, a table, a dresser top, etc. with the Hotel Mount Kit as described in these instructions.
Installing the wall mount kit You can mount the TV on the wall using a wall mount kit (sold separately). Wall mount Adapter Wall mount bracket TV C Wall mount Adapter Wall mount bracket TV C •• The Product shape may differ depending on the model. The wall mount kit (sold separately) allows you to mount the TV on a wall. For detailed information on installing the wall mount, see the instructions provided with the wall mount. Contact a technician for assistance when installing the wall mount bracket.
Securing the TV to the Wall Caution: Pulling, pushing, or climbing on the TV may cause the TV to fall. In particular, ensure your children do not hang on or destabilize the TV. This action may cause the TV to tip over, causing serious injuries or death. Follow all safety precautions provided in the Safety Flyer included with your TV. For added stability and safety, you can purchase and install the anti-fall device. To Prevent the TV from Falling •• TV Holder Kits are sold separately.
Wall Mount Kit Specifications (VESA) Install your wall mount on a solid wall perpendicular to the floor. If you are attaching the wall mount to building materials other than plaster board, contact your nearest dealer. If installed on a ceiling or slanted wall, the TV may fall and cause severe personal injury. •• The wall mount kit is not supplied, but sold separately. •• NOTE –– Standard dimensions for wall mount kits are shown in the table below.
Providing proper ventilation for your TV When you install your TV, maintain a distance of at least 4 inches (10 cm) between the TV and other objects (walls, cabinet sides, etc.) to ensure proper ventilation. Failing to maintain proper ventilation may result in a fire or a problem with the product caused by an increase in its internal temperature. When you install your TV with a stand or a wall mount, we strongly recommend you use parts provided by Samsung Electronics only.
03 The Remote Control About the Buttons on the Remote Control •• The images, buttons, and functions of the remote control may differ depending on the model. •• The remote control has Braille points on the Power, Channel, Volume, and Select buttons and can be used by visually impaired persons. Displays and selects the available video sources. Turns the TV on and off. Gives direct access to channels. Selects additional digital channels being broadcast by the same digital station.
Installing batteries into the remote control Match the polarity of the batteries to the symbols in the battery compartment. •• Use the remote control within 23 feet of the TV. •• Bright light may affect the performance of the remote control. Avoid using near bright fluorescent lights or neon signs. •• The color and shape of the remote may vary depending on the model.
04 Initial Setup When you turn on your TV for the first time, it immediately starts the Initial Setup. Follow the instructions displayed on the screen and configure the TV's basic settings to suit your viewing environment. If you already completed the Initial Setup, run the Initial Setup again using the following menu. •• Hotel Option (MUTE > 1 > 1 > 9 > SelectE) > System > TV Reset If you select TV Reset, the TV resets all values to their factory defaults.
Previous 2 Next 3 Clock Settings 6 Set the correct time by applying daylight saving time (if required) and setting your local time zone. Clock Mode Auto Date --/--/---- Time --:-- -- DST Current Time --:-- -- Off Time Zone Eastern Setting the current time •• If the TV will be tuned to digital broadcast channels, and these channels transmit date and time information, set the Clock Mode to Auto. The TV will set the date and time automatically.
05 The Connection Panel BACK OF TELEVISION ➀ ➆ ➁ ➇ ➈ ➉ ➂ ➃ ➄ AV IN COMPONENT IN ➅ •• Whenever you connect an external device to your TV, make sure that power on the TV and the device is turned off. •• When connecting an external device, match the color of the connection terminal to the cable. ① USB (5V 0.5A), USB (HDD 5V 1A) –– Connector for software upgrades and Media Play, etc. –– Service connection. ② DIGITAL AUDIO OUT (OPTICAL) Connects to a Digital Audio component.
④ LAN Connect to a wired LAN using CAT 7 cable. ⑤ COMPONENT IN / AV IN –– Use to connect to Component video / audio devices such as DVD players and AV (Composite) devices such as VCRs. –– Connect audio cables to L-AUDIO-R on your TV (with AV IN / Component IN Adapter) and the other ends to corresponding audio out jacks on A/V or Component devices. –– The COMPONENT IN jack is also used as the VIDEO jack.
06 Connections Connecting to your Internet network You can set up your TV so that it can access the SMART TV applications through your local area network (LAN) using a wired or wireless connection. •• After you have physically connected your TV to your network, you must configure the network connection to complete the process. You can configure the connection after the Initial Setup process, through the TV’s menu.
Network Security Protocols The TV only supports the following wireless network security protocols: •• Authentication Modes: WEP, WPAPSK, WPA2PSK •• Encryption Types: WEP, TKIP, AES In compliance with the newest Wi-Fi certification specifications, Samsung TVs do not support WEP or TKIP security encryption in networks running in the 802.11n mode.
Connecting the TV to an SBB or STB TV Rear Panel STB (SBB) ETH MODEM Data Cable Connect the DATA jack of the TV to the ETH MODEM jack of the STB (SBB) with the Data cable. •• The ETH MODEM jack name that you connect the Data Cable to may differ depending on the SBB or STB type. •• The remote control IR signal need to meet the following specification to use IR pass through function. IR signal reciever specification –– Band pass filter center frequency: 37.
List of Hospitality SI Vendors and Compatible Data Cables Supplied with the TV •• Confirm you are using the correct data cable for your SI vendor. Refer to the code label on the data cables. •• Contact your nearest dealer or your SI Vendor to buy the data cable not included in the TV. Note the labeled end. SI Vendor Confirm the code on the Code Label. Cable code Note the labeled end.
Connecting the Bathroom Speakers You can connect the Bathroom Speakers using the following method. Connecting through the Variable Output (available without an external amplifier) TV Rear Panel 1 Speaker 2 VOL+ VOL- Volume Control Box •• The rear panel may differ depending on the model. 1 Connect the VARIABLE AUDIO OUT port of the TV to the Bathroom Wall Speakers of the hotel.
Connecting the RJP (Remote Jack Pack) Connect the input jacks on the TV to the RJP. The RJP lets guests connect audio and video sources to the TV. RJP Rear USB HDMI S-VIDEO RCA AUDIO/PC RS/232 3 RS-232 Data Cable 2 HDMI cable 1 Video / Audio Cable TV Rear Panel •• The rear panel may differ depending on the model. 1 Connect the AV IN [VIDEO] / [L-AUDIO-R] port of the TV (with AV IN Adapter) to the RCA port of the RJP. 2 Connect the HDMI port of the TV to the HDMI port of the RJP.
•• RJP (Remote Jack Pack): The RJP is a hardware module that has various audio and video inputs (A/V video, A/V audio, PC and HDMI) and corresponding outputs. The corresponding outputs are connected from the RJP to the TV. The RJP communicates with the TV via RS232. The RJP communicates with the TV by sending messages regarding active or inactive sources. –– A group of Hotel Option menu items let you assign numbered priorities to the jacks of the RJP. 1 is the highest priority and 2 is the lowest.
07 Setting the Hotel Option Menus To access the Hotel Option menus, press MUTE > 1 > 1 > 9 > SelectE buttons on your remote control. To control the TV functions in the Hotel Option menu, the TV has two modes, the Standalone mode and the Interactive mode. The menu items that differ between the modes are listed below. Menu items in the Standalone mode only: •• SI Vendor: Smoovie / SSCP •• Network / Home Menu / REACH Solution / H.Browser Solution / HMS / Virtual Standby / Room Number and its submenus.
Hotel Option menu items To enter this menu, press the MUTE > 1 > 1 > 9 > SelectE buttons on the remote control in order. To exit from this menu, turn off (or turn off and unplug the power cable if you have changed SI vendor) the TV, and then turn on again. Any changes you made are saved. •• The menu items may not be supported depending on the models. Hotel Option menu Item Description Hospitality Mode Select Hospitality Mode. •• Interactive: TV works with an SI STB or SBB.
Hotel Option menu Item Channel Setup Gives you direct, immediate access to some of the channel menu functions on the user Broadcasting menu such as Auto Program, Audio Options, etc. Channel Editor Lets you edit the channels stored in the TV's memory. •• Change the channel numbers and names, manage genre and language groups and delete channels. •• Apply the Screen Off to channels you select. The Screen Off blanks out the video from a channel and outputs only audio.
Hotel Option menu Item Clock Music Mode Remote Jack Pack Description Local Time Select the way to update the clock data •• Standalone: Manual / Time Channel •• Interactive: Manual / Auto / Time Channel –– Manual: The clock is set automatically from the DTV channel or manually by the user when the TV is in Standalone mode. –– Time Channel: The clock is set from the selected channel. Timer Type Enable or disable the alarm function.
Hotel Option menu Item External Source USB Pop-up Screen When USB is connected to the TV : •• Default: A popup window appears. •• Automatic: This enters the USB content menu automatically. •• Disable: Neither the popup window nor the menu appears. External Source Banner If set to on, the TV displays the External Source Banner (information) when you change the TV source to another external input, press the SOURCE button on the remote control, or turn on the TV.
Hotel Option menu Item Cloning Description Clone TV to USB Clone the current TV options to a USB memory device. Clone USB to TV Clone the saved TV options on a USB memory device to the TV. Setting Auto Initialize If you set Setting Auto Initialize to On, the TV menu items are restored again to their values cloned initially when the TV turns off and then on. Network Setup If this item is entered into, network setup menu is displayed.
Hotel Option menu Item Security Description Factory Lock Disable entry to Hotel Option menu. •• ON: The password is needed before entering Hotel Option menu. •• OFF: Disable this function. Password Popup Enable or disable password input popup window. If this option is set to off, the TV will not display the password input popup window when entering the Hotel Option menu. If set to on, the password input popup window appears.
Hotel Option menu Item Self Diagnosis for TV Enter Self Diagnosis Menu. •• Start Picture Test: Use this test when you experience a problem with your TV's picture. •• Start Sound Test: Use this test when you experience a problem with your TV's sound. •• Signal Information: Show digital broadcasting signal information. •• Reset Smart Hub: Reset the Smart Hub and Samsung account settings stored on your TV. •• Reset: Restore all TV settings, excluding network settings, to the factory defaults.
Hotel Option menu Item Description REACH RF Mode Turn on or off the REACH RF Mode. When set to on, the TV can operate with the REACH Server (Modulator) through the RF cable. REACH IP Mode You can turn on or off the REACH IP Mode. When set to on, the TV can operate with the REACH IP Server through the IP network. Server URL Setting You can enter the address of REACH IP Server. (Example: http://192.168.1.
Hotel Option menu Item HMS Virtual Standby Description HMS Mode You can turn on or off the HMS Mode. When set to on, the TV can operate with the HMS server through the IP network. HMS Server URL Setting You can enter the HMS server's address. (Example: http://192.168.1.2:8080) HMS Gateway Role When there is one TV per room, set to Master. When there are more than one TVs per room, set the main TV to Master and the others to Slave.
Welcome Message Hotel Option (MUTE > 1 > 1 > 9 > SelectE) > Logo/Message > Welcome Message Welcome Message function displays a custom message on the TV every time it is turned on. •• Set Welcome Message to on to display the message when the TV is powered on. •• You can make the welcome message and edit it. •• You can edit the welcome message by using on screen keyboard in the Edit Welcome Message (Hotel Option > Logo/Message > Edit Welcome Message).
Logo Download Hotel Option (MUTE > 1 > 1 > 9 > SelectE) > Logo/Message > Hospitality Logo DL This option lets you download the logo image to the TV’s memory from a USB device. •• The wait message appears while the image is being copied to the TV. •• The completed message appears when the copy operation finishes successfully. •• The failed message appears if the copy operation was unsuccessful. •• No USB appears if no USB device is connected.
Cloning USB to TV: Copies menu settings and channel data in a USB device to a TV Shortcut: Turn the TV off, insert the USB device, turn the TV on, and then press the SelectE button on the remote control for 5 seconds. To clone data to the TV using the Hotel menu, follow these steps: 1. Turn the TV off. 2. Insert the USB drive into the USB port on the rear of the TV. 3. Turn the TV on. 4. Enter the Hotel Option menu by pressing buttons in order. (MUTE > 1 > 1 > 9 > SelectE) 5.
Settings Cloned in the Hotel Menu •• The menu items may not be supported depending on the models.
Menu Item Sub Item Cloned or not USB Pop-up Screen Default / Automatic / Disable Yes External Source Banner ON / OFF Yes Auto Source ON / OFF Yes Anynet+Return Source Power On Src / Last Source / Each model source list (TV, HDMI1, HDMI2, etc.
Menu Item Sub Item Self Diagnosis for TV Self Diagnosis for HTV System Home Menu REACH Solution H.
Setting Auto Initialize Hotel Option (MUTE > 1 > 1 > 9 > SelectE) > Cloning > Setting Auto Initialize When you clone settings from one TV to another, you clone both the guest side menu and hotel side menu settings: Picture, Sound, Channel, and Hotel Option menu. This lets you set nearly all of the menu values on your hospitality TVs to the same, standard settings.
Menu Item R-Gain G-Gain 2 Point B-Gain R-Offset G-Offset White Balance B-Offset 20 Point Interval 20 Point Settings Red Green Picture Expert Settings Blue Gamma HLG ST.2084 BT.
Menu Item Broadcasting Audio Options Preferred Language Clock Mode Time Clock System Manager Time Zone Language Auto Protection Time Anynet+ (HDMI-CEC) Game Mode External Device Manager General HDMI UHD Color HDMI Black Level Input Device Manager Ambient Light Detection Minimum Backlight Eco Solution Power Saving Mode Motion Lighting Auto Power Off High Contrast Accessibility DST Grayscale Enlarge English - 47 Keyboard Language Keyboard Type
Updating the TV’s Software DO NOT turn off the TV’s power until the update is complete. The TV will turn off and on automatically after completing the software update. Video and audio settings will be reset to their defaults after a software update. We recommend you clone the TV's settings so that you can easily reset them after the upgrade. •• For more information about the USB cloning function, refer to page 40. Updating through a USB device To update the TV's software, follow these steps: 1.
08 Using a Multi Code Remocon A Multi Code Remocon is a special remote which is designed to control multiple TVs. This function is useful where there is more than one TV in a location. You can control up to 10 TVs with a different ID code of each remote with no conflicts between the TVs. ID numbers are displayed on each TV's OSD. The Initial ID code for each TV is 0. •• You can set and reset the ID code in analog TV mode or PC mode. (Not available in DTV mode.
09 Setting the Soundbar Samsung Soundbar (AirTrack) and Hospitality TVs in 2018 •• Samsung Soundbar (AirTrack) and hospitality TVs support the HDMI ARC feature If you connect a compatible Samsung Soundbar (AirTrack) to a compatible Samsung hospitality TV using a single HDMI cable, guests can listen to the TV's sound through the Soundbar (AirTrack). •• Sound bar Out in Hotel Option menu makes you control to where the TV sound is outputted when the TV is turned on.
10 Editing Channels Channel Bank Editor (Smoovie TV Only) Channel Bank Editor in conjunction with the SMOOVIE remote lets you control the channels guests have access to. Channel Bank Editor provides three Banks of channels and lets you select which channels will be available from each bank. SMOOVIE remotes have installable Bank Cards which correspond to the channel banks in the Channel Bank Editor. The remotes only allow access to channels in the channel bank that correspond to the installed card.
Smoovie Set Up Sequence 1. Complete the Initial Setup. 2. The TV displays the Hotel Option menu. –– If the Initial Setup is already done, enter the Hotel Option menu. (MUTE > 1 > 1 > 9 > SelectE) 3. Select the channel type. (Power On > Power On Channel Type) –– ATV or ADTV for Air –– CATV or CDTV for cable 4. Select Smoovie in the SI Vendor menu. 5. Select Channel Setup (Channel > Channel Setup). 6. Select Air or Cable to auto tune. 7.
Editing the Channel Number Change the channel number of a channel you select. To change a channel number, follow these steps: 1. Select a channel on the Channel Edit screen. 2. Use the directional buttons on the remote control, move the focus to Edit Channel Number, and SelectE button. 3. Use the up or down directional buttons on the remote control to change the channel number. 4. Select OK when done, and then press the SelectE button on the remote contorl.
Assigning the Channel Number to the external device The external device source of the TV are displayed in the last page of the Channel Editor menu as shown below. > 1. Select a external device source on the Channel Edit screen. 2. Use the directional buttons on the remote control, move the focus to Edit Channel Number, and SelectE button. 3. Use the up or down directional buttons on the remote control to assign the channel number. 4.
11 Anti-theft Kensington Lock The Kensington Lock is a device you can use to physically fix a TV to a location when you use it in a public place. The appearance and locking method may differ from the illustration at right, depending on the manufacturer. Refer to the manual provided with the Kensington Lock for additional information on proper use. •• The Kensington Lock slot is only available on the HG43NJ690U model. The Kensington Lock is not supplied by Samsung.
12 Specifications and Other Information Specifications Model Name HG43NJ690U HG50NJ690U Display Resolution 3840 x 2160 3840 x 2160 Screen Size Diagonal Measured Diagonally 43˝ Class 50˝ Class 42.5 inches 49.5 inches 20 W 20 W 20° / 60° / 90° 20° / 60° / 90° 38.2 x 22.2 x 2.3 inches 44.3 x 25.6 x 2.4 inches (970.2 x 563.2 x 58.8 mm) (1124.8 x 650.2 x 59.7 mm) Sound (Output) Stand Swivel (Left / Right) Dimensions (W x H x D) Body With stand Weight Without Stand With Stand 38.2 x 24.3 x 8.
Model Name HG75NJ690U Display Resolution 3840 x 2160 Screen Size Diagonal Measured Diagonally 74.5 inches 75˝ Class Sound (Output) 20 W Stand Swivel (Left / Right) 0° Dimensions (W x H x D) Body 66.3 x 38.0 x 2.4 inches (1684.6 x 966.4 x 60.6 mm) With stand 66.3 x 41.6 x 14.0 inches (1684.6 x 1056.5 x 356.1 mm) Weight Without Stand With Stand 81.6 lbs (37.0 kg) 82.7 lbs (37.
Supported Resolutions for UHD Input Signals •• Resolution: 3840 x 2160p, 4096 x 2160p –– An HDMI connection with HDMI UHD Color set to Off supports up to UHD 50P/60P 4:2:0 input signals, while an HDMI connection with HDMI UHD Color set to On supports up to UHD 50P/60P 4:4:4 and 4:2:2 input signals.
Mode Resolution Display format Horizontal frequency (KHz) Vertical frequency (Hz) Clock frequency (MHz) CEA-861 720(1440) x 576i 720(1440) x 480i 720 x 576 720 x 480 1280 x 720 1280 x 720 1920 x 1080i 1920 x 1080i 1920 x 1080 1920 x 1080 1920 x 1080 1920 x 1080 1920 x 1080 3840 x 2160 3840 x 2160 3840 x 2160 3840 x 2160 3840 x 2160 4096 x 2160 4096 x 2160 4096 x 2160 4096 x 2160 4096 x 2160 50 Hz 60 Hz 50 Hz 60 Hz 50 Hz 60 Hz 50 Hz 60 Hz 24 Hz 25 Hz 30 Hz 50 Hz 60 Hz 24 Hz 25 Hz 30 Hz 50 Hz 60 Hz 24
Dimensions Front view / Side view The displayed image may differ from your TV, depending on the model. •• 43˝ (Unit: inches) 2.3 38.2 37.1 20.9 22.2 24.3 8.9 21.9 •• 50˝ (Unit: inches) 2.4 44.3 43.2 24.3 25.6 27.7 8.9 21.
•• 55˝ (Unit: inches) 2.3 48.8 48.8 26.9 28.1 30.3 8.9 21.9 •• 65˝ (Unit: inches) 2.4 57.4 56.3 31.7 33.0 35.8 14.0 26.
•• 75˝ (Unit: inches) 2.4 57.4 56.3 31.7 33.0 36.0 14.0 26.6 Jack panel detail / Rear view Detailed dimensions can be checked at Displaysolutions.samsung.com. Base Stand detail The displayed image may differ from your TV, depending on the model. •• 43˝ (Unit: inches) 2.2 5.3 R0.3 R0.1 5.9 21.9 7.8 8.
•• 50˝-55˝ (Unit: inches) 2.2 5.3 R0.3 R0.1 5.9 21.9 8.6 8.9 •• 65˝ (Unit: inches) 2.2 5.3 R0.3 R0.1 5.9 26.6 9.5 14.
•• 75˝ (Unit: inches) 2.1 13.7 8.4 Licenses Manufactured under license from Dolby Laboratories. Dolby, Dolby Audio, Pro Logic, and the double-D symbol are trademarks of Dolby Laboratories. THIS PRODUCT IS SOLD WITH A LIMITED LICENCE AND IS AUTHORISED TO BE USED ONLY IN CONNECTION WITH HEVC CONTENT THAT MEETS EACH OF THE THREE FOLLOWING QUALIFICATIONS: (1) HEVC CONTENT ONLY FOR PERSONAL USE; (2) HEVC CONTENT THAT IS NOT OFFERED FOR SALE; AND (3) HEVC CONTENT THAT IS CREATED BY THE OWNER OF THE PRODUCT.
Important Warranty Information Regarding Television Format Viewing •• See the warranty card for more information on warranty terms. Wide screen format LED Displays (16:9, the aspect ratio of the screen width to height) are primarily designed to view wide screen format full-motion video. The images displayed on them should primarily be in the wide screen 16:9 ratio format, or expanded to fill the screen if your model offers this feature and the images are constantly moving.
SAMSUNG ELECTRONICS NORTH AMERICAN LIMITED WARRANTY STATEMENT Subject to the requirements, conditions, exclusions and limitations of the original Limited Warranty supplied with Samsung Electronics (SAMSUNG) products, and the requirements, conditions, exclusions and limitations contained herein, SAMSUNG will additionally provide Warranty Repair Service in the United States on SAMSUNG products purchased in Canada, and in Canada on SAMSUNG products purchased in the United States, for the warranty period origin
Contact SAMSUNG WORLD WIDE If you have any questions or comments relating to Samsung products, please contact the SAMSUNG customer care center. Samsung Hospitality Hotline 1-866-sam4biz (US) 1-800-749-0205 (CANADA) 1-800-726-7864 (MEXICO) Web site: http://www.samsung.com/us/business © 2018 Samsung Electronics Co., Ltd. All rights reserved.