BD-ES6000 Blu-ray™ Disc Player user manual imagine the possibilities Thank you for purchasing this Samsung product. To receive more complete service, please register your product at www.samsung.
Safety Information Warning TO REDUCE THE RISK OF ELECTRIC SHOCK, DO NOT REMOVE THE COVER (OR BACK). NO USER-SERVICEABLE PARTS ARE INSIDE. REFER SERVICING TO QUALIFIED SERVICE PERSONNEL.
Precautions 1. Read these instructions. 3. Heed all warnings. 2. 4. 5. 6. 7. 8. 9. Keep these instructions. Follow all instructions. Do not use this apparatus near water. Clean only with a dry cloth. Do not block any ventilation openings. Install in accordance with the manufacturer's instructions. Do not install near any heat sources such as radiators, heat registers, stoves, or other apparatus (including AV receivers) that produce heat.
Safety Information • Do not plug multiple electric devices into the same wall socket. Overloading a socket can cause it to overheat, resulting in a fire. • Maintenance of Cabinet. -- Before connecting other components to this player, be sure to turn them off. -- If you move your player suddenly from a cold place to a warm place, condensation may occur on the operating parts and lens and cause abnormal disc playback.
Contents Safety Information 3 3 Warning Precautions Important Safety Instructions 3 Disc Storage & Management 4 Using the 3D function 3 4 Handling Cautions Copyright Getting Started 7 7 7 8 Disc and Format Compatibility 12 Rear Panel Supported Formats 15 15 15 16 16 16 24 24 26 27 28 28 29 29 30 Front Panel Remote Control Tour of the Remote Control Connections 14 19 29 Accessories 13 Accessing the Settings Screen 18 Region Code Disc types your player cannot play 11 13 18 Di
Contents 35 35 35 37 37 37 38 38 38 38 Buttons on the Remote Control used for Video Playback Using the Tools Menu Controlling Music Playback Buttons on the Remote Control used for Music Playback Using the Tools Menu Repeating Tracks on an Audio CD Shuffling Tracks on an Audio CD Creating a Playlist from a CD Ripping 39 Playing Photo Contents 40 Using the Tools Menu when a file is highlighted 39 Using the Tools Menu Network Services 42 42 43 44 44 Appendix Controlling Video Playback Using Sm
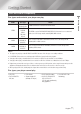
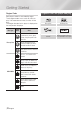
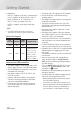
Getting Started Disc and Format Compatibility VIDEO MUSIC PHOTO ||NOTE | Disc Type Blu-ray Disc 3D Blu-ray Disc DVD-VIDEO DVD-RW DVD-R DVD+RW DVD+R CD-RW/-R, DVD-RW/-R, BD-RE/-R CD-RW/-R, DVD-RW/-R, BD-RE/-R Details BD-ROM or BD-RE/-R recorded in the BD-RE format. DVD-VIDEO, recorded DVD+RW/DVD-RW(V)/DVD-R/+R that have been recorded and finalized, or a USB storage media containing MKV, MP4 contents. Music recorded on CD-RW/-R, DVD-RW/-R, BD-RE/-R or a USB storage media containing MP3 or WMA contents.
Getting Started Region Code Both players and discs are coded by region. These regional codes must match for a disc to play. If the codes do not match, the disc will not play. The Region Number for this player is displayed on the rear panel of the player. Disc Type Blu-ray Disc Region Code DVD-VIDEO | 8 English Blu-ray Disc 3D Blu-ray Disc BD-LIVE NTSC broadcast system in U.S.
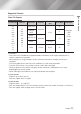
Supported Formats *.avi *.mkv *.asf *.wmv *.mp4 *.3gp *.vro *.mpg *.mpeg *.ts *.tp *.trp Container Video Codec MPEG4 SP/ASP AVI MKV ASF MP4 3GP VRO VOB PS TS H.
Getting Started `` Comments -- MPEG4 : Supports up to GMC 1-Warping Point. -- H.264 : Supports up to BP/MP/HP Level 4.1. -- WMV : Supports V9, VC1 SP/MP/AP L3. -- MPEG1 : Does not support D-picture. -- MPEG2 : Supports up to Hight Profile High Level. ||NOTE | \\ Some MKV and MP4 format discs may not play, depending on their video resolution and frame rate. Music File Support File Container Extension *.mp3 *.
AVCHD (Advanced Video Codec High Definition) \\ Some AVCHD format discs may not play, depending on the recording conditions. AVCHD format discs need to be finalized. \\ "x.v.Color" offers a wider color range than normal DVD camcorder discs. Accessories Check for the supplied accessories shown below.
Getting Started Front Panel STOP BUTTON POWER BUTTON REMOTE CONTROL SENSOR ||NOTE | PLAY/PAUSE BUTTON EJECT BUTTON STANDBY INDICATOR DISC SLOT \\ When the player displays the Blu-ray Disc menu, you cannot start the movie by pressing the Play button on the player or the remote. To play the movie, you must select Play Movie or Start in the disc menu, and then press the v button.
Remote Control 02 Tour of the Remote Control SOURCE Turn the player on and off. Press to eject a disc. Press numeric buttons to operate options. Use to enter the disc menu. VOL VOL – + VOL +– VOL SAMSUNG TV 1 2 3 4 5 6 7 8 DISC MENU 0 POPUP Press to search backwards or forwards. HOME SMART HOME HUB TOOLS INFO Press to use the Tools menu. Return to the previous menu. These buttons are used both for menus on the player and also several Blu-ray Disc functions.
Connections Connecting to a TV Connect an HDMI cable (not supplied) from the HDMI OUT jack on the back of the product to the HDMI IN jack on your TV. -- Do not connect the power cord to the wall outlet until you have made all the other connections. -- When you change the connections, turn off all devices before you start. Audio Video ||NOTE | \\ If you use an HDMI-to-DVI cable to connect to your display device, you must also connect the Digital Audio Out on the player to an audio system to hear audio.
Connecting to an Audio System 03 You can connect the Blu-ray player to an the audio system using the method illustrated below. -- Do not connect the power cord to the wall outlet until you have made all the other connections. -- When you change the connections, turn off all devices before you start. Connections Method 1 Connecting to an HDMI supported AV receiver • Connect an HDMI cable (not supplied) from the HDMI OUT jack on the back of the product to the HDMI IN jack on your receiver.
Connections Connecting to a Network Router Wireless Network You can connect your player to your network router using one of the methods illustrated below. To use the AllShare network functionality, you must connect your PC to your network as shown in the illustrations. The connection can be wired or wireless.
Settings The Initial Settings Procedure ||NOTE | \\ If you skip Network Setup during the Initial Settings procedure, you can configure your network settings later. See "Configuring Your Network Connection" on pages 24~26 for instructions. \\ If you want to display the Initial Settings screen again and make changes, select Settings > System > Initial Settings in the Home screen or select the Reset option.
Settings Accessing the Settings Screen 1. Select Settings on the Home screen, and then press v button. The Settings screen appears. 3D Settings Display TV Aspect Ratio Smart Hub Screen Size Audio BD Wise Resolution Network Auto HDMI Deep Color Auto VOL Auto VOL – + VOL +– VOL Progressive Mode Auto SAMSUNG TV 1 2.
Settings Menu Functions TV Aspect Ratio Smart Hub Screen Size BD Wise Resolution Movie Frame (24Fs) HDMI Color Format HDMI Deep Color Progressive Mode Lets you adjust the output of the player to the screen size and screen format of your TV. Lets you select the optimal size for the Smart Hub Screen. BD Wise is Samsung's latest inter-connectivity feature.
Settings Audio Digital Output PCM Downsampling Lets you select the digital audio output format that is suitable for your TV or AV Receiver. For more details, see the digital output selection table on page 51. Lets you choose to have 96Khz PCM signals downsampled to 48Khz before they are outputted to an amplifier. Choose On if your amplifier or receiver is not compatible with a 96Khz signal. Lets you apply dynamic range control to Dolby Digital, Dolby Digital Plus, and Dolby True HD audio.
Network Lists network connected AllShare devices and lets you control whether each device (a smartphone, a tablet, etc.) can share content with or control the player. Device Name Lets you input a name for the player that will identify it on your networks. BD-Live Settings System Initial Settings Quick Start Set various BD-Live function. BD-Live allows you to access extra features available on some Blu-ray Discs if you are connected to the Internet.
Settings System Anynet+ (HDMI-CEC) Anynet+ is a convenient function that offers linked operations with other Samsung players that have the Anynet+ feature and lets you control those products with one Samsung TV remote. To operate this function, you must connect this player to an Anynet+ Samsung TV using an HDMI cable. You can connect a wireless USB keyboard or mouse to the USB port on the rear of the player. Keyboard Settings : Lets you configure a wireless USB keyboard connected to the player.
System 1. 2. General Support Software Upgrade Contact Samsung Remove any disc or USB storage device. Press and hold the @ button on the front panel for 5 seconds or more. All settings will revert to the factory settings. You can change the options listed below to match your preferences. Time Zone : Select the time zone in which you live. Menu Transparency : Adjust the transparency of the menu box. For more information about the Software Upgrade function, see "Upgrading Software" on pages 28~30.
Settings Networks and the Internet When you connect this player to a network, you can use network based applications and functions such as Smart Hub and BD-LIVE, and upgrade the player's software through the network connection. For more information about accessing and using Internet services, see the Network Services chapter of this manual on pages 42~44. Instructions for configuring the network connection start below. ĞĞ 1.
< Getting the Network Settings Values > 1. 2. 3. 4. 1. Right click the Network icon on the bottom right of the Windows desktop. Select Start in the Network Settings screen, and then press the v button. The player searches for and then displays a list of the available networks. In the pop-up menu, click Status. On the dialog that appears, click the Support tab. Network Settings Select your wireless router from the list. On the Support tab, click the Details button. The Network settings are displayed.
Settings 1. 2. 3. 4. 5. 6. 7. 8. 9. Select Start in the Network Settings screen, and then press the v button. The player searches for and then displays a list of the available networks. Select the desired network, and then press the v button. Select Next, and then press the v button again. On the Security screen, enter your network's Security Code or Pass Phrase. Enter numbers directly using the number buttons on your remote control.
5. • Through the player using a PIN. Each is covered below. Through the Wi-Fi Device 1. 2. 3. On the Wi-Fi device, follow the procedure on the device for connecting to another Wi-Fi Direct device. See the device's user manual for instructions. When you have completed the procedure, you should see a pop-up on your TV screen saying that a device that supports Wi-Fi Direct has requested to connect. Select OK, and then press the v button to accept.
Settings AllShare Settings The AllShare Settings screen lists your network connected AllShare devices and their IP addresses. Through this screen, you can allow a device to access the player, deny access, or delete the device from the AllShare list. 1. 2. 3. 4. 5. In the Home screen, select Settings, and then press the v button. Select Network, and then press the v button. Select AllShare Settngs, and then press the v button. Select a device, and then press the v button.
2. 2. 1. Visit www.samsung.com. 3. Enter the product's model number into the search field, and then click Find Product. 4. 5. 6. 7. 8. 9. Click SUPPORT on the top right of the page. Click Get downloads in the center of the page below the Downloads header. Click Firmware in the center of the page. Click the ZIP icon in the File column on the right side of the page. Click OK in the pop-up that appears to download and save the firmware file to your PC. Unzip the zip archive to your computer.
Settings Standby Mode Upgrade You can set the Standby Mode Upgrade function so that the player downloads new upgrade software when it is in Standby mode. In Standby mode, the player is off, but its Internet connection is active. This allows the player to download upgrade software automatically, when you are not using it. 1. 2. Press the ▲▼ buttons to select Standby Mode Upgrade, and then press the v button. Select On or Off.
Media Play 1. Push a disc gently into the slot with the disc’s label facing up. Playback starts automatically. To access the AllShare Play Main screen, select AllShare Play on the Home screen, and then press the v button. The AllShare Play Screen at a Glance AllShare Play 1 My list Videos 2 Photos Music / Videos / Disc USB DLNA No Disc inserted. There is no device connected. a Login 2.
Media Play Method 1 1. 2. 6. Turn the player on. Connect the USB device or mobile phone to the USB port on the rear panel of the player. The New Device Connected pop-up appears. New device connected. Play videos, photos, or music content from Disc, USB, PC or mobile devices. m80 Videos Photos Smart Hub " Enter ' Return Disc to Digital Settings c Safely Remove USB ||NOTE | \\ If the pop-up does not appear, go to Method 2. 3. 4. 5.
Pause a track. 5. Play tracks in random order. To access the controls, play a track, and then use the ◄► buttons to move to the control of your choice. ||NOTE | \\ The Music Screen controls are only accessible when a track is playing. \\ All controls do not appear at the same time. \\ For more information about playing music, go to Controlling Music Playback on pages 37~39. Playing a Disc with User Recorded Content You can play mulitmedia files you have recorded on DVD or CD discs. 1. 2.
Media Play 7. In the pop-up that appears, click Save File. 9. In the pop-up that appears, click Run, and then follow the directions that appear on your screen. 8. Find the AllShare install file on your disk, and then double click the file. Controlling the Playback of Content Located on Your PC with Your Smart Phone PC Download the AllShare Installation/Instruction manual from the same Software Tab by clicking the corresponding PDF file symbol in the File column on the right.
SOURCE Controlling Video Playback – + VOL +– VOL VOL VOL 7 8 DISC MENU 9 TITLE MENU 0 POPUP Using the disc menu, title menu, popup menu, and title list DISC MENU button HOME SMART HOME HUB TOOLS buttons INFO Playback related The player does not play sound in Search, Slow or Step mode. • To return to normal playback, press the RETURN speed EXIT 6 button.
Media Play 1. Press the ▲▼ buttons to select repeat A-B, and then press the v button. If there is more than one movie on the disc or device, select to start a different title. Title Search 1. Select Title Search, and then press the v button. 2. Use the ▲▼ buttons to select a title, and then press the v button. Repeat Mode Select to play the chapter of your choice. Full Screen Select to play the movie from a selected time point. 1. Select Time Search, and then press the v button. Time Search 2.
Go to Videos List Information Select to go to the list of videos on the current media. Select to view video file information. ||NOTE | \\ Depending on the disc or storage device, the Tools menu may differ. See pages 39~41 for addtional options. \\ Video files with high bitrates of 20Mbps or more strain the player's capabilities and may stop playing during playback. SOURCE VOL SAMSUNG TV You can control the 1 playback 2 3of music content located on a DVD, USB, mobile device or PC.
Media Play Repeating Tracks on an Audio CD You can set the product to repeat tracks on an audio CD (CD-DA/MP3). 1. 2. During playback, use the ► button to select in the lower right corner of the screen, and then press the v button. Use the ▲▼ to select the repeat mode you want - Off, One Song, or All - and then press the v button.
6. 9. Press the v button to begin the ripping process. The Ripping Completion Bar popup appears. Picture Mode When ripping is complete, the “Ripping is completed.” message appears. Press the v button. 10. Press the RETURN button to go back to the Playback screen. ||NOTE | \\ This function is not available with DTS Audio CD. \\ This function may not be supported by some discs. \\ This function will be encoded to the .mp3 format at 192kbps.
Media Play Using the Tools Menu when a file is highlighted Selection Play lets you select specific music, video, and photo files to play. It works essentially the same for all media. The example below is for photos. When a file is highlighted, press the TOOLS button. View Folder view Title Artist Album Genre Latest Date Earliest Date Monthly | 40 English 1. On the selection screen, use the ▲▼◄► buttons to select a photo you want to view, and and then press the v button.
Select Edit Playlist to remove files or tracks from an existing playlist. The storage device containing the playlist must be inserted into or attached to the player. ||NOTE | Send \\ You can also move to Select All on the right, and then press the v button to select all tracks or files. 3. Select Send on the right side, and then press the v button. 4. Use the ▲▼ buttons to select the on line site you want to upload the files or tracks to, and then press the v button.
Network Services You can enjoy various network services such as Smart Hub or BD-LIVE by connecting the player to your network. Smart Hub at a Glance 1 To use network services, you must first: 1. 2. 0 9 Using Smart Hub Using Smart Hub, you can download movies, videos, and music from the Internet, and access various for pay or free-of-charge applications and view them on your TV. Application content includes news, sports, weather forecasts, stock market quotes, maps, photos, and games.
9 Web Browser at a Glance 1 Samsung Apps : Open Samsung Apps to download various for pay or free-of-charge application services. http://www.samsung.com Network Services 0 06 My Applications : Displays your personal gallery of applications which you can add to, modify, and delete. Using the Web Browser You can access the internet using the Web Browser application which is installed in the Smart Hub screen by default. 1. 2.
Network Services Navigation Help : Displays the remote control buttons you can use to navigate in Web Browser. • GREEN (B) : To display the Control Panel. • YELLOW (C) : To switch the pointer. • ( ) : Scroll Up/Scroll Down the page. • Tools : To display Tools window. • Return : To return to the previous menu. 2 BD-LIVE™ Once the player is connected to your network, you can enjoy various movie-related service contents available on BD-LIVE compliant discs. 1. 2. 3. 4. 5. 6. 7. 8. 9.
Appendix Compliance and Compatibility Notice 45 | Appendix English 07 NOT ALL discs are compatible • Subject to the restrictions described below and those noted throughout this Manual, including the Disc Type and Characteristics section of this user manual, disc types that can be played are: pre-recorded commercial BD-ROM, DVD-VIDEO, and Audio CD (CD-DA); BD-RE/-R, DVD-RW/-R; and CD-RW/-R. • Discs other than the above cannot and/or is not intended to be played by this player.
Appendix Copy Protection • Because AACS (Advanced Access Content System) is approved as content protection system for Blu-ray Disc format, similar to use of CSS (Content Scramble System) for DVD format, certain restrictions are imposed on playback, analog signal output, etc., of AACS protected contents. The operation of this product and restrictions on this product may vary depending on your time of purchase as those restrictions may be adopted and/or changed by AACS after the production of this product.
• Dolby and the double-D symbol are registered trademarks of Dolby Laboratories. • Manufactured under license under U.S. Patent Nos: 5,956,674; 5,974,380; 6,487,535 & other U.S. and worldwide patents issued & pending. DTS, the Symbol, & DTS and the Symbol together are registered trademarks & DTS 2.0+Digital Out is a trademark of DTS, Inc. Product includes software. © DTS, Inc. All Rights Reserved. 2.
Appendix Additional Information Note 3D Settings • For some 3D discs, to stop a movie during 3D playback, press the 5 button once. The movie stops and the 3D mode option is de-activated. To change a 3D option selection when you are playing a 3D movie, press the 5 button once. The Blu-ray menu appears. Press the 5 button again, then select 3D Settings in the Blu-ray menu.
BD-LIVE Internet Connection Settings • In the external memory mode, disc playback may be stopped if you disconnect the USB device in the middle of playback. • Only those USB devices formatted in the FAT file system (DOS 8.3 volume label) are supported. We recommend you use USB devices that support USB 2.0 protocol with 4 MB/sec or faster read/write speed. • The Resume Play function may not work after you format the storage device.
Appendix Resolution according to the contents type Contents Type E-contents/ Digital contents DVD Max. Resolution of TV input Max. Resolution of TV input Max.
Digital Output Selection Optical HDMI Receiver Optical HDMI Receiver or Optical PCM Up to 7.
Appendix Troubleshooting Before requesting service, please try the following solutions. PROBLEM SOLUTION No operation can be performed with the remote control. • Check the batteries in the remote control. They may need replacing. • Operate the remote control at a distance of no more than 20 feet from the player. • Remove the batteries and hold down one or more buttons for several minutes to drain the microprocessor inside the remote control to reset it.
PROBLEM SOLUTION The picture is noisy or distorted • Make sure that the disc is not dirty or scratched. • Clean the disc. No HDMI output. • Check the connection between the TV and the HDMI jack of the player. • Check if your TV supports 480p, 720p, 1080i or 1080p HDMI input resolution. Abnormal HDMI output screen. • If random noise appears on the screen, it means that TV does not support HDCP (High-bandwidth Digital Content Protection).
Appendix PROBLEM BD-LIVE SOLUTION I cannot connect to the BD-LIVE server. • Test whether the network connection is successful using the Network Status function. (See page 20) • Check whether a USB memory device is connected to the player. • The memory device must have at least 1GB of free space to accommodate the BD-LIVE service. You can check the available size in BD Data Management. (See page 21) • See if the BD-LIVE Internet Connection option is set to Allow(All).
Specifications HDMI Audio Output Network Video Audio Digital Audio Output Ethernet Wireless LAN Security WPS(PBC) • • • • Appendix USB DC12V, 2.0A 14.7W 2.2 Ibs 7.4 (W) X 7.4 (D) X 2.2 (H) inches +41°F to +95°F 10 % to 75 % USB 2.0 5V 500mA Max.
LIMITED WARRANTY TO ORIGINAL PURCHASER This SAMSUNG brand product, as supplied and distributed by SAMSUNG and delivered new, in the original carton to the original consumer purchaser, is warranted by SAMSUNG against manufacturing defects in materials and workmanship for a limited warranty period of: One (1) Year Parts and Labor* (*90 Days Parts and Labor for Commercial Use) This limited warranty begins on the original date of purchase, and is valid only on products purchased and used in the United States.
QUESTIONS OR COMMENTS? COUNTRY CALL OR VISIT US ONLINE AT IN THE US 1-800-SAMSUNG (726-7864) www.samsung.com WRITE Samsung Electronics America, Inc.