Samsung Array User Guide ©2012 Sprint. Sprint and the logo are trademarks of Sprint. Other marks are trademarks of their respective owners.
Table of Contents Get Started ................................................................................................................................ 1 Your Phone at a Glance ...................................................................................................... 1 Set Up Your Phone ............................................................................................................. 1 Activate Your Phone .........................................................................
-way Calling ..............................................................................................................24 In-call Options.............................................................................................................24 Speed Dialing .............................................................................................................25 Plus (+) Code Dialing ..................................................................................................25 History .
Parental Controls ...............................................................................................................36 Using Parental Controls ..............................................................................................36 Customize Parental Controls Restrictions ...................................................................37 Reset/Delete ......................................................................................................................
Send Email .................................................................................................................51 Text Messaging and MMS .................................................................................................52 Compose Text Messages ...........................................................................................52 Social Network Messages ..................................................................................................
Camera Settings ................................................................................................................69 Shooting Mode ...........................................................................................................69 Adjusting the Resolution .............................................................................................71 Adjusting the White Balance .......................................................................................
Device Self Service ............................................................................................................84 World Time ........................................................................................................................84 Memo Pad .........................................................................................................................84 Voice Memos ......................................................................................................
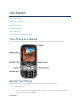
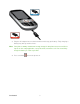
Get Started The following topics give you all the information you need to set up your phone and Sprint service the first time. Your Phone at a Glance Set Up Your Phone Activate Your Phone Set Up Voicemail Sprint Account Information and Help Your Phone at a Glance The following illustration outlines your phone’s primary external features and buttons. Set Up Your Phone You must first install and charge the battery to begin setting up your phone. 1. Install the battery.
Insert the battery, contacts end first, and gently press the battery into place. Replace the battery compartment cover, making sure all the tabs are secure and there are no gaps around the cover. Note: When you insert the battery, your phone may power on automatically. 2. Plug the USB connector into the charger/accessory jack on the bottom of your phone.
3. Plug the AC adapter into an electrical outlet and charge your battery. Fully charging a battery may take up to three hours. Note: Your phone’s battery should have enough charge for the phone to turn on and find a signal, run the setup application, set up voicemail, and make a call. You should fully charge the battery as soon as possible. 4. Press and hold Get Started to turn the phone on.
If your phone is activated, it will turn on, search for Sprint service, and begin the setup application. If your phone is not yet activated, see Activate Your Phone for more information. Activate Your Phone Depending on your account or how and where you purchased your phone, it may be ready to use or you may need to activate it on your Sprint account. ● If you purchased your phone at a Sprint Store, it is probably activated and ready to use.
• ● Tip: Go to sprint.com/activate and complete the online instructions to activate your phone. Activate on your phone: • Turn on your new phone. (Make sure the old one is turned off.) Your phone will automatically attempt Hands-Free Activation. • Tap Activate to override auto-activation and start the manual activation wizard. • Follow the onscreen prompts to complete the activation process. To confirm activation, make a phone call.
Manage Your Account Sprint Support Services Sprint Account Passwords As a Sprint customer, you enjoy unlimited access to your personal account information, your voicemail account, and your data services account. To ensure that no one else has access to your information, you will need to create passwords to protect your privacy. Account User Name and Password If you are the account owner, you will create an account user name and password when you sign on to sprint.com.
● Learn more about data services and other products like games, ringtones, screen savers, and more. From Your Sprint Phone ● Press to check minute usage and account balance. ● Press to make a payment. ● Press to access Sprint Customer Care. From Any Other Phone ● Sprint Customer Service: 1-888-211-4727. ● Business Customer Service: 1-888-788-4727. Sprint Support Services Sprint 411 and Sprint Operator Services let you easily access information and calling assistance from your Sprint phone.
Phone Basics Your phone is packed with features that simplify your life and expand your ability to stay connected to the people and information that are important to you. The following topics will introduce the basic functions and features of your phone. Your Phone’s Layout Turn Your Phone On and Off Your Home Screen Status Bar Enter Text Your Phone’s Layout The following illustrations outline your phone’s basic layout.
● QWERTY Option Key (left) lets you select softkey actions or menu items using the QWERTY keyboard. ● Display Screen displays all the information needed to operate your phone, such as the call status, the Contacts list, the date and time, and the greeting. ● QWERTY Option Key (right) lets you select softkey actions or menu items using the QWERTY keyboard. ● Navigation Key scrolls through the phone’s menu options and acts as a shortcut key from standby mode.
● Volume Keys allow you to adjust the ringtone volume in standby mode or adjust the voice volume during a call. The volume button can also be used to scroll up or down to navigate through the different menu options. ● Charger/Accessory Jack allows you to connect the phone charger or an optional USB cable. ● Camera Button lets you activate the camera. CAUTION! Inserting an accessory into the incorrect jack may damage the phone.
Status Icons Icon Description Signal Strength – Shows your current signal strength. (More bars = stronger signal.) No Service – Your phone cannot find a usable signal. Roaming – Your phone is “roaming” off the Nationwide Sprint Network. 1x Data Status – 1x data service is available. When active, the icon is animated. 3G/2G Data Dormant – 3G/2G data service is currently dormant. Battery – Shows your current battery charge level. (Icon shown is fully charged.
1 Beep – Your phone is set to beep when you receive an incoming call. 1 Beep and Vibrate – Your phone is set to beep and vibrate when you receive an incoming call. TTY – Your phone is operating in TTY mode. Alarm – An alarm has been set on your phone. Missed Alarm – You have missed an alarm event. Calendar Event – You have a pending event scheduled. Multiple Alerts – You have multiple alert messages. Self Timer – The self-timer function is enabled. Auto – The white balance has been set to Automatic.
running and one has been minimized and placed in the background. Bluetooth Enable – The Bluetooth technology is active and enabled. Device Connected– The Bluetooth phone is connected. BT Headset Connected – The Bluetooth Headset is connected and visible. Bluetooth Hidden – The phone is hidden to other Bluetooth phones and not transmitting its information. Text Message – You have new text messages. Voicemail – You have new voicemail messages. Missed Call – You have missed an incoming call.
ABC Mode In Abc mode, also known as multi-tap entry, you press keys one, two, three, or four times to once for “a,” twice for “b”, or enter the letters you see on the keypad. For example, press three times for “c”; or press “s.” once for “p,” twice for “q,” three times for “r,” or four times for 1. Select the Abc mode 2. Press the corresponding keys repeatedly until the correct letter appears. (For example, to enter the word “Bill,” press twice, three times, three times again.
With the QWERTY keyboard, you can type letters, numbers, punctuation, and other special characters into text entry fields or other applications as easily as with your computer. For more information, see Text Messaging and MMS. Open the Device and Access the Keyboard 1. Rotate the device 90 degrees counter-clockwise. 2. Slide the top section of the device up to open, as shown in the illustration.
The following keys perform special functions when entering text: Icon Description FN: Allows you to use alternate characters displayed at the top of the QWERTY keys. Examples: $, @, #, ! Shift: Changes the text input mode among Upper/Lower/Mixed case mode. SYM: Launches the Symbols page. Scroll down and tap an entry from the extensive list of emoticons. Space: Inserts an empty space. OK/Enter: Selects or accepts a currently highlighted option.
● Tip: Symbols to enter symbols. When entering text, press to change letter capitalization (Abc > ABC > abc). The keyboard provides dual-use keys labeled with alphabetic characters on the lower half and numbers and symbols on the upper half. Press the key corresponding to the orange character you want to enter. Access Additional QWERTY Text Editing Options 1. Touch and hold an active text entry field. 2.
Phone Calls With the Sprint National Network and your phone, you can enjoy clear calling across the country. Make Phone Calls Receive Phone Calls Voicemail Phone Call Options History Make Phone Calls There are several convenient ways to place calls from your phone. Call Using the Keypad Call from History Call from Contacts Call a Number in a Text Message Call Emergency Numbers Call Using the Keypad Making calls is as easy as entering a phone number and pressing the Talk key. 1.
Tip: To redial your last outgoing call, press , highlight a number, and press twice. To redial other recent numbers, press again. You can also place calls from your phone by speed dialing numbers from your Contacts using your History listings and Voice Services. Call from History You can make a call directly from your History list. 1. Press > History. 2. Highlight an entry and press . Note: You cannot make calls from History to entries identified as No Caller ID or Restricted.
3. Highlight Call and press . Call Emergency Numbers You can place emergency calls to 911, even if your phone is locked or your account is restricted. Note: When you place an emergency call, your phone automatically enters Emergency mode. View Options During an Emergency Call ► Press OPTIONS (right softkey) to view the following: My Phone # (left softkey) to display your MSID and device phone number during an emergency call.
When you place an emergency 911 call, the GPS feature of your phone seeks information to calculate your approximate location. Depending on several variables, including availability and access to satellite signals, it may take up to 30 seconds or more to determine and report your approximate location. Important: Always report your location to the 911 operator when placing an emergency call.
► Select Answer to answer the call. Note: When your phone is off, calls go directly to voicemail. Ending a Call ► Press . Voicemail Your phone automatically transfers all unanswered calls to your voicemail, even if your phone is in use or turned off. You should set up your Sprint Voicemail and personal greeting as soon as your phone is activated. Always use a password to protect against unauthorized access. You should set up your Sprint Voicemail and personal greeting as soon as your phone is activated.
1. Dial your wireless phone number. 2. When your voicemail answers, press . 3. Enter your password. Phone Call Options Your phone application provides many useful features and options to help you make the most of your calling experience. Dialing Options 3-way Calling In-call Options Speed Dialing Plus (+) Code Dialing Dialing Options When you enter numbers in standby mode, you will see a variety of dialing options displayed as softkeys on the phone’s screen.
3-way Calling With 3-Way calling, you can talk to two people who are on two different phone lines at the same time. When using this feature, the normal airtime rates will be charged for each of the two calls. 1. Place your call to the first recipient. 2. Once you have established the connection, press OPTIONS (right softkey) > 3-way call. (Your first call is automatically put on hold.) 3. Select one of the following: Contacts to choose a caller from your Contacts list.
Note: After selecting this option, the menu item changes to Key Unmute. Select this option to unmute the keys. ● Messages to display your current messages (Voicemail, text messages, etc.). ● Recent History to view your call histories. ● Tools to access the Tools menu. Speed Dialing You can store up to 98 numbers in your phone’s speed dial memory. Dial speed dial entries using one keypress for locations 2–9 or two key presses for locations 10–99.
View History The following procedures will guide you through viewing your call history list. 1. Press > History. 2. Highlight an entry and press Shortcut: You can also press . from standby mode to display your recent calls. Note: History record only calls that occur while the phone is turned on. If a call is received while your phone is turned off, it will not be included in history. If you return a call from the voicemail menu, it will not be included in your phone’s history.
2. Highlight a Log entry and press . 3. Press OPTIONS (right softkey) to display the following options: Delete to delete the entry. Delete All to delete all entries. Prepend to add numbers to the beginning of the selected number. Save Contact to save the number to a new or existing entry. Note: This option displays only when the number has not been saved as a new contact or appended to an existing one. Contact Details to view contact information.
Settings The following topics provide an overview of items you can change using your phone’s Settings menus.
Selecting Wallpaper Choose the wallpaper type to display on your home screen. 1. Press > Settings > Display > Wallpaper. 2. Select No Image, Take New Picture, My Albums, Downloaded, or Preloaded and press . Selecting a Foreground Select a feature to display on your home screen. 1. Press > Settings > Display > Foreground. 2. Select Clock/Calendar, Greeting or None and press . Selecting a Theme Choose the appearance of your main menu. 1. Press > Settings > Display > Theme. 2.
One Contact to assign the picture to a single entry in your contacts list. Assign a Picture ID to Unsaved Numbers 1. Press > Settings > Display > Picture ID > Unsaved Numbers. 2. Select No Image, Take New Picture (see Taking Pictures), My Albums, Downloaded or Preloaded and press . Assign a Picture ID to Private or Unknown Numbers 1. Press > Settings > Display > Picture ID > Private/Unknown. 2. Select No Image, Take New Picture (see Taking Pictures), My Albums, Downloaded or Preloaded and press .
Activate PowerSave Mode 1. Press > Settings > Display > PowerSave Mode. 2. Press On to activate the feature. 3. Read the feature definitions and press DONE (left softkey). Volume Adjust your phone’s volume settings to suit your needs and your environment. > Settings > Volume. 1. Press 2. Select Incoming Ringer Volume, Playback Volume, or Key Beeps. 3. Using the navigation key, choose a volume level. 4. Press . Ringtones Ringtones help you identify incoming calls and messages.
Assign a Ringtone to All Contacts 1. Select Contact Entries > All Contacts. 2. Select Downloaded, Preloaded, or No Ringer. 3. Use your navigation key to scroll through the available ringtones. Press PLAY (left softkey) to hear a sample ringtone. 4. Press to assign a ringtone. Assign a Ringtone to One Contact 1. Select Contact Entries > One Contact. 2. Highlight a single contact and press ASSIGN (left softkey). 3.
Selecting Ringtone Types for Messages Select a ringtone that notifies you when a message has arrived. 1. Press > Settings > Ringers > Messages. 2. Select Downloaded, Preloaded, or No Ringer. 3. Select a category and then use your navigation key to scroll through the available ringtones. Press PLAY (left softkey) to hear a sample ringtone. 4. Press to assign a ringtone. Selecting Ringtones for Alarm/Calendar Assign a ringtone to your phone's alarm and calendar. 1.
Text Entry Configure settings for text entry. 1. Press > Settings > Text Entry. 2. Choose from the following: Auto-Capital: Set to On to have the first word in a field, and the first word after a period, be capitalized automatically, or choose Off. Auto-Space: Set to On to have a space inserted automatically when you select a word, or choose Off. Predictive Language: Select the language to be used when using the XT9 Predictive Text entry mode.
Icon Glossary displays the icons used in your phone’s display. Version displays information about your phone’s settings and browser information. Advanced displays information about your phone’s network settings. My Account displays your account details and allows you to hear your current minute usage and account balance. 2. Press DONE (left softkey) when finished viewing the information.
► Press . Location Your phone is equipped with a Location feature for use in connection with location-based services. The Location feature allows the network to detect your position. Turning Location off will hide your location from everyone except 911. Note: Turning Location on will allow the network to detect your position using GPS technology, making some Sprint applications and services easier to use.
While signed out, you can still place or receive phone calls, check voicemail, and use other voice services. You may enable data services again at any time. Enable Parental Controls 1. Press > Settings > Parental Controls. 2. Use the navigation keys to toggle Parental Controls On. 3. If this is your first time to setup these controls, you will be asked to setup a parental lock code that manages the areas that will be locked via this menu. Enter a new four-digit Lock code.
Voice Calls to lock the phone and prevent outgoing calls. Incoming calls can still be received. Text Messaging to restrict access to the Messaging folder including Text and Picture messages. You can also choose specific contacts allowed for the user to access. Web to restrict access to all data features such as Internet and other data usage. Camera/Camcorder to restrict access to the Camera functionality. Force Location On to protect GPS activity.
Delete Stuff You can choose specific content to delete, rather than resetting the entire phone to its default state. 1. Press > Settings > Reset/Delete and enter your Lock code. 2. Select Delete Stuff. 3. Choose from Text Messages, Call Logs, Cookies and Cache, Downloaded Content, Contacts, or Pictures/Videos. 4. Press DONE (left softkey) to delete the information from your phone. Change Lock Code You can change your lock code in the Reset/Delete menu as well as through the menu.
Navigation Keys Abbreviated Dialing With Abbreviated Dialing, making phone calls is quick and easy. Activate Abbreviated Dialing 1. Press > Settings > Others > Abbreviated Dialing. 2. Select On or Off. Call Answer Select how to answer incoming calls on your phone: whether you want to press the Talk key, to press any number key, or simply to open the phone. 1. Press > Settings > Others > Call Answer. 2. Highlight an option and press .
1. Press > Settings > Others > Accessibility > Voice Recognition. 2. Select Adaptation > Adapt Voice. 3. Press START (left softkey) and repeat each word, phrase, or telephone number you hear. To reset the adaptation: 1. Press > Settings > Others > Accessibility > Voice Recognition. 2. Select Adaptation > Reset Voice > Yes (left softkey). To change the Audio mode: 1. Press > Settings > Others > Accessibility > Voice Recognition. 2. Select Audio Modes and select an option.
1. Press > Settings > Others > Airplane Mode. 2. Read the disclaimer and press OK (left softkey). 3. Highlight On, Off, or On Power Up and press . Note: While in Airplane Mode, your phone’s standby screen will display “Phone off.” Data Data settings on your phone help prevent accidental connections to the Web. Net Guard When you first connect to the Web, the Net Guard will be displayed to confirm that you want to connect. This feature helps you avoid accidental connections.
Roaming When you’re roaming on digital networks, your call quality and security will be similar to the quality you receive when making calls on the Nationwide Sprint Network. However, you may not be able to access certain features, such as data services, depending on the available network. Data Roam Guard Depending on service availability and roaming agreements, your phone may be able to access data services while roaming on certain digital systems.
2. Highlight an option and press . Domestic Voice to restrict roaming mode during domestic voice calls. Domestic Data to restrict roaming mode during domestic data usage. International Voice to restrict roaming mode during international voice calls. International Data to restrict roaming mode during international data usage. Language You can choose to display your phone’s onscreen menus in English or in Spanish. 1. Press > Settings > Others > Language. 2.
Turn TTY Mode On or Off > Settings > Others > TTY Options. (You will see an informational 1. Press message.) 2. Highlight TTY Full, TTY + Talk, or TTY + Hear and press . - or Highlight TTY Off and press . Access the State Telecommunications Relay Service (TRS) for Assistance with TTY Calls ► Dial and press to reach an operator. For additional information about Sprint Relay Services and TTY compatibility, call Sprint Relay Customer Service at 1-800-676-3777 or visit www.sprintrelay.com.
Contacts The Contacts application lets you store and manage contacts from a variety of sources, including contacts you enter and save directly in your phone as well as contacts synchronized with your Google Account, your PC, compatible email programs (including Exchange Server), and your Facebook friends. Get Started With Contacts Add a Contact Save a Phone Number Edit a Contact Send Contacts via Bluetooth Get Started With Contacts Your phone automatically sorts the Contacts entries alphabetically.
Delete Contact to remove the contact from the Contacts. Contact History to display the call and messaging history related to that contact. Send Contact to forward the contact information to a Bluetooth. Set as Secret to hide the contact’s information during an incoming call. Settings to modify the entire contact information. • Speed Dials to view all numbers assigned to the speed dial list. • Hide/Show Secret to view the list of hidden contacts.
Vib to assign a vibration pattern to accompany incoming calls from the new contact. URL to add a website’s URL to the entry. Address to enter a physical address for the contact. Birthday to add a birth date to the entry’s information card. Memo to add a note, street address, or other information. Job Title to add the entry’s business or organization position title. Company to enter business information such as a company name. 7.
Delete a Contact Add or Edit Information for a Contact Once you've entered a contact into your phone, you can add to or edit that contact's information. 1. From the Home screen, press CONTACTS (right softkey). - or Press > Contacts. 2. Highlight an entry and press . 3. Highlight the information you wish to edit (Name, Ringer, etc.) and press . . 4. Add or edit the information and press 5. Press DONE (left softkey) to save your changes.
2. Press OPTIONS (right softkey) > Delete Contact. 3. Press DELETE (left softkey) to confirm the deletion. Send Contacts via Bluetooth With the Bluetooth capabilities on your phone, you can transmit contact information to another Bluetooth-compatible phone. 1. Highlight a Contacts entry from the Contacts list. 2. Press OPTIONS (right softkey) > Send Contact. Note: A screen will pop up asking you to enable Bluetooth. Press Yes. 3.
Accounts and Messaging With Sprint service and your phone’s messaging capabilities, you have the opportunity to share information through many different channels and accounts. Email Text Messaging and MMS Social Network Messages Entering Text Using the Keypad Email Use Email to send and receive email from multiple accounts, right from your phone. Set up Email You can easily set up your email account using the following procedure. 1. Press > Messages > Email. 2.
Text Messaging and MMS With Text Messaging (SMS), you can send and receive instant text messages between your wireless phone and another messaging-ready phone. Multimedia messages, or MMS, can contain text and pictures, recorded voice, audio or video files, picture slideshows, contact cards (vCard), or appointments (vCalendar). See your service plan for applicable charges for messaging. Compose Text Messages Quickly compose and send text messages on your phone. ► Press > Messages > Send Message.
1. Press > Web. 2. Enter http://www.facebook.com/mobile and follow the instructions to activate or setup a Facebook mobile account. 3. Press > Social Networking. 4. Highlight Facebook and press . 5. Enter your Facebook username (Email or Phone) and password. 6. Navigate to the Log In button and press Go (left softkey). Registering and Using Twitter Follow the procedure below to set up and use Twitter on your phone. 1. Press > Web. 2. Enter www.twitter.
1. From a screen where you can enter text, press OPTIONS (right softkey) to change the text input mode. For more information, see Compose Text Messages. 2. Select one of the following options: Tip: Text Mode • Predictive Text to enter text using a predictive text system that reduces the number of key presses required while entering a word. • Abc to use multi-tap entry – press for “c.” • 123 to enter numbers by pressing the numbers on the keypad. • Symbols to enter symbols.
ABC Mode In Abc mode, also known as multi-tap entry, you press keys one, two, three, or four times to once for “a,” twice for “b”, or enter the letters you see on the keypad. For example, press three times for “c”; or press “s.” once for “p,” twice for “q,” three times for “r,” or four times for 1. Select the Abc mode. 2. Press the corresponding keys repeatedly until the correct letter appears. (For example, to enter the word “Bill,” press twice, three times, three times, and three times again.
Applications and Entertainment All your phone’s features, such as applications, downloading games, ringers, and more, and shopping are accessible through the Applications list. Applications Downloading Games, Ringers, and More GPS Services Shopping Applications You can access a wide variety of applications in many different categories with your phone and data service. To get started with applications: 1. Press > My Stuff > Applications. 2.
third-party application provider. To find out how a third-party application will collect, access, use, or disclose your personal information, check the application provider’s policies, which can usually be found on their website. If you aren’t comfortable with the third-party application’s policies, don’t use the application. Downloading Games, Ringers, and More You have access to a dynamic variety of downloadable content, such as games, ringers, screen savers, and other applications.
Downloading an Item Once you’ve selected an item, highlight it and press Menu/OK, or press OK (left softkey) to download it. You will see a summary page for the item including its title, the vendor, the download details, the file size, and the cost. Links allow you to view the License Details page, which outlines the price, license type, and length of license for the download, and the Terms of Use page, which details the Premium Services Terms of Use and your responsibility for payment.
Access My Stuff Manager > My Stuff > [Application Manager, Games, Social Networking, ► Press Ringtones, Wallpaper, Applications, Call Tones]. Download Purchased Content from My Stuff 1. From the My Stuff display, highlight an item and press information page for the selected item.) . (You will see the 2. Highlight Download and press . (The item will download automatically. When you see the New Download screen, you have successfully downloaded the item to your phone.
3. Highlight On and press . Sprint Family Locator Sprint Family Locator uses GPS technology to locate your child’s phone and display the location on an interactive map. Note: Sprint Family Locator service requires an additional monthly fee. Visit www.sprint.com/familylocator for complete details. You may also use Sprint Family Locator with any computer with an Internet connection. You can also sign up for Sprint Family Locator online at www.sprint.com/familylocator.
Web and Data With your Sprint service, you are ready to start enjoying the advantages of data services and Web access from your phone. This section will help you learn the basics of using your data services, including managing your user name, launching a data connection, and navigating the Web with your phone. Getting Started with Web and Data Service Browser Getting Started with Web and Data Service The following topics address your phone’s data connections and the built-in Web browser.
> Settings > Others > Data > Update Data Profile. (To cancel, press ► Press before completing the update.) Launching a Web Connection You can access the Web from your phone. ► Press page.) > Web. (Your data connection starts and you see the SprintWebSM home While connecting, you may see an animation and a “Connecting” message. Data Connection Status and Indicators Your phone displays the current status of your data connection through indicators at the top of the screen.
► Press a softkey. (If you see an additional pop-up menu when you press the softkey, select the menu items using your keypad [if they’re numbered], or by highlighting the option and pressing Tip: . Depending on which websites you visit, the labels on the softkeys may change to indicate their function. Scrolling As with other parts of your phone’s menu, you’ll have to scroll up and down to see everything on some websites. To scroll line by line through websites: ► Press the navigation key up and down.
► Press TOOLBAR (right softkey) > MY HOMEPAGE. Data Services FAQs Check our list of FAQs to answer questions you may have about your phone's data services. How will I know when my phone is ready for data service? Your user name (for example, bsmith01@sprintpcs.com) will be displayed when you press Settings > Phone Information > Phone Number/User ID. How do I sign in for the first time? You are automatically signed in to access data services when you turn on your phone.
Browser The browser menu offers additional options to expand your use of the Web on your phone. Although the home page offers a broad and convenient array of sites and services for you to browse, not all sites are represented, and certain functions, such as going directly to specific websites, are not available. For these and other functions, you will need to use the browser menu.
Help provides browser shortcut information. Advanced allows you to access additional Browser menu options such as: Icon Row, Startup page, Page info, Images on/off, Virtual mouse, Redirect prompt, Send referrer, Turn on error logging, Certificates, Reset browser setting, Reset browser, and About Browser prompt. Restarting the Web Browser If the Web browser seems to be malfunctioning or stops responding, you can usually fix the problem by simply restarting the browser.
Camera and Video Taking pictures with your phone’s built-in camera is as simple as choosing a subject, pointing the lens, and pressing a button. Take Pictures Record Videos Camera Settings Sending a Picture Sending a Video Assigning Photos Take Pictures You can use the camera or camcorder to take and share pictures and videos. Displaying the Status Using the Timed Mode Take a Picture with the Phone Open > Photos & Videos > Camera to activate camera mode. Additional camera 1.
2. Press to take the picture. (Your phone automatically saves the picture.) Displaying the Status The Status feature allows you to zoom in on an object when you take a picture. 1. Press > Photos & Videos > Camera to activate camera mode. 2. Press the navigation key up and select an option: Status off removes the status information from the screen. Status on displays the status icons that reflect your current settings.
Video Mail: Restrict the length of the video so it can be attached to a message. Long Video: Record video of any length. Recording Videos 1. Using the display screen as a viewfinder, compose your video by aiming the lens at your subject. 2. Press to start recording. Press again to stop recording.
5 to take a series of five pictures 10 to take a series of 10 pictures. Note: The Continuous setting will automatically set the shot image size to 320 x 240. 3. Using the phone’s display screen as a viewfinder, aim the camera lens at your subject. 4. Press Album.) until the shutter sounds. (Your phone automatically saves the picture to the 5. Press to return to camera mode to take another picture. - or Press OPTIONS (right softkey) > Review Album to review your continuous shot frames.
On to activate the panoramic option. Note: The Panoramic setting will automatically set the shot image size to 320 x 240. 3. Move the camera toward the desired direction. 4. Press only once to begin the panoramic photo process. 5. Move the camera slowly from left to right, ensuring that the red frame evenly surrounds the screen during each automated shot. Note: The camera will not capture a photo unless the red frame evenly surrounds the screen. 6.
2. Use the right navigation key and highlight WHITE BALANCE. 3. Select one of the following: Auto – The white balance has been set to Automatic. Use this for taking pictures indoors or outdoors using automatic white balance settings. Daylight – The white balance has been set to Sunny. Use this for taking pictures or movies outdoors on bright sunny days. Cloudy – The white balance has been set to Cloudy. Use this for taking pictures or movies outdoors under cloudy conditions.
3. Select Shutter1, Shutter2 or Shutter3. Adjusting the Grid This feature allows you to adjust the camera's grid. 1. From camera mode, press the down navigation key and highlight Grid. 2. Select Off or On. Adjusting the Brightness This feature allows you to adjust the brightness of the picture. ► From camera mode, press the navigation key left or right. (You will see the gauge bar.) Press the right to increase the brightness or the left navigation key to decrease it.
Sending a Video Once you have recorded a video, you can use the messaging capabilities of your phone to instantly share it with family and friends. Send a Photo to a Contact 1. Record a video. 2. With the video displayed, press SEND (left softkey). 3. Select a listed contact or one of the following options: Contact to select a recipient from your phonebook entries and send the video via MMS message. Bluetooth (left softkey) to send the video via Bluetooth device.
Tools and Calendar Learn how to use many of your phone’s productivity-enhancing features. Alarm Calendar Bluetooth Updating Phone Voice Service Calculator Device Self Service World Time Memo Pad Voice Memos Alarm Your phone comes with a built-in alarm clock that has multiple alarm capabilities. 1. Press > Tools > Alarm. 2. Press CREATE NEW (left softkey). 3. Highlight the ALARM field to turn the alarm on or off. 4. Select a time for the alarm. Select AM or PM by pressing the right softkey. 5.
Select an interval of 5 minutes, 10 Minutes, 15 Minutes, 20 Minutes, or Off to disallow the Snooze feature. 8. Select a Volume level using the right and left navigation keys. 9. Press DONE (left softkey). Calendar Your phone’s Calendar tool helps you organize your time and you can set it to remind you of important events.
3. Enter the event title information and press NEXT (left softkey). 4. Select an event type using your navigation keys to scroll left or right. 5. Select an alarm time for the event using your navigation keys to scroll left or right. You can choose No Alarm, On Time, 10 Min. Before, 30 Min. Before, or 1 Hour Before. Note: The default alarm time is 10 Min. Before. 6. Select a repeating status for the event using your navigation keys to scroll left or right. 7.
1. To silence the alarm and reset the schedule, press any key except the navigation keys. 2. To view additional options, press the appropriate option: Snooze silences the alarm and schedules it to replay again in 10 minutes. View displays the event detail screen. Dismiss (right softkey) stops the alarm and eliminates any further notices about the event. Erasing Events You can delete events scheduled for a specific time and date. Erasing a Day’s Events 1. Press > Tools > Calendar > Scheduler.
Turning Bluetooth On and Off Before using Bluetooth, you must turn it on. By default, your phone’s Bluetooth feature is set to Off. Turning Bluetooth on makes your phone “discoverable” by other in-range Bluetooth phones. Turn Bluetooth On 1. Press > Tools > Bluetooth. 2. Highlight On and press to enable Bluetooth. Turn Bluetooth Off 1. Press > Tools > Bluetooth. 2. Highlight Off and press to disable Bluetooth.
Pair with Another Bluetooth Phone > Tools > Bluetooth > Add New > . (Your phone will display a list 1. Press of discovered in-range Bluetooth phones.) 2. Highlight a phone and press 3. Enter the PIN code and press . .
Available ASR commands include: ● Call to call an entry in your Contacts list or a spoken phone number. ● Send Text to send a text message to the spoken name or phone number. ● Lookup to lookup the spoken contact name. ● Go To
● Status ● Time ● Signal Strength ● Network ● Battery ● My Phone Number 1. Press and hold . 2. If you hear “Say a command,” say “Check.” 3. If you hear “Which status item?,” say a command. ASR Options The ASR options menu allows you to modify confirmations prompts, voice adaptations, and ASR modes. Change ASR Confirmation 1. Press and hold . 2. Press SETTINGS (right softkey) > Confirmation and select an option.
Change the ASR Mode 1. Press and hold . 2. Press SETTINGS (right softkey) > Audio Modes and select an option. Expert Mode to sound a beep only. Prompt Mode to prompt for required information. Calculator Your phone comes with a built-in calculator and handy tip and eco-calculators for figuring tip percentages and miles-per-gallon. Tip Calculator Eco Calculator 1. Press > Tools > Calculator > Calculator. 2. Enter numbers using your keypad. Press to enter decimal points.
1. Press > Tools > Calculator > Eco Calculator. 2. Press CREATE (left softkey). 3. Use your keypad and navigation key to enter the Distance (mi), Fuel ($), (gallon), and Price ($/gallon) amounts. The calculator displays the ($/mile) and (gallon/mile) efficiency amounts. Device Self Service This built-in service on your phone allows you to activate your phone manually via a Webenabled UI. 1. Press > Tools > Device Self Service. 2. Follow the onscreen prompts to manually activate your new phone.
Delete Saved Notes 1. Press > Tools > Memo Pad. 2. Highlight a note and press . 3. Press OPTIONS (right softkey) > Delete > Yes (left softkey). Voice Memos Use your phone’s Voice Memo feature to record brief memos to remind you of important events, phone numbers, or grocery list items and to record conversations during a call. Note: Your phone can store 1 minute of memos during a call and 2 minutes within the Tools menu.
End a Memo Recording ► Press or FINISH (right softkey). Playing Voice Memos You can play and review the voice memos you have recorded. 1. Press > Tools > Voice Memo > Review. 2. Highlight the Memo you want to play and press REVIEW (left softkey). Erasing Voice Memos You can erase voice memos that you have previously recorded. 1. Press > Tools > Voice Memo > Review. 2. Highlight the Memo you want to erase and press OPTIONS (right softkey) > Delete > DELETE (left softkey). Erase All Voice Memos 1.
Send a Voice Memo Message You can even send a voice memo as a message. 1. Press > Tools > Voice Memo > Review. 2. Highlight the Memo you want to send and press OPTIONS (right softkey) > Send Message. 3. Select the message recipient and press information Tools and Calendar 87 .
Index 3-way Calling, 24 911 Calls, 20 Abbreviated Dialing, 40 Accessibility, 41 Voice Guide, 42 Voice Recognition, 41 Account Help, 5 Manage, 6 Services, 7 Account Passwords, 6 Accounts, 52 Activation, 4 Airplane Mode, 42 Alarm Ringers, 33 Setting, 78 Answering Calls, 21 Roam Enabled, 22 Applications, 58 Downloading, 59, 60 My Stuff, 61 ASR Activating, 84 Checking Phone Status with, 85 Making Calls with, 84 Opening Menus with, 84 Options, 85 Auto Key Guard, 34 Backlight Control, 30 Battery Install, 1 Blueto
Browser, 67 Opening, 67 Options, 67 Toolbar, 67 Calculator, 86 Eco, 87 Tip, 87 Calendar, 79 Call Answer, 40 Camera, 69 Sending Pictures, 75 Settings, 71 Shooting Modes, 71 Taking Pictures, 69 Contacts, 47 Accessing, 47 Adding, 48 Assigning a Picture, 50 Calling from, 19 Contact Match, 43 Delete, 50 Deleting, 50 Edit, 49 List Options, 47 Save a Number, 49 Sending via Bluetooth, 51 Data, 42, 63 FAQs, 66 Net Guard, 42 Update Profile, 43 Data Services Password, 6 Display Backlight Control, 30 Brightness, 30 Pic
Keypad, 13 Numbers, 14, 56 Preset Messages, 14, 56 QWERTY Keyboard, 15 Selecting Mode, 55 Smileys, 14, 56 Symbols, 14, 56 Entertainment, 69 GPS Services, 61 Activating Location Mode, 61 Sprint Family Locator, 62 History Calling from, 19 Clear, 27 Options, 26 View, 26 Home Screen, 10 Status Icons, 11 In-call Options, 24 Language, 44 Location, 36 Lock Code, 36 Lock Phone, 35 Memo Pad, 88 Messaging, 52, 53 Calling from, 19 Composing, 53 Ringers, 33 MMS Messaging, 53 My Stuff, 60 Applications, 61 Navigation Key
Reset, 38 Using the Dialpad, 18 Vision Username, 35, 39 Phone Lock, 35 Pictures Sending, 75 Power On, 10 PowerSave Mode, 30 Reset Phone, 38 Ringers, 31 Alarm, 33 Battery Alert, 33 Incoming Calls, 31 Messages, 33 Power Off, 33 Power On, 33 Roaming, 43 Data Guard, 43 Setting, 44 Settings, 28 Bluetooth, 82 Contacts, 45 Display, 28 Language, 44 Location, 36 Lock Phone, 35 Others, 40 Parental Controls, 37 Phone Information, 35 Reset/Delete, 38 Ringers, 31 Volume, 31 Shopping, 62 Smileys, 16 SMS Messaging, 53 Soc
Status Icons, 11 TDD Options, 45 Text Messaging, 53 Tools, 78 Alarm, 78 Bluetooth, 81 Calculator, 86 Calendar, 79 Memo Pad, 88 Update Phone, 83 Voice Service, 83 World Time, 87 TTY Options, 45 Text Telephone, 45 Turning Off, 45 Turning On, 45 Turn Device On, 10 Update Data Profile, 43 Firmware, 83 Phone, 83 PRL, 83 Videos, 69 Recording, 70 Sending, 76 Vision Username, 35, 39 Voice Guide Accessibility, 42 Voice Memos Editing, 89 Erasing, 89 Recording, 89 Reviewing, 90 Sending, 90 Voice Recognition Accessibil
Volume, 31 Web, 63 FAQs, 66 Launching, 64 Launching a Connection, 64 Navigating, 64 Status and Indicators, 64 Your User Name, 63 World Time, 87 Index 93