
Product specifications


Samsung Electronics
3-11
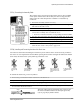
3-2-2(g) Air Purging
The air in indoor unit and in the pipe must be purged. If air remains in the refrigeration pipes, it will affect the compressor,
reduce to cooling/heating capacity, and could lead to a malfuction. Refrigerant for air purging is not charged in the outdoor unit.
Use additional refrigerant as shown at the right figure. Each unit must be purged in turn
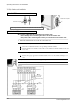
INDOOR
A-UNIT
INDOOR
B-UNIT
liquid side
Gas side
Pipeline
Valve cork
Flare Nut
Charging Port
Pipeline
Charging hose of
Low pressure hose
<Structure of 3-way valve>
Outdoor
unit
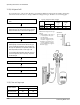
CAUTION
1. Check the piping connections
3. Open the valve of the low pressure side of Manifold
gauge counterclockwise for 10 seconds, and then close
it to closed position.
4. Check for gas leakage.
- Check the flare connections for gas leakage.
7. Mount the valve stem nuts to the 2-way and 3-way
valve. And mount the service port cap to 3-way valve
5. Purge the air from the system.
- Loosen the liquid side(1/4”) flare nut after gas leakage
check
- Open the low pressure side valve of the Manifold
gauge for 10 seconds to purge the air from the system.
Repeat this three times or more.
- Tighten the liquid side(1/4”) flare nut when the low
pressure of the manifold gauge indicates about
0.5Kg/cm
2
.
8. Check for gas leakage.
- At this time, especially check for gas leakage from the
3-way valve’s stem nuts, and from the service port cap.
6. Set valve cork of both liquid side and gas side of
packed valve to the open position.
2. Connect the charging hose of low pressure side of
Manifold gauge to the packed valve having a charging
port(1/2” Packed valve)
Operating Instructions and Installation