-10 0 +10 LOW INPUT GAIN DELAY 0 STEREO/MONO CROSSOVER LIM L/H GAIN 0 1 95 L/M 75 1.5K 150 950 -6 L/LM LMID M/H LIM 500 5K LM/HM 0 PHASE 950 ST MONO 3W 4W ST 4W 2W LOW MUTE LIM HIGH 750 1.5K 1.5K GAIN 50 500 +6 MID 260 2.
Safety Instructions Caution: To reduce the hazard of electrical shock, do not remove cover or back. No user serviceable parts inside. Please refer all servicing to qualified personnel.
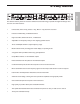
Table of Contents Table des matières Inhalt ENGLISH Contenido DEUTSCHE Introduction 2 S•3-way Funktionen S•3-way Features 3 Regler und Funktionen Vorderseite Rückseite 34–35 34–35 S 3•Way bedienen S•3-way einrichten S•3-way für den 3-Weg Stereo-Betrieb einrichten S•3-way Regler 36 37–39 40 Controls and Functions Front Panel Layout Rear Panel Layout 4-5 4-5 Operating the S 3•Way Setting Up the S•3-way Setting up the S•3-way for Stereo 3-way Operation S•3-way Controls 6 7-9 10 S 3•Way System
ENGLISH Introduction Thank you for purchasing the Samson S•3-way electronic crossover. The Samson S•3-way is a one-space, dual channel electronic crossover capable of managing the frequency control for Stereo 2-Way, Stereo 3-Way, 4-Way Mono and 4-Way Mono Low speaker systems. The S•3way is an ideal crossover solution for small and large PA systems, live sound venues, commercial installations, recording studio monitors and DJ set-ups.
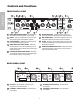
S•3-Way Features CHANNEL 1 -20 -10 0 +10 LOW INPUT GAIN DELAY STEREO/MONO CROSSOVER L/H 0 1 95 L/M 75 1.5K 150 950 -6 L/LM LMID M/H LIM 0 260 2.6K 500 5K LM/HM PHASE 950 ST MONO 3W 4W ST 4W 2W LOW MUTE LIM HIGH 750 1.5K 1.5K GAIN 50 500 +6 MID HIGH GAIN 2 0 +12 dB mSec HPF +6 dB 35 350 18 Hz 2.
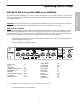
Controls and Functions ENGLISH FRONT PANEL LAYOUT 2 1 3 5 4 6 7 CHANNEL 1 -20 -10 0 +10 LOW INPUT GAIN DELAY 0 STEREO/MONO CROSSOVER LIM L/H GAIN 0 1 95 L/M L/LM 75 1.5K 150 950 -6 LMID LIM M/H GAIN 500 5K LM/HM HIGH PHASE 9 ST MONO 3W 4W ST 4W 2W LOW MUTE LIM GAIN 750 1.5K 0 260 2.6K 50 500 +6 MID 8 HIGH CD EQ MID L MID MONO SUB 0 950 2.
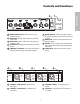
Controls and Functions 10 ENGLISH 11 CHANNEL 2 -20 -10 0 +10 LOW LIM L/H L/M MID HMID LIM POWER INPUT GAIN DELAY 0 GAIN 0 1 95 150 950 -6 0 +12 2 950 -6 +6 dB HPF 500 5K 35-800 35 350 350 Hz FREQ 800 8K -6 +6 dB 350 700 RANGE Hz CH 2 INPUT CH 1 HIGH OUTPUT CH 2 INPUT CH 1 HIGH OUTPUT -6 +6 dB 15 RANGE SWITCH - Selects the range at which the frequency control operates from normal to times 10. 16 MONO SUB - Selects mono operation for the sub bass output.
Operating the S•3-way ENGLISH SETTING UP THE S•3-way Whether you are an experienced audio engineer or just starting out, the next sections of this manual will help you get going with your S•3-way. Now that you have unpacked the unit and have become a bit familiar with the front panel controls, you can follow the next sections of this manual to begin to set-up and operate your new crossover.Further on in this manual, you will find detailed wiring diagrams of various speaker system set-ups.
Operating the S•3-Way SETTING UP THE S•3-way FOR STEREO 3-way OPERATION CAUTION: Before you apply power to your speaker system amplifiers, be certain to set the frequency controls to the manufacturers recommended crossover points for the drivers or enclosures you are using. NOTE: LAST ON / FIRST OFF When running a loudspeaker system with one or multiple power amplifiers, it is highly recommended that you follow the LAST ON / FIRST OFF rule.
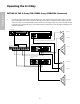
Operating the S•3-Way • Connect the mixer’s left output to the S•3-way’s CH1 (Left) input and the mixer’s right output to the S•3way’s CH2 (Right) input. Now connect the S•3-way’s CH1 (Left) Low Output to the left input of the low end power amp, CH1 (Left) Mid Output to the left input of mid-range power amp, and (Left) High Output to the left input of High power amp. Now make the same connections for the S•3-way’s CH2(Right) and amplifiers right side. PL1602 Mixer SAMSON TECHNOLOGIES CORP., NEW YORK, U.S.
Operating the S•3-Way SETTING UP THE S•3-way FOR STEREO 3-way OPERATION (Continued) Lower your power amplifier outputs to all the way off. Turn on all your power amplifiers. Run an audio signal (like some music from a CD) through your mixer and raise the output faders until you see the Input Meter LED’s begin to light. • Slowly raise the S•3-way’s Input Gain until the Input Meter reads 0dB. • Now raise your power amps to their normal operating level.
Operating the S•3-Way ENGLISH PHASE SWITCHES The S•3-way incorporates individual PHASE reversal switches on each frequency band. When engaged, the LED illuminates indicating that the selected output is now 180 degrees out of phase.
S•3-Way System Set-Ups STEREO TWO-WAY OPERATION ENGLISH It you’re operating your PA system Stereo 2-way, wire your system as shown in the system diagram below: SAMSON TECHNOLOGIES CORP., NEW YORK, U.S.A. PL 1602 16 CHANNEL LINE MIXER S/N POWER MIC 1 INPUTS BALANCED 10K‰ -30 to +4db TIP + RING - SLEEVE GND.
S•3-Way System Set-Ups STEREO THREE WAY OPERATION ENGLISH It you’re operating your PA system Stereo 3-way, wire your system as shown in the system diagram below. PL1602 Mixer SAMSON TECHNOLOGIES CORP., NEW YORK, U.S.A. PL 1602 16 CHANNEL LINE MIXER S/N POWER MIC 1 INPUTS BALANCED 10KΩ -30 to +4db TIP + RING - SLEEVE GND.
S•3-Way System Set-Ups MONO FOUR WAY OPERATION It you’re operating your PA system Mono 4-way, wire your system as shown in the system diagram below. ENGLISH PL1602 Mixer SAMSON TECHNOLOGIES CORP., NEW YORK, U.S.A. PL 1602 16 CHANNEL LINE MIXER S/N POWER MIC 1 INPUTS BALANCED 10KΩ -30 to +4db TIP + RING - SLEEVE GND.
S•3-Way System Set-Ups The S• 3way incorporates a special operating mode, MONO 4-WAY LOW for operating sub woofers at very low frequencies. In the MONO 4-WAY LOW mode the frequency divisions are half of those in MONO 4-WAY mode. It you’re operating your PA system Mono 4-way LOW, wire your system as shown in the system diagram below: PL1602 Mixer SAMSON TECHNOLOGIES CORP., NEW YORK, U.S.A. PL 1602 16 CHANNEL LINE MIXER S/N POWER MIC 1 INPUTS BALANCED 10KΩ -30 to +4db TIP + RING - SLEEVE GND.
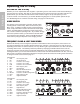
Connections Unbalanced 1/4” Connector Ground Ground ENGLISH Signal Signal Tip (signal) Sleeve (ground) Balanced TRS 1/4” Connector Signal (tip) Signal (ring) Tip (signal) Ring (signal) Signal (tip) Signal (ring) Ground Ground Sleeve (ground) XLR Balanced Wiring Guide Hot Common (1) Hot (2) Common 1 2 3 Female XLR Hot (2) Common (1) 1 2 3 End View 2 Cold (3) Common Hot 1 3 Solder Points Cold (3) Cold Male XLR 15 1 3 Solder Points Cold 2 End View
ENGLISH SETTING UP THE S•3-way USING A REAL TIME ANALYZER SETTING UP THE S•3-way USING A REAL TIME ANALYZER A REAL TIME ANALYZER (RTA) is an especially useful tool for setting up your crossover, as it will enable you to set parameters like DELAY and LEVEL more accurately. Some Audio Engineers can use their ears to tune a loudspeaker system. Some will even use the crossover to create the over-all system curve using the crossover like an equalizer.
SETTING UP THE S•3-way USING A REAL TIME ANALYZER Turn off the High Frequency MUTE switch and turn up the High Frequency Level control until the RTA reads 0dB at the crossover frequency. • Now, press the LOW MUTE switch again turning on the low frequency output. Notice the reading on the RTA at the crossover frequency. If the reading is 0dB, there is no need to adjust the delay time and you can assume that the speakers are in phase. If the RTA reads less than +3dB you’ll need to delay the low frequency.
Présentation du S•3-Way CHANNEL 1 -20 -10 0 +10 LOW INPUT GAIN DELAY 0 STEREO/MONO CROSSOVER LIM L/H GAIN 0 1 95 L/M 75 1.5K 150 950 -6 L/LM LMID M/H LIM 0 260 2.6K 500 5K LM/HM PHASE 950 ST MONO 3W 4W ST 4W 2W LOW MUTE LIM HIGH 750 1.5K 1.5K GAIN 50 500 +6 MID HIGH GAIN 2 0 +12 dB mSec HPF +6 dB 35 350 18 Hz 2.
Commandes et fonctions FACE AVANT 2 1 3 5 4 6 7 CHANNEL 1 -20 -10 0 +10 LOW INPUT GAIN DELAY 0 STEREO/MONO CROSSOVER LIM L/H GAIN 0 1 95 L/M L/LM 75 1.5K 150 950 -6 LMID LIM M/H GAIN 500 5K LM/HM HIGH PHASE 9 ST MONO 3W 4W ST 4W 2W LOW MUTE LIM GAIN 750 1.5K 0 260 2.6K 50 500 +6 MID 8 HIGH CD EQ MID L MID MONO SUB 0 950 2.
Commandes et fonctions 10 11 CHANNEL 2 -20 -10 0 +10 LOW LIM L/H L/M MID HMID LIM POWER INPUT GAIN DELAY 0 GAIN 0 1 95 150 950 -6 0 +12 2 950 -6 +6 dB HPF 500 5K 35-800 35 350 350 Hz FREQ 800 8K -6 +6 dB 350 700 RANGE Hz CH 2 INPUT CH 1 HIGH OUTPUT CH 2 INPUT CH 1 HIGH OUTPUT -6 +6 dB 15 TOUCHES RANGE - Sélection de la plage opérationnelle du potentiomètre de contrôle de la fréquence (normal à X10).
Utilisation des fonctions du S•3-way CONFIGURATION DU S•3-way Que vous soyez un ingénieur du son expérimenté ou amateur, suivez les instructions données ci-après afin de comprendre le fonctionnement du S•3-way. Maintenant que l’appareil est déballé et que vous vous êtes familiarisé avec les réglages en face avant, reportez-vous aux sections suivantes pour configurer et utiliser le filtre actif. Vous trouverez également des informations détaillées pour le câblage de configurations d’enceintes spécifiques.
Utilisation des fonctions du S•3-Way CONFIGURATION 3 VOIES STÉRÉO DU S•3-WAY L’exemple suivant présente la configuration pour enceinte stéréo 3-voies avec un Subwoofer 15 pouces, un hautparleur médiums de 12 pouces et un Tweeter à compression de 1 pouce sur les côtés gauche et droit. D’autres configurations vous sont présentées plus avant dans ce manuel : 2 voies stéréo et 4 voies mono.
Utilisation des fonctions du S•3-Way CONFIGURATION 3 VOIES STÉRÉO DU S•3-WAY (suite) • Connectez la sortie gauche de la console à l’entrée (gauche) du canal 1 du S•3-way et la sortie droite de la console à l’entrée (droite) du canal 2 du S•3-way.
Utilisation des fonctions du S•3-Way CONFIGURATION 3 VOIES STÉRÉO DU S•3-WAY (suite) Réduisez au minimum le niveau de sortie des amplificateurs. Placez tous les amplificateurs sous tension. Transmettez un signal audio (celui d’un CD par exemple) depuis la console et augmentez le niveau à l’aide des Faders jusqu’à ce que les témoins des afficheurs de niveau d’entrée commencent à s’allumer. • Augmentez progressivement le gain d’entrée du S•3-way jusqu’à ce que l’afficheur de niveau d’entrée indique 0 dB.
Utilisation des fonctions du S•3-Way TOUCHES PHASE Le S•3-way est équipé de touches d’inversion de phase individuelles sur chaque bande de fréquences. Lorsque la touche est enfoncée, le témoin s’allume pour indiquer qu’un déphasage de 180 degrés est appliqué sur la sortie correspondante.
Configurations du système S•3-Way CONFIGURATION 2 VOIES STÉRÉO (STEREO TWO-WAY) Si vous utilisez un système de sonorisation 2-voies stéréo, câblez votre sytème tel que représenté ci-dessous : SAMSON TECHNOLOGIES CORP., NEW YORK, U.S.A. PL 1602 16 CHANNEL LINE MIXER S/N POWER MIC 1 INPUTS BALANCED 10K‰ -30 to +4db TIP + RING - SLEEVE GND.
Configurations du système S•3-Way CONFIGURATION TROIS VOIES STÉRÉO (STEREO THREE WAY) Si votre système de sonorisation utilise des enceintes 3 voies stéréo, câblez tel que représenté ci-dessous : PL1602 Mixer SAMSON TECHNOLOGIES CORP., NEW YORK, U.S.A. PL 1602 16 CHANNEL LINE MIXER S/N POWER MIC 1 INPUTS BALANCED 10KΩ -30 to +4db TIP + RING - SLEEVE GND.
Configurations du système S•3-Way CONFIGURATION QUATRE VOIES MONO (MONO FOUR WAY) Si votre système de sonorisation utilise des enceintes mono 4 voies , câblez tel que représenté ci-dessous : PL1602 Mixer SAMSON TECHNOLOGIES CORP., NEW YORK, U.S.A. PL 1602 16 CHANNEL LINE MIXER S/N POWER MIC 1 INPUTS BALANCED 10KΩ -30 to +4db TIP + RING - SLEEVE GND.
Configurations du système S•3-Way CONFIGURATION MONO 4 VOIES POUR SUBWOOFERS (MONO 4-WAY LOW) Le S• 3way intègre un mode MONO 4-WAY LOW particulier permettant d’utiliser des Subwoofers fonctionnant à des fréquences très basses. En mode MONO 4-WAY LOW, les divisions entre les fréquences correspondent à la moitié de celles utilisées en mode MONO 4-WAY. Si votre système de sonorisation utilise des Subwoofers mono 4 voies, câblez tel que représenté ci-dessous : PL1602 Mixer SAMSON TECHNOLOGIES CORP.
Annexe A : Configuration d’un S•3-way à l’aide d’un analyseur en temps réel (RTA) CONFIGURATION DU S•3-way à l’aide d’un ANALYSEUR EN TEMPS RÉEL UN ANALYSEUR EN TEMPS RÉEL (RTA) est un outil particulièrement utile vous permettant de configurer votre filtre actif, en vous aidant à régler plus précisément des paramètres comme le délai et le niveau. Certains ingénieurs du son savent utiliser leurs oreilles pour paramétrer un système d’enceintes.
FRANÇAIS Annexe A : Configuration d’un S•3-way à l’aide d’un analyseur en temps réel (RTA) • Désactivez le Mute sur la bande aiguë et augmentez le niveau sur cette bande jusqu’à ce que l’analyseur indique 0 dB à la fréquence de coupure. • Appuyez une nouvelle fois sur la touche MUTE de la bande grave pour activer de nouveau la sortie sur cette bande. Observez l’indication donnée par l’analyseur à la fréquence de coupure.
S•3-Way Funktionen CHANNEL 1 -20 -10 0 +10 LOW INPUT GAIN DELAY 0 STEREO/MONO CROSSOVER LIM L/H GAIN 0 1 95 L/M 75 1.5K 150 950 -6 L/LM LMID M/H LIM 0 260 2.6K 500 5K LM/HM PHASE HIGH 750 1.5K 1.5K GAIN 50 500 +6 MID 950 ST MONO 3W 4W ST 4W 2W LOW MUTE LIM HIGH GAIN 2 0 +12 dB mSec +6 dB HPF 35 350 18 Hz 2.
Regler und Anschlüsse VORDERSEITE 2 1 3 5 4 6 7 CHANNEL 1 -20 -10 0 +10 LOW INPUT GAIN DELAY 0 STEREO/MONO CROSSOVER LIM L/H GAIN 0 1 95 L/M L/LM 75 1.5K 150 950 -6 LMID LIM M/H GAIN 500 5K LM/HM HIGH PHASE 9 ST MONO 3W 4W ST 4W 2W LOW MUTE LIM GAIN 750 1.5K 0 260 2.6K 50 500 +6 MID 8 HIGH CD EQ MID L MID MONO SUB 0 950 2.
Regler und Funktionen 10 11 CHANNEL 2 -20 -10 0 +10 LOW LIM L/H L/M MID HMID LIM POWER INPUT GAIN DELAY 0 GAIN 0 1 95 150 950 -6 0 +12 2 950 -6 +6 dB HPF 500 5K 35-800 35 350 350 Hz FREQ 800 8K -6 +6 dB 350 700 RANGE Hz CH 1 HIGH OUTPUT CH 2 INPUT CH 1 HIGH OUTPUT +6 dB DEUTSCHE CH 2 INPUT -6 15 RANGE-TASTE - Aktiviert die Tieffrequenzbedämpfung bei 25 Hz. 16 MONO SUB - Wählt den Mono-Betrieb für die Sub Bass-Ausgabe.
S•3-way-way bedienen S•3-way EINRICHTEN Die nächsten Abschnitte dieses Handbuchs werden sowohl dem erfahrenen Tontechniker als auch dem Neuling helfen, das S•3-way in Betrieb zu nehmen. Nachdem Sie das Gerät ausgepackt und sich mit den vorderseitigen Reglern etwas vertraut gemacht haben, sollten Sie die Anleitungen der nächsten Abschnitten befolgen, um Ihr neues Crossover einzurichten und zu bedienen.
S•3-Way bedienen S•3-way FÜR DEN 3-WEG STEREO-BETRIEB EINRICHTEN Das folgende Betriebsbeispiel basiert auf einem 3-Weg-System mit einem 15” Sub- und 12" Mitten-Lautsprecher sowie einem 1" Kompressionstreiber auf der linken und rechten Seite. Es gibt auch Systembeispiele für andere Einrichtungen, z. B. den 2-Weg Stereo- und 4-Weg Mono-Betrieb.
S•3-Way bedienen S•3-way FÜR DEN 3-WEG STEREO-BETRIEB EINRICHTEN (Fortsetzung) • Verbinden Sie den linken Ausgang des Mischers mit dem CH1-Eingang (links) des S•3-way und den rechten Ausgang des Mischers mit dem CH2-Eingang (rechts) des S•3-way. Verbinden Sie jetzt den CH1 Low-Ausgang (links) des S•3-way mit dem linken Eingang der Bass-Endstufe, den CH1 Mid-Ausgang (links) mit dem linken Eingang der Mitten-Endstufe sowie den (linken) High-Ausgang mit dem linken Eingang der Höhen-Endstufe.
S•3-Way bedienen S•3-way FÜR DEN 3-WEG STEREO-BETRIEB EINRICHTEN (Fortsetzung) • Drehen Sie die Ausgangspegel-Regler Ihrer Endstufen ganz zurück. Schalten Sie alle Endstufen ein. Leiten Sie ein Audiosignal (z. B. eine Musik-CD) durch den Mischer und schieben Sie dessen Ausgangsfader hoch, bis die Eingangspegel-LEDs zu leuchten beginnen. • Drehen Sie den Input Gain-Regler des S•3-way langsam auf, bis auf der Eingangsanzeige 0 dB angezeigt wird.
S•3-Way bedienen PHASE-TASTEN Das S•3-way verfügt über separate PHASE REVERSAL-Tasten pro Frequenzband. Bei gedrückter Taste leuchtet die LED und zeigt damit an, dass das Signal des gewählten Ausgangs jetzt um 180 Grad phasengedreht ist.
S•3-Way Systemeinrichtungen 2-WEG STEREO BETRIEB Wenn Sie Ihr PA-System in 2-Weg Stereo betreiben, sollten Sie Ihr System wie im Systemdiagramm unten verdrahten: SAMSON TECHNOLOGIES CORP., NEW YORK, U.S.A. PL 1602 16 CHANNEL LINE MIXER S/N POWER MIC 1 INPUTS BALANCED 10K‰ -30 to +4db TIP + RING - SLEEVE GND.
S•3-Way Systemeinrichtungen 3-WEG STEREO BETRIEB Wenn Sie Ihr PA-System in 3-Weg Stereo betreiben, sollten Sie es wie im Systemdiagramm unten verdrahten: PL1602 Mixer SAMSON TECHNOLOGIES CORP., NEW YORK, U.S.A. PL 1602 16 CHANNEL LINE MIXER S/N POWER MIC 1 INPUTS BALANCED 10KΩ -30 to +4db TIP + RING - SLEEVE GND.
S•3-Way Systemeinrichtungen 4-WEG MONO BETRIEB Wenn Sie Ihr PA-System in 4-Weg Mono betreiben, sollten Sie es wie im Systemdiagramm unten verdrahten: PL1602 Mixer SAMSON TECHNOLOGIES CORP., NEW YORK, U.S.A. PL 1602 16 CHANNEL LINE MIXER S/N POWER MIC 1 INPUTS BALANCED 10KΩ -30 to +4db TIP + RING - SLEEVE GND.
S•3-Way Systemeinrichtungen 4-WEG MONO LOW BETRIEB Das S• 3way verfügt über eine spezielle Betriebsart, 4-WEG MONO LOW, für den Betrieb von Sub Woofern mit sehr tiefen Frequenzen. Im 4-WEG MONO LOW-Modus sind die Frequenz-Unterteilungen nur halb so groß wie im 4-WEG MONO-Modus. Wenn Sie Ihr PA-System in 4-Weg Mono LOW betreiben, sollten Sie es wie im Systemdiagramm unten verdrahten: PL1602 Mixer SAMSON TECHNOLOGIES CORP., NEW YORK, U.S.A.
Anhang A: S•3-way mittels Echtzeit-Analyzer einrichten S•3-way MITTELS ECHTZEIT-ANALYZER EINRICHTEN Ein ECHTZEIT-ANALYZER (bzw. REAL TIME ANALYZER / RTA) ist ein besonders nützliches Werkzeug zum Einrichten Ihres Crossovers, da Sie Parameter wie DELAY und LEVEL präziser einstellen können. Manche Tontechniker können ein Lautsprechersystem mit dem Gehör feineinstellen. Manche erstellen sogar mit dem Crossover die Gesamt-Systemkurve, indem Sie es wie einen EQ einsetzen.
Anhang A: S•3-way mittels Echtzeit-Analyzer einrichten • Lösen Sie die High Frequency MUTE-Taste und drehen Sie den High Frequency Level-Regler auf, bis der RTA den Wert 0 dB bei der Trennfrequenz anzeigt. • Drücken Sie jetzt nochmals die LOW MUTE-Taste, um den Tieffrequenz-Ausgang einzuschalten. Achten Sie auf die Anzeige des RTA bei der Trennfrequenz. Wenn 0 dB angezeigt wird, müssen Sie die Verzögerungszeit nicht einstellen und können davon ausgehen, dass die Lautsprecher phasensynchron arbeiten.
Características del S•3-Way CHANNEL 1 -20 -10 0 +10 LOW INPUT GAIN DELAY 0 STEREO/MONO CROSSOVER LIM L/H GAIN 0 1 95 L/M 75 1.5K 150 950 -6 L/LM LMID M/H LIM 0 260 2.6K 500 5K LM/HM PHASE HIGH 750 1.5K 1.5K GAIN 50 500 +6 MID 950 ST MONO 3W 4W ST 4W 2W LOW MUTE LIM HIGH GAIN 2 0 +12 dB mSec HPF +6 dB 35 350 18 Hz 2.
Controles y funciones DISTRIBUCION DEL PANEL FRONTAL 2 1 3 5 4 6 7 CHANNEL 1 -20 -10 0 +10 LOW INPUT GAIN DELAY 0 STEREO/MONO CROSSOVER LIM L/H GAIN 0 1 95 L/M L/LM 75 1.5K 150 950 -6 LMID LIM M/H GAIN 500 5K LM/HM HIGH PHASE 9 ST MONO 3W 4W ST 4W 2W LOW MUTE LIM GAIN 750 1.5K 0 260 2.6K 50 500 +6 MID 8 HIGH CD EQ MID L MID MONO SUB 0 950 2.
Controles y funciones 10 11 CHANNEL 2 -20 -10 0 +10 LOW LIM L/H L/M MID HMID LIM POWER INPUT GAIN DELAY 0 GAIN 0 1 95 150 950 -6 0 +12 2 950 -6 +6 dB HPF 500 5K 35-800 35 350 350 Hz FREQ 800 8K -6 +6 dB 350 700 RANGE Hz H G CH 1 HIGH OUTPUT CH 2 INPUT CH 1 HIGH OUTPUT -6 +6 dB 15 CONMUTADOR RANGE - Selecciona la gama a la que el control de frecuencia pasa del modo normal al modo por 10. 16 MONO SUB - Selecciona el modo mono para la salida de subgraves.
Utilizar el S•3-way INSTALAR EL S•3-way Tanto si es un ingeniero de audio experimentado como si está empezando, las siguientes secciones de este manual le ayudarán a comprender el S•3-way. Ahora que ya ha desembalado la unidad y que ya ha empezado a familiarizarse con los controles del panel frontal, puede leer las siguientes secciones de este manual para instalar y utilizar el nuevo divisor de frecuencias.
Utilizar el S•3-Way CONFIGURAR EL S•3-way PARA EL MODO ESTÉREO DE 3 VÍAS El siguiente ejemplo operativo es para un sistema estéreo de 3 vías con un altavoz de graves de 15", un altavoz de medios de 12" y un altavoz de compresión de 1" y para los lados izquierdo y derecho. Encontrará ejemplos de sistemas para otras configuraciones, incluyendo el modo estéreo de 2 vías y el modo mono de 4 vías.
Utilizar el S•3-Way CONFIGURAR EL S•3-way PARA EL MODO ESTÉREO DE 3 VÍAS (Cont.) • Conecte la salida izquierda del mezclador a la entrada CH1 (izquierda) del S•3-way, y la salida derecha del mezclador a la entrada CH2 (derecha) del S•3-way.
Utilizar el S•3-Way CONFIGURAR EL S•3-way PARA EL MODO ESTÉREO DE 3 VÍAS (Cont.) • Baje el nivel de las salidas del amplificador al mínimo. Ponga en marcha todos los amplificadores de potencia. Haga pasar una señal de audio (como la música de un CD) a través del mezclador y suba los deslizadores de las salidas hasta que los LEDs del indicador de nivel empiecen a iluminarse. • Gire lentamente el mando INPUT GAIN del S•3-way hasta que los indicadores de nivel muestren 0dB.
Utilizar el S•3-Way CONMUTADORES PHASE El S•3-way incorpora conmutadores de inversión de fase PHASE individuales en cada banda de frecuencia. Al activarlos, el LED se ilumina para indicar que la salida seleccionada se encuentra desfasada en 180 grados.
Configuraciones del sistema S•3-Way MODO ESTÉREO DE DOS VÍAS Si utiliza el sistema de amplificación de potencia en el modo estéreo de 2 vías, cablee el sistema tal como muestra la siguiente figura: SAMSON TECHNOLOGIES CORP., NEW YORK, U.S.A. PL 1602 16 CHANNEL LINE MIXER S/N POWER MIC 1 INPUTS BALANCED 10K‰ -30 to +4db TIP + RING - SLEEVE GND.
Configuraciones del sistema S•3-Way MODO ESTÉREO DE 3 VÍAS Si utiliza el sistema de amplificación de potencia en el modo estéreo de 3 vías, cablee el sistema tal como muestra la siguiente figura. PL1602 Mixer SAMSON TECHNOLOGIES CORP., NEW YORK, U.S.A. PL 1602 16 CHANNEL LINE MIXER S/N POWER MIC 1 INPUTS BALANCED 10KΩ -30 to +4db TIP + RING - SLEEVE GND.
Configuraciones del sistema S•3-Way MODO MONO DE CUATRO VÍAS Si utiliza el sistema de amplificación de potencia en el modo mono de 4 vías, cablee el sistema tal como muestra la siguiente figura. PL1602 Mixer SAMSON TECHNOLOGIES CORP., NEW YORK, U.S.A. PL 1602 16 CHANNEL LINE MIXER S/N POWER MIC 1 INPUTS BALANCED 10KΩ -30 to +4db TIP + RING - SLEEVE GND.
Configuraciones del sistema S•3-Way MODO MONO DE 4 VÍAS PARA GRAVES El S• 3-way incorpora un modo operativo especial, mono de 4 vías para graves, para subwoofers que trabajan con frecuencias extremadamente bajas. En el modo mono de 4 vías para graves, las divisiones de frecuencia son la mitad de las del modo mono de 4 vías. Si utiliza el sistema de amplificadores en el modo mono de 4 vías para graves, cablee el sistema tal como muestra la siguiente figura: PL1602 Mixer SAMSON TECHNOLOGIES CORP.
Apéndice A: Configurar el S•3-way utilizando un Analizador en Tiempo Real (RTA) CONFIGURAR EL S•3-way UTILIZANDO UN ANALIZADOR EN TIEMPO REAL Un ANALIZADOR EN TIEMPO REAL (RTA) es una herramienta especialmente útil para configurar el divisor de frecuencias, ya que permite ajustar parámetros como DELAY y LEVEL de manera más precisa. Algunos ingenieros de audio pueden utilizar su oído para afinar un sistema de altavoces.
Apéndice A: Configurar el S•3-way utilizando un Analizador en Tiempo Real (RTA) • Desactive el conmutador MUTE de las frecuencias altas y suba el control de nivel de las frecuencias altas hasta que el RTA indique 0dB en la frecuencia de división. • Ahora pulse el conmutador MUTE de las frecuencias bajas de nuevo para activar la salida de las frecuencias bajas. Observe la indicación del RTA en la frecuencia de división.
Specifications Inputs Female Balanced XLR Impedance Balanced Max. Input level >15k Ohms +26dBu balanced Outputs Male Balanced XLR Impedance Balanced Max. Output Level 100 Ohms +26 dBu Global Specifications Frequency Response <10 Hz to >90 kHz, +0/-3 dB Signal to Noise (Ref +4 dBu), 22 Hz to 22 kHz, un-weighted 90dB high out, mid 90dB, low 94dB, all outs >100dB muted. CMRR Min.
62 INPUT GAIN ST 2 WAY ST 3 WAY HOT GND PIN 3 COLD 3 WAY STEREO / 4 WAY MONO XOVER Operating Frequencies Ch 1 A 35Hz to 800Hz X1 or 350Hz to 8KHz 35Hz to 800Hz X1 or 350Hz to 8KHz 35Hz to 800Hz 18Hz to 400Hz www.samsontech.
Samson Technologies Corp. 575 Underhill Blvd. P.O. Box 9031 Syosset, NY 11791-9031 Phone: 1-800-3-SAMSON (1-800-372-6766) Fax: 516-364-3888 www.samsontech.