
Installation Guide

SALSBURY INDUSTRIES
1010 East 62
nd
Street, Los Angeles, CA 90001-1598
Ph: 1-800-624-5269 Int’l Ph: 323-846-6700
Fx: 1-800-624-5299 Int’l Fx: 323-846-6800
www.mailboxes.com engineering@mailboxes.com
Installation instructions are provided as general guidelines. It is advised that a professional installer be consulted. Salsbury Industries assumes no product assembly or installation liability.
Copyright © 2017 Salsbury Industries. All rights reserved. (02/10/17) Page 1 of 2
With its high quality design and construction, Salsbury’s 3900 series free-standing 4C horizontal mailboxes will provide years of maintenance free
service. Please read this entire document before beginning installation.
Installation Planning Notes
1. The free-standing 4C horizontal mailbox unit has been
configured to meet the USPS height regulations.
2. The free-standing enclosure is shipped fully assembled with the
exception of the front panel and the mailbox unit, which are
installed after the enclosure is fastened to the floor or concrete
pad.
3. Determine the location of each of the 3900 series free-standing
4C horizontal mailbox units.
4. If necessary, construct the concrete pad on which the 3900 free-
standing 4C mailbox(es) will be mounted.
5. Due to the various mounting surfaces and subfloors to which the
free-standing enclosure may be installed, mounting fasteners
are not supplied.
6. Select the appropriate anchors or fasteners to attach the free-
standing enclosure to the floor or other surface to which it will be
mounted.
7. Provide a means for leveling the enclosure, if necessary.
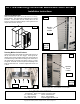
Types of Fasteners Used
Type A, Fig. 1 – To fasten the front panel into the enclosure, use the
#10x1/2” pan head self-drilling sheet metal screw (supplied).
Type B, Fig. 2a – To fasten the sides and the bottom of the mailbox
unit into the enclosure, use the #8x3/4” pan head self-tapping
machine screw (supplied).
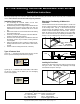
Mounting the Free-Standing 4C Mailbox Unit
to the Floor
Place the outside enclosure into the selected position. Transfer mark
the four (4) large hole locations in the horizontal bottom side flanges
to the mounting surface. See Fig. 3. Remove the enclosure and
make the holes for the installation fasteners. Install the installation
fasteners. Position the rubber pads on the floor surface. See Fig. 4.
Return the enclosure to the selected position on top of the rubber
pads. Lock the enclosure down by completing the installation of the
fasteners. The use of leveling nuts on stud anchors is suggested.
Installing the Front Panel
Install the front panel at the lower end of the front of the enclosure.
Use Type A screws. The quantity varies depending on the height
and width of the front panel. See Fig. 5.
4C Free-Standing Horizontal Mailboxes–3900 Series
Installation Instructions
Fig. 1
Fig. 5
Type A
1
Fig. 2a
Type B
1
Type A
INSTALLATION
FASTENERS
(NOT SUPPLIED)
LEVELING
NUT
Fig. 3
Fig. 4
RUBBER
PAD